
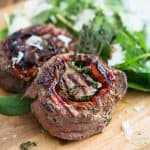
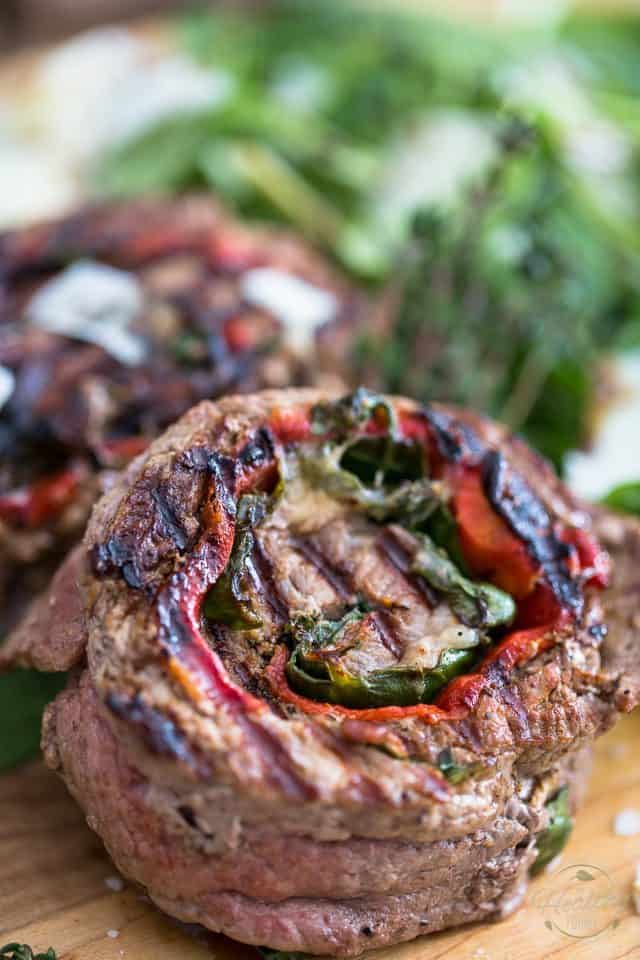
Beef Pinwheels

I’m sure that, at some point in your life, you have come across those Beef Pinwheels, or Rosettes as they are sometimes called, when checking out the goods in the meat counter at your local butcher or grocery store.
They sure look beautiful and fascinating, and I’ve often been super tempted to buy some myself, but the thing is they tend to cost an arm and a leg and are often marinated or stuffed with ingredients that I don’t necessarily care for, so I always passed.
I figured maybe I could try my hand at making my own. Surely, it couldn’t be that complicated! That way, I would be sure that the cute little swirly medallions would be to my liking.
I decided to sort of take the lazy route, though. Instead of slicing the entire roast open, unrolling it with my knife like some kind of a meat blanket, I chose to slice my meat crosswise into thin slices, which I then pounded to an even thinner thinness (whoa, a thinner thinness… can you even say that?) with a meat mallet. That made the job a WHOLE lot easier, trust me. Plus, I find that the meat cooks so much quicker that way, and remains much more tender, too. In the end, I think that my method is totally WIN-WIN-WIN, and I’m sure that you will love it, too, once you have given it a try.
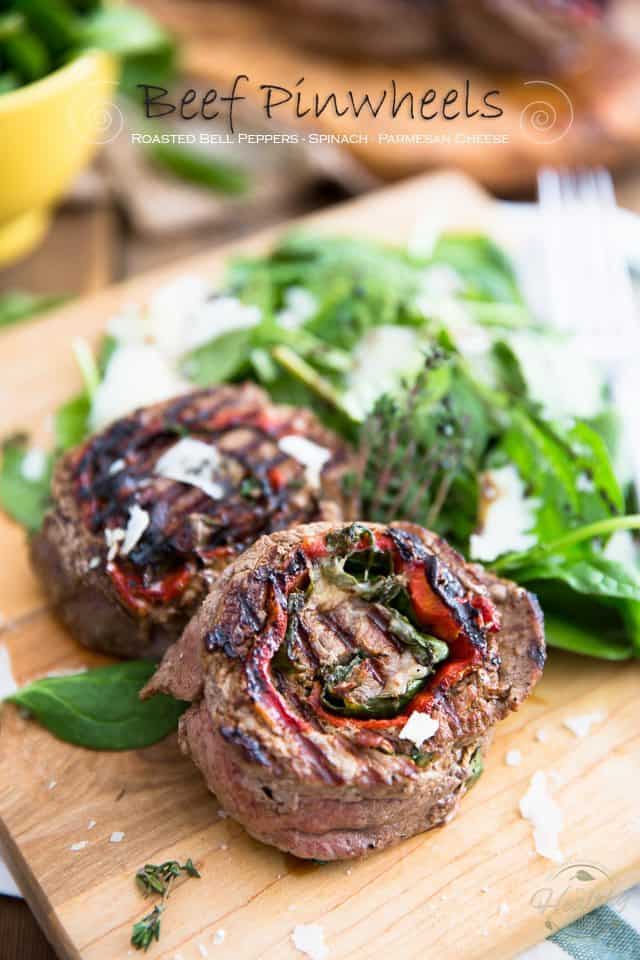
Now, I chose to stuff my pinwheels with Sweet Roasted Bell Peppers, Baby Spinach Leaves and Shaved Parmesan Cheese. What a winning flavor combination that was!!! Makes me want to add yet another WIN to that WIN-WIN-WIN thing…
But hey, if you’re not a fan of some, or all of these ingredients, you always have the option of leaving them out, or replacing them with something else. The procedure will be the exact same.
Speaking of which, let’s see how it goes, shall we?

Before you begin, place the roast in the freezer for 20 to 25 minutes, until it feels fairly firm when you squeeze it but not rock solid. This simple precaution will make your roast SO much easier to slice.
You’ll want to slice that roast into 20 thin slices of roughly 1/4″ each.
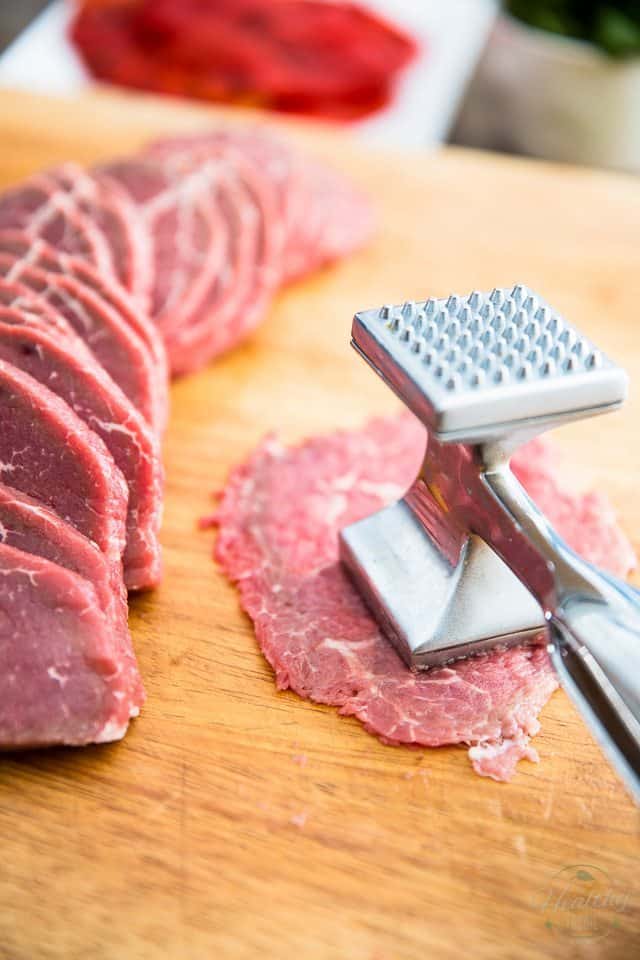
Then, you’ll want to pound each one of those slices with a meat mallet until it becomes almost paper thin.
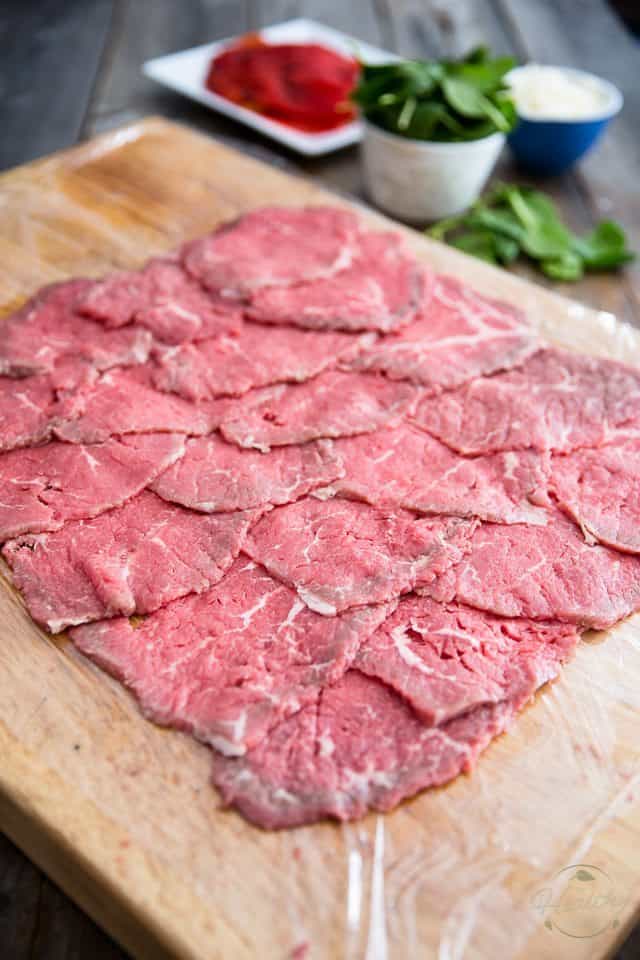
Next, lay two pieces of plastic film side-by-side on your work surface in order to form a large rectangle.
Arrange the paper thin slices of meat over that plastic film, creating as big a rectangle as you possibly can while making sure that all the slices of meat overlap.
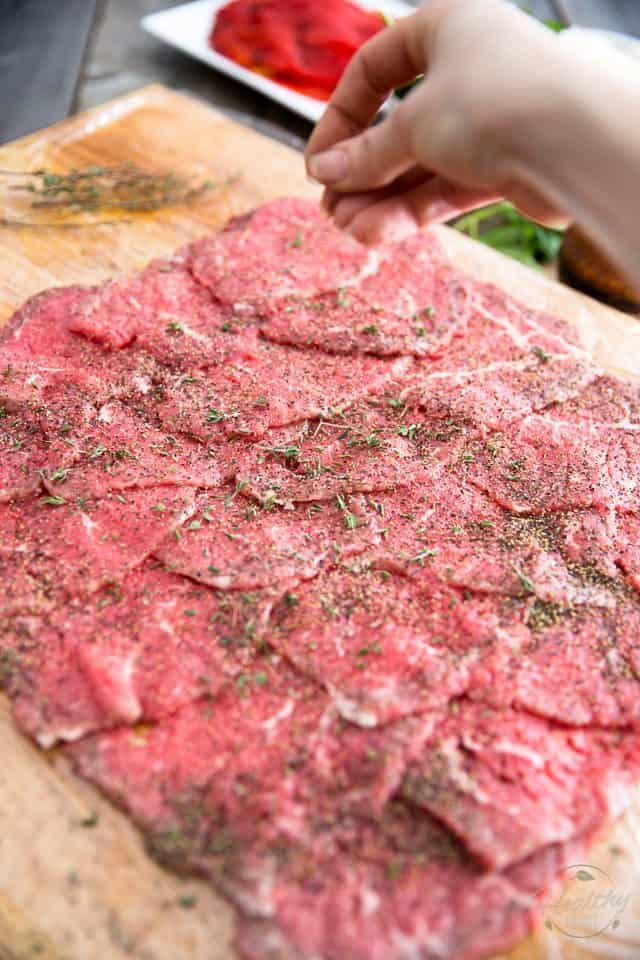
Sprinkle the meat generously with salt, pepper and fresh thyme.
I used about a teaspoon of each.
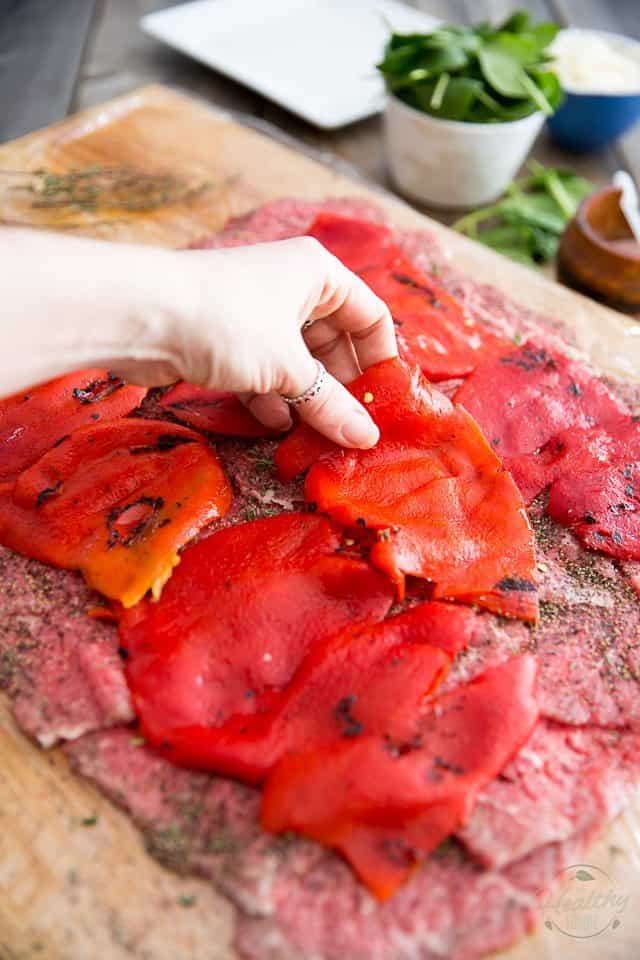
Now, arrange the roasted bell peppers over the meat, in a single layer.
I used pickled roasted peppers, for the sake of convenience (and also too because bell peppers are fairly pricey in my neck of the woods this time of year) but feel free to make your own at home, if you prefer.
If you choose to use the pickled peppers too, make sure you pat them really dry before arranging them over the meat.
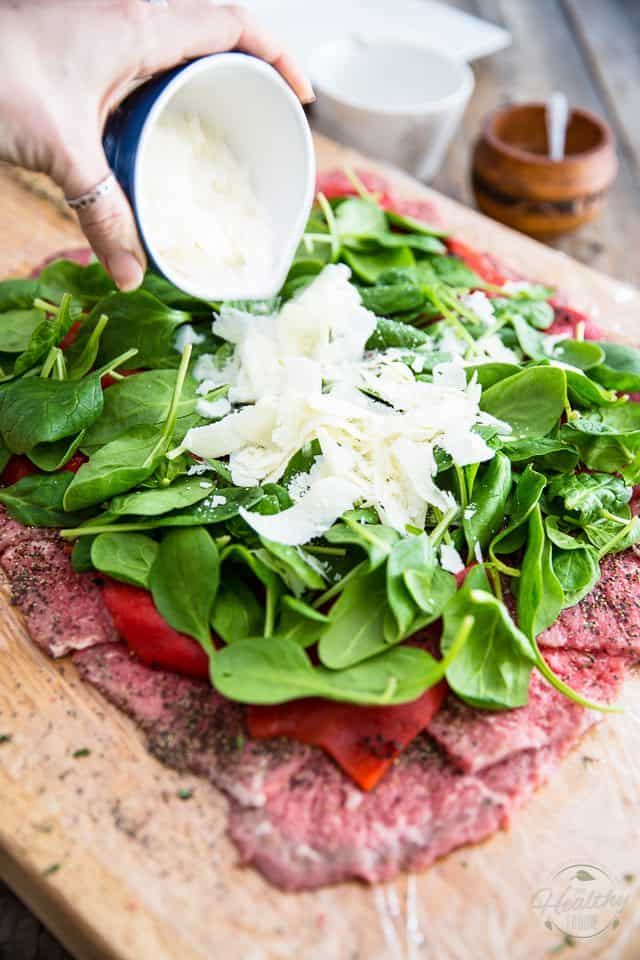
Top the bell peppers with a few cups of baby spinach leaves and finally, sprinkle with about a cup of shaved Parmesan.
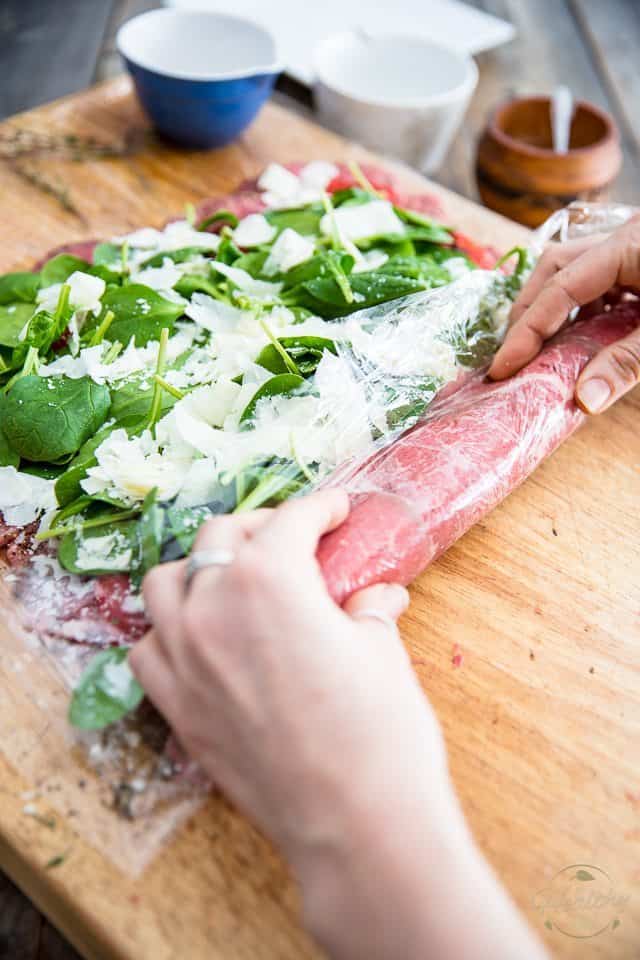
Starting at one of the shorter ends, ideally the one where the meat is tucked underneath the other rows, start rolling the meat, as tightly as you can, using the plastic film to support and form the roll as you go.
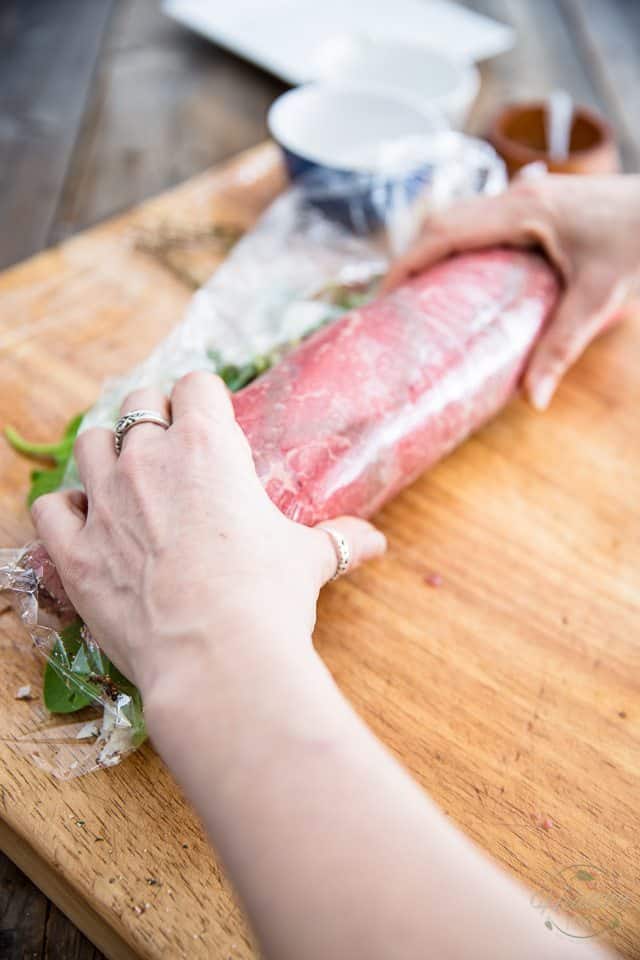
Take the plastic out of the way as you roll forward but always keep it over your roast.
When you get to the end, wrap it around your roast.
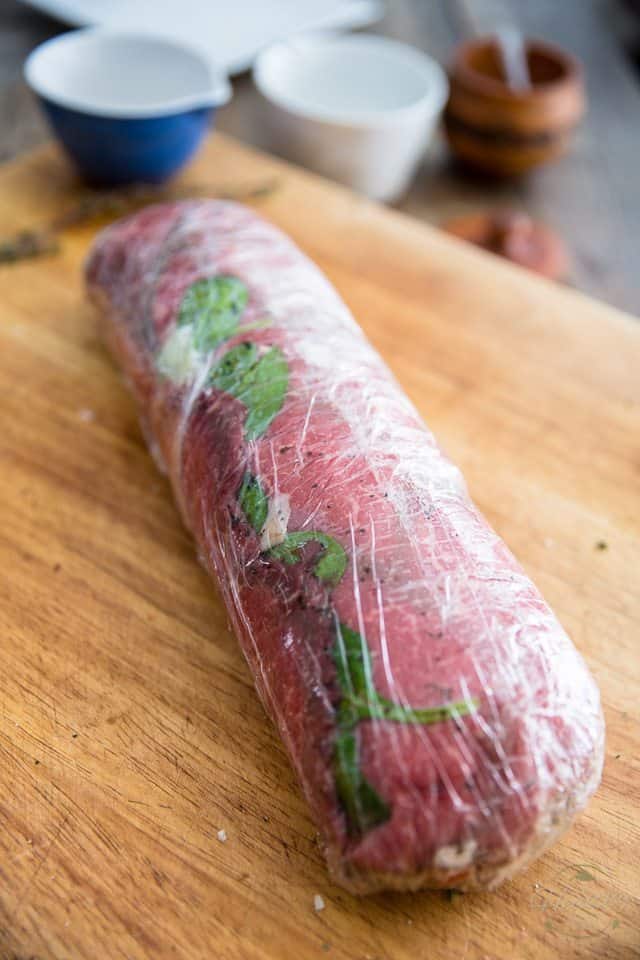
Add one or two additional layers of plastic film and then place your roast in the refrigerator to chill and firm up for at least 3 hours, or up to overnight.
Your roast will be easier to slice if it’s nice and firm.
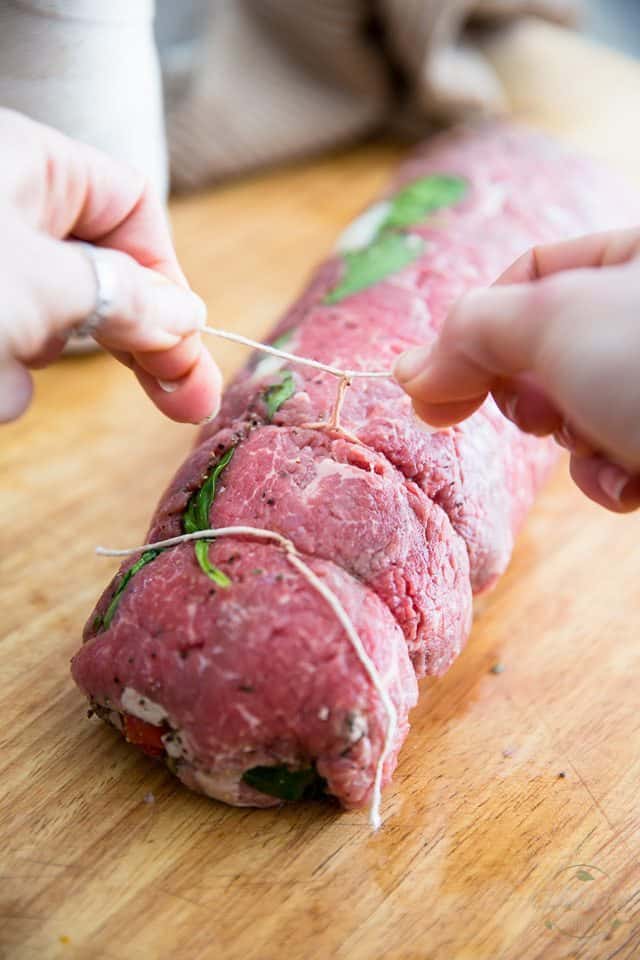
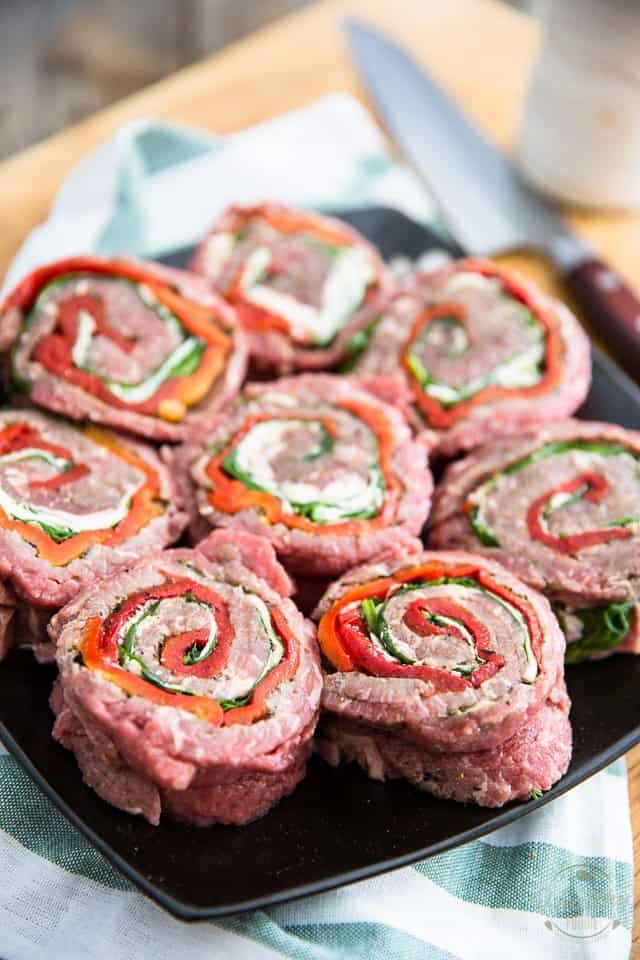
When you’re ready to make your steak medallions, take the roast out of the fridge, and tie it super tightly with butcher’s twine in 8 different locations, about every 1½ inch or so.
Don’t forget to trim off the excess twine!
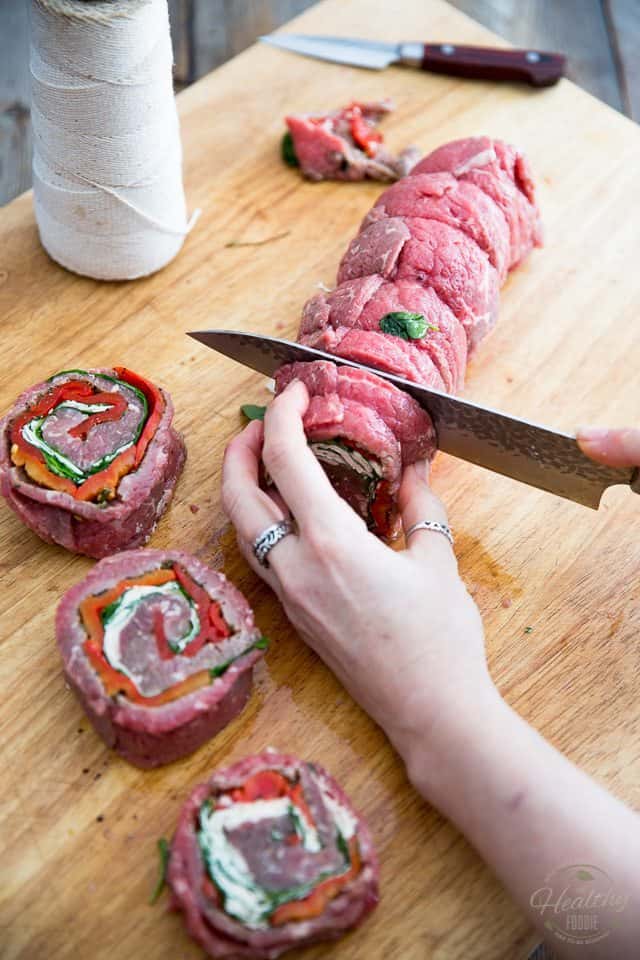
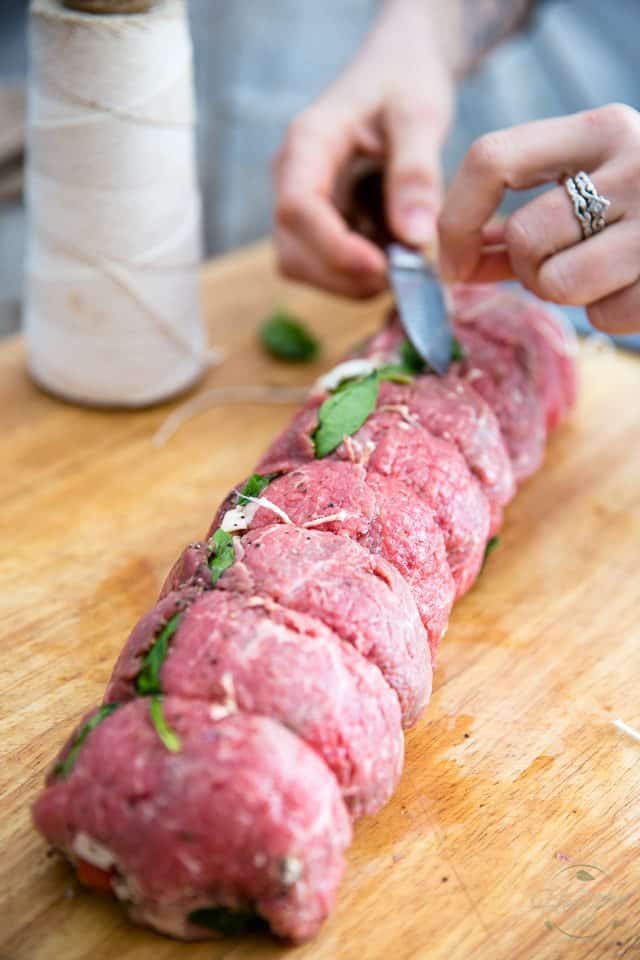
We’re almost done! Just one more step to go: using a sharp knife, slice the roast between each of the strings, thus creating 8 rosettes.
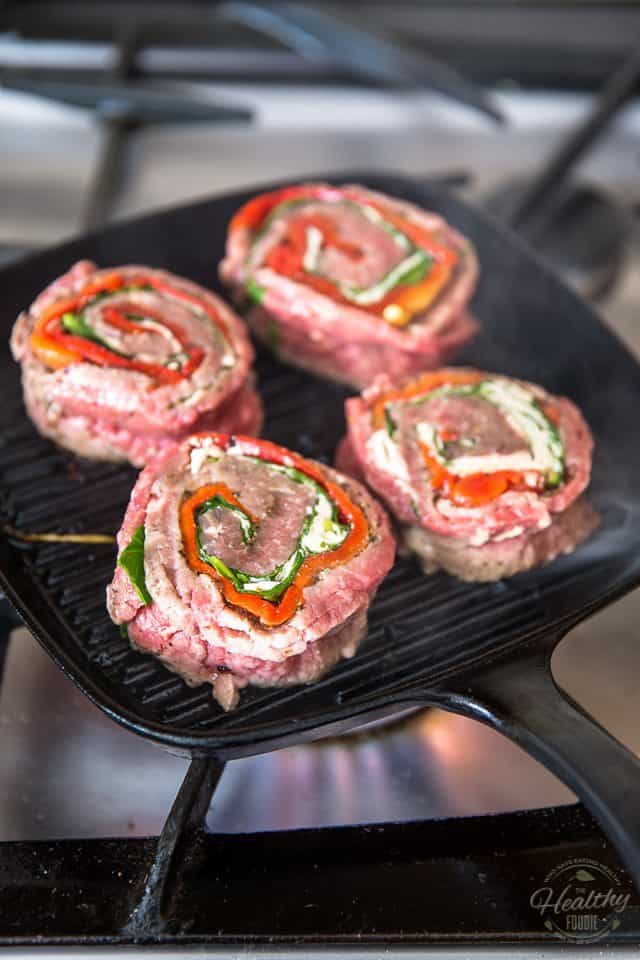
All that’s left to do now is cook these beauties! Heat a skillet over really high heat and add a liberal amount of your healthy cooking fat of choice. When the pan is nice and hot, add the pinwheels and cook them for about 3 minutes per side.
Oh, and please, resist the urge to play with your medallions with all your might. Just leave them be. If you move them, you’ll only end up destroying them and will also prevent them from caramelizing. And you’ll probably end up losing all of that precious cheese.
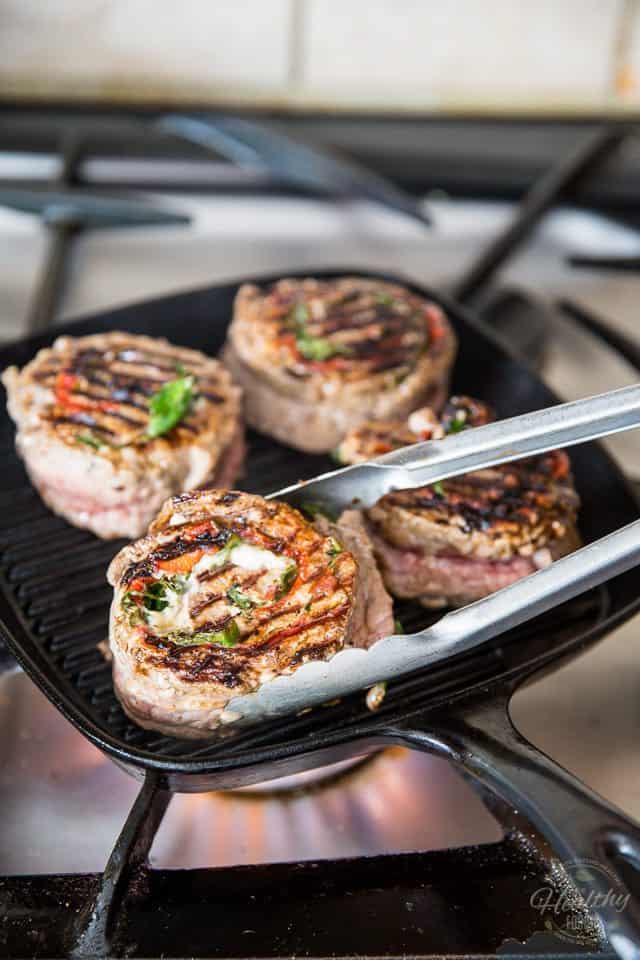
Just place them in the super hot pan, cook for 3 minutes, flip carefully, cook for another 2 to 3 minutes, depending on how thick your pinwheels are and how done you want them to be.
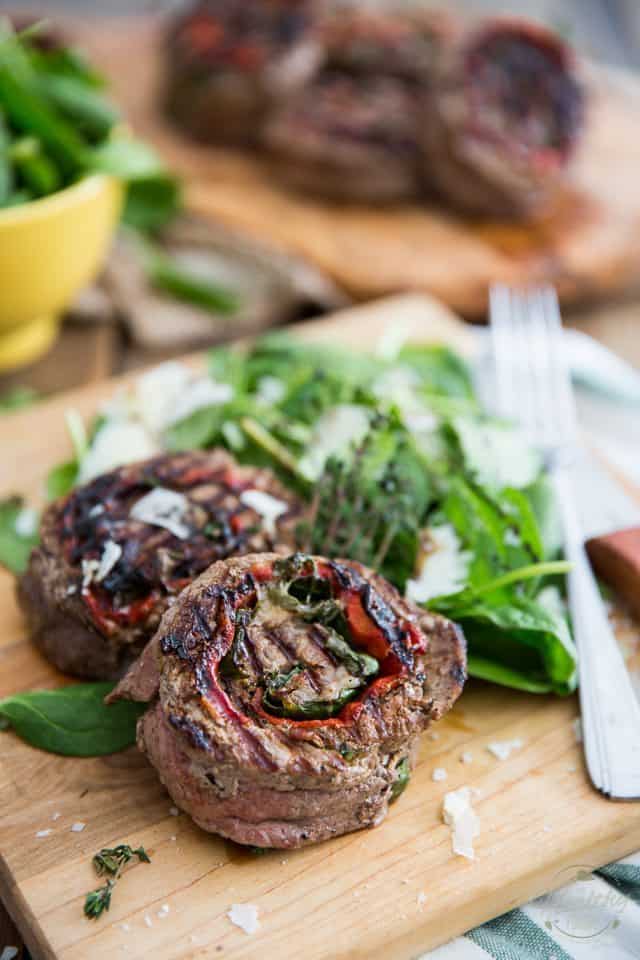
Remove the cooked pinwheels to a plate, tent lightly and allow to rest for about 5 minutes before serving.
Beef Pinwheels
Ingredients
- 2.2 lb beef roast from the inside round
- 6 roasted bell peppers, cut open and patted dry
- 2 cups fresh baby spinach leaves
- 1 cup shaved parmesan cheese
- 1 tsp Himalayan salt
- 1 tsp freshly ground black pepper
- 1 tsp finely chopped fresh thyme
Instructions
- Place the roast in the freezer for 20 to 25 minutes, until it feels firm when you squeeze it but not rock solid. This simple precaution will make your roast much easier to slice.
- Slice the roast into 20 thin slices of roughly 1/4" each; pound each slice with a meat mallet until it becomes almost paper thin.
- Lay two pieces of plastic film side-by-side on your work surface in order to form a large rectangle. Arrange the paper thin slices of meat over that plastic film, creating as big a rectangle as you possibly can while making sure that all the slices of meat overlap.
- Sprinkle the meat with the salt, pepper and thyme and then arrange the red bell peppers over the meat in a single layer. Top with the baby spinach leaves and finally, sprinkle with the shaved parmesan.
- Starting at one of the shorter ends, ideally the one where the meat is tucked underneath the other rows, start rolling the meat, as tightly as you can, using the plastic film to support and form the roll as you go. Wrap the roll tightly with one or two additional layers of plastic film and place the roast in the refrigerator to chill and firm up for at least 3 hours, or up to overnight.
- Tie the roast with butcher's twine in 8 different locations, about every two inches or so, and then trim off the excess twine.
- Next, using a sharp knife, slice the roast between each of the strings, thus creating 8 beef pinwheels.
- Heat a skillet over really high heat and add a liberal amount of your healthy cooking fat of choice. When the pan is nice and hot, add the pinwheels and cook for about 3 minutes per side.
- Remove the cooked pinwheels to a plate, tent lightly and allow to rest for about 5 minutes before serving.
Nutrition
If you’ve tried this recipe, please take a minute to rate the recipe and let me know how things went for you in the comments below. It’s always such a pleasure to hear from you!
You can also FOLLOW ME on PINTEREST, FACEBOOK, INSTAGRAM and TWITTER for more delicious, healthy recipes!


11 Comments on “Beef Pinwheels”
This looks yummy. Going to try it with a flank steak and both green and red peppers. Woo so good. Thanks for the great idea! May even use your Montreal steak seasoning.
Awesome idea!!! How’s things going with you, Melinda?
These look soo good! Way better than the pre-made ones 🙂 Pinning!
this looks delicious but I’m curious why instead of letting it rest in the fridge, why not tie it up and roast in a dutch oven then slice into pinwheels? and cover with the sauce from the oven?
Also was thinking of smothering with olive tapenade, before the red pepper/spinach layer. have you tried something like this?
It would most certainly work, Mark, but then you’d end up with a completely different dish… kinda like grilling a chicken breast vs carving it off a roasted chicken. They’re both chicken breasts but they’re also extremely different. I really love your idea of adding olive tapenade, though. I think it’s absolutely brilliant. I even want to try it myself! 🙂
I layer a little Italian ham, sliced provolone, spinach, salt and fresh pepper, Italian blend shaved cheese, and pimentos
I used a London broil…just flattened it as thin as I could and continued with the directions as posted without cutting the roast into slices. Best ever! My company loved it and it is now a go-to recipe for future company.
looks yummy! i will try this very soon!
Well it turned out fibe not that much work but I’d spice it up abit next time probably MO treat steak spice and some garlic.
My wife hates all bell peppers. Can sun dried tomatoes be used for color instead of peppers?
Absolutely!