
Mini Carrot Muffin Bites, and what to do with leftover pulp…
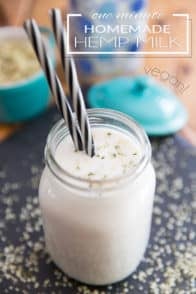
 I recently started making my own milk at home and I am totally, completely hooked.
I plan on doing that on a regular basis, from now on.
Listen to me go… I say that like I’m some sort of a pro, yet I’ve only done it twice so far; but really, it’s so easy, one time is all it takes!
And you know what?
Home made milk tastes SOOOOO much better, is so much fresher, contains no added anything, and it’s so much FUN to make!
So far I’ve made one batch of almond and one batch of hazelnut (that last one was was simply divine and sinfully delicious). Next week-end, I’ll be making a batch of black soy bean milk!
I’m just so excited, I can barely wait.
Now, if you’re anything like me, you’re probably thinking “yeah, ok… that’s nice. But nuts are so darn expensive, I don’t want to spend a fortune on making JUST milk with them and then throw out all that precious pulp… I’d rather enjoy the ENTIRE nut, you know, not just part of it. If I’m gonna pay for a whole nut, might as well USE a whole nut…”
Well, that’s exactly what I thought initially, but going through with the actual process proved me completely wrong.
In fact, it’s a lot cheaper to make your own milk at home.
For less money than you would pay for a liter of the commercial stuff, you get an equal amount of home made milk PLUS you get to keep the meal that’s left behind!
By all means, do not get rid of that! It’s all good stuff, really! All you need to do is get creative and find ways to use it.
Why not try these cute little mini carrot muffin bites, for instance?

Oh, by the way, these little cuties contain no grains or added sugar whatsoever, and they are even paleo friendly! The addition of almond pulp and whey protein also really helps boost their protein content!
They make for an awesome snack, are a terrific portable breakfast and could even be served for dessert, why not? You’ll be surprised at how soft, moist, sweet and spicy they are!
What else can you do with that pulp?
Well, if you are patient, I also came up with a decadent Double Dark Chocolate Cranberry Cookie recipe, using the hazelnut meal this time. I shall post this one for you guys pretty soon…
I’ve used up a lot of mine in my morning smoothies, to boost the protein and healthy fat contents… just kept the meal in the fridge and threw a couple of teaspoonful in the mix when preparing my breakfast smoothies.
You’re more the cereal type? That’s fine, too! You could also throw a couple of teaspoonfuls in your morning cereal… it sure would add a nice little crunch and texture to them!

Oh, and it would be simply heavenly in oatmeal, I’m sure of that!
If you don’t feel like using it right away, you can also spread it on a cookie sheet and bake it in a 175F oven for about an hour, or until it’s really dry. You then sift it with a loose mesh sieve or give it a quick spin in your food processor to separate the particles. You can then keep this in the pantry like you would any nut meal or flour.
Now… what did I convince you to try here? The milk or the muffins?
Or was it the cookies? 😉
 MINI CARROT MUFFIN BITES
[Grain free, Gluten free, No added sugar, High Protein, Paleo Friendly]
INGREDIENTS
(Makes 24 mini muffins)
- 225g grated carrots
- 300g fresh pineapple chunks
- 150g pitted dates, coarsely chopped
- 200g almond pulp, leftover from almond milk (I haven’t tried this, but I’m pretty sure you could use regular almond meal)
- ¼ cup unsweetened shredded coconut
- ¼ cup coconut flour
- ½ cup flaxseed meal
- 2 scoops (75g) unflavored whey protein powder
- 2½ tsp baking powder *(see note)
- 2 tbsp ground cinnamon
- 1 tbsp fresh ginger, grated
- ½ tsp ground clove
- ½ tsp freshly grated nutmeg
- ½ cup egg whites
- ½ cup raisins (Sultana or Thompson)
- ½ cup pumpkin seeds
DIRECTIONS
- Preheat your oven to 375F. Coat two 12 mini muffin pans with cooking spray.
- Add all the ingredients, except for raisins and pumpkin seeds to the bowl of your food processor. Process until very well combined, about 1 or 2 minutes. Scrape the sides as needed.
- Transfer to a large mixing bowl and add raisins and pumpkin seeds.
- Fill each mini muffin cup all the way to the top as they won’t be taking much expansion in the oven.
- Bake for approximately 20-23 minutes, until the muffins start to color and a toothpick inserted in the middle comes out clean.
- Cool completely on a cooling rack and keep refrigerated for up to a week.
*Storebought baking powder contains corn starch. To keep this completely grain free, you can make your own baking powder at home using one part baking soda, two parts cream of tartar and two parts non grain starch, such as tapioca, potato or arrowroot.


27 Comments on “Mini Carrot Muffin Bites, and what to do with leftover pulp…”
BOTH…Sonia..definitively BOTH!!! Superlative, informative post…I’ve been so concerned about the waste factor of expensive nuts ..not to mention the time factor….that it stopped me from attempting
my own nut milk concoctions…Thank you for your many ideas with what to do with that precious “by-product” of the milk…and making your own nut meals/flours is especially a fabulous one, as these too add up with regards to the food budget!! I will be making your mini carrot muffin bites STAT…as a result..so wonderful that you’ve made them paleo-friendly! For those of us who are dairy and grain-free…thanks too for allowing us to rediscover “creamy” (nut milks) and “cocooning” (warm baked goods) descriptors back into our lives!
So super happy to hear that you found so much inspiration in this post Donna! And thank you for such super kind words! I hope you like the mini muffins and I also hope that you too, fall in love with making your own milk at home! Now I think I’m wanting to create different flavor combinations, much like I do with nut butters. I think that between nuts and I, it’s a love affair that will last until death do us part! Love nuts, in any way, shape or form. Can’t help it, I’m a nut junkie! 😉
What a great idea! Glad to know I’m not the only one who will do ANYTHING to avoid wasting food!
Oh, Elly, I’m so with you. I don’ think there is anything that I hate more than to waste food, and like you said, I will do anything to avoid that! Glad you like these ideas!
Neat! It’s fantastic that you found something to do with the leftover pulp. Can you taste the pineapple at all or is it just a way to sweeten them? These look amazing. 🙂
Thanks Erin! I wouldn’t say that you can really taste the pineapple, but they do add a lot of sweetness. In fact, these muffins are very spicy, I’d say there almost like a cross between gingerbread and carrot cake. And since the batter is made in the food processor, the texture is really soft and somewhat velvety. Very yummy!
Oh I wish I know how to bake so I can do this kind of recipe.. I know this one is good and very Delicious!
I have to admit, I do think that way so I’m super excited to see a recipe to use the pulp. I just couldn’t throw it away! Very yummy looking little muffins – I love the pineapple 😀
Muffins are always a lovely option:) I just made some myself yesterday, so thanks for a new recipe for ones to try next time . . .
I keep meaning to start making my own nut milk too. Soon enough! And I will be bookmarking your pulp recipes, naturally 🙂
Yum, great work! I love making my own nut milks too but haven’t done it in forever. Great to know that you can make muffins out of the pulp. I’ve only ever made crackers because I was scared to bake with it and mess everything up!
Oooooh… crackers? Do you have a recipe on your site? I’ll have to go check that out! I really like crackers but don’t eat them anymore because, well… frankly, because I don’t buy much “prepared” food anymore, so I would definitely need to try my hand at making a batch at home. *Mental note taken to explore your site for cracker recipe… bet they’re grain free too! :)*
Hi, Sonia! I’m your long time “silent reader”, but I HAVE to speak out, finally. It’s because I just can’t keep feelings for myself – feelings of great respect for your efforts, gratitude for so many great ideas and recipes and also admiration of your creativity.)) Keep up the great things you do!
And a little question about this recipe.. Did you use fresh or dried pulp? And what is best in your opinion – using dried or fresh pulp in recipes?
Oh my! Thank you so much Natalie, I don’t know what to say… I’m flushed! Glad you decided to speak your mind! 🙂 Comments such as this one really inspire me to keep doing what I do, so thank you very, very much for sharing your appreciation! 😀
As for the pulp, I used the fresh almond pulp in this recipe. I have yet to try the dry version. I’ve only tried drying it so far, that much worked super well, but the meal is still sitting in my cupboard. Fear not though, I get the feeling that it will not be sitting there for too long… and then I’ll be able to answer your question. I might have to conduct several tests, though, before I can really make my mind up.
Thanks again, Natalie. You have no idea just how much I appreciate your comment. You really made my day! 😀
Thanks for the reply! I will experiment myself as well.
And I just wanted to tell you that I’m from Latvia. Ever guessed you have readers from such places in the world?
Latvia! Wow! That certainly isn’t right next door!
Tell me, can you find most of the ingredients that I use over there, or are some of them on the hard to find side?
Let me know what comes out of your experiments! I am planning on using some dry hazelnut meal this week-end in an upside down pineapple cake. Keeping my fingers crossed!
Well, basic ingredients certainly mostly are available, but even some of them are missing. For example, you won’t find skim milk here, the lowest fat % is 2. Almond milk… If you ask about this in the store, you will be looked at as a totally crazy person! : D We only have soy milk, which is 3 times more expensive than cow’s. So, I’m making all of this myself. Whole wheat flour is a pain to find actually, and it also costs about 3 times more. We also don’t have nut butters in our stores. Only couple years ago they started to sell transfat and sugar laden peanut butter. People buy it and love it, but this is the only thing that they are offered. I’m starting to get really sad now : D I just realized that all that I like to eat on a daily basis is something so untraditional in my region.
But more “exotic” stuff like quinoa or chia seeds, became but not affordable. I used to order them online, but since Eropean Union issued really cruel regulation, which implies to pay 22% VAT as well as customs duty for commercial parcels from overseas that exceed 10 EUR (about 13$). This is how they protect EU internal market and make peoples’ lifes harder. ((
So, be happy that you have such a wide range of choice and ease at eating healthy, tasty food! But I’m also trying my best and your blog helps me a lot. Thank you for that!
Hi Sonia!
I made almond milk yesteday (yummers!, dried the pulp today, whizzed it in my blender and stored it in my pantry to use in recipes calling for almond flour (I’ve done it before–works fine). Love your blog! Anyway one last thing…I believe there is a typo in your note about making baking powder at home? You said you can make your own CORNSTARCH at home when I think you meant BAKING POWDER XD
Funny you should mention that, I just noticed a couple of days ago and thought I had to go change it, then it sort of slipped my mind… thanks for reminding me! I just changed it now. Glad you like the almond milk and thanks for the tip about drying the pulp! Good to know it really works fine! 🙂
Hey! This recipe looks great. I have some pulp I have to use!! But I’m not a fan of protein powder… Is there something else I can replace it with, or omit it?? Thanks!
I’ve never actually tried it without, Allyne, but I’m pretty sure you can omit the protein powder. Its main purpose it to boost the protein content of these muffins. It doesn’t really affect the structure of the treats.
Let me know how they turn out if you end up giving it a try!
So glad someone else asked this and was answered… I was JUST about to ask! I dry all of my nut milk pulp, whizz it in the food processor, and store it in a jar in the fridge..Detoxinista has a great raw freezer cookie recipe that uses the pulp, but I’m very excited to try this sometime this week! I’ll let you know how it goes, using dry nut pulp, and no protein powder!
I did it! You were right, amazingly easy and delicious. I tried your tip on roasting the pulp and have used the results both as a yogurt topping and as part of a crumble on apple crisp. Thank you for the healthful recipe.
Life is the art of drawing sufficient conclusions from insufficient premises.
Name: Gilbert Coop
LOL!
Arm and leg warmers are usually made of some sort of insulating fabric that’s thicker than the usual Lycra or jersey material. The most common is a fleece-backed Lycra called Roubaix which traps air against your skin to keep you warm.