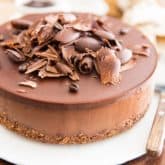
Mocha Chocolate Vegan Cheesecake
A truly heavenly dessert that contains nothing but wholesome ingredients, this sinfully creamy Mocha Chocolate Vegan Cheesecake will totally blow your mind!
Servings 16
Calories 539kcal
Equipment
- Springform pan
- High Speed Blender
Ingredients
For the crust
- 1-1/2 cups rolled oats ground*
- 3/4 cup almond flour
- 1/4 cup cacao powder
- 1/2 tsp ground cinnamon
- 1/4 tsp salt
- 1/4 cup melted coconut oil
- 1/4 cup maple syrup
- 1 tsp pure vanilla extract
For the creamy mocha filling
- 2-1/2 cups raw cashews
- 1 cup hot very strong coffee I used espresso
- 1 cup date paste
- 1 cup full fat coconut milk
- 1/2 cup coconut oil
- 1/2 cup maple syrup
- 3 tbsp lime juice
- 1 tbsp pure vanilla extract
- 1/2 tsp salt
- 1 cup unsweetened chocolate melted **
For the chocolate topping
- 1-1/4 cups finely chopped dark chocolate
- 1/2 cup full fat coconut milk
- 1/4 cup coconut oil
- pinch salt
Optional garnish
- Chocolate shavings ***
- Whole roasted coffee beans
Instructions
For the crust
- Line the bottom of an 8" springform pan with parchment paper. To do that, remove the ring and cover the bottom with parchment paper; Fold the excess paper back under the plate and, while holding it in place with one hand, put the ring back in its position with the other hand. Bring the excess paper back from under the pan but do not cut it off.
- Combine the ground rolled oats, almond flour, cacao powder, cinnamon and salt in a large mixing bowl. Add the melted coconut oil, maple syrup and vanilla extract and mix until well combined.
- Transfer the mixture to the prepared pan and press it delicately at the bottom, going slightly up the sides; place in the fridge to set.
For the creamy mocha filling
- Put the raw cashews and hot coffee in the container of a high speed blender and process until smooth and creamy; start on low and progressively increase the speed to high, and stop to scrape the sides once or twice to be sure that every last bit is incorporated.
- Once smooth, add the date paste, coconut milk, coconut oil (no need to melt it this time), maple syrup, lime juice, vanilla and salt and again, process until well combined, smooth and creamy, stopping to scrape the sides as needed.
- Pour in the melted chocolate and blend until fully incorporated.
- Transfer the mixture into the prepared crust, tap the sides a few times to even out the top and eliminate air bubbles, then smooth the top with a small offset spatula.
- Place the cake in the fridge until completely set, at least 4 hours.
For the chocolate topping
- Place all the ingredients in a small saucepan and melt over very low heat, stirring almost constantly until about half of the chocolate chunks are melted. Remove from heat and keep stirring until fully melted and silky, returning the pan to the heat source briefly only if and as needed. It is very important that you do not let the mixture become hot.
- Take the cake out of the fridge and pour the melted chocolate mixture over it, then gently tap the side of your pan and give it a little shake to help the chocolate settle and get really smooth.
- Delicately transfer the cake to the fridge to set, about 30 minutes total. However, if are going to garnish the top with chocolate shavings, you should do so while the chocolate topping is still on the soft side, after about 10 minutes of refrigeration, and then return the cake to the fridge for another 20 minutes; this will ensure that the shavings adhere well to the chocolate topping. If you're not going to garnish that top, simply leave the cake in the fridge until fully set, about 30 minutes.
- Once set, carefully remove the cake from the pan**** and place it on a cake plate.
- Keep your finished cake in the refrigerator but if time permits, leave it at room temperature for about an hour before serving.
Notes
*Use a coffee grinder or small food processor to grind the oats
**Melt the chocolate using your favorite method. Me, I like to chop it super finely and then melt it in a small saucepan over very low heat, stirring almost constantly until about half of the chocolate is melted. I then kill the heat and keep stirring until all the chocolate bits are melted, returning to the heat briefly if and as needed.
***If you want to make your own chocolate shavings, check out this post to find out how I make mine
****To release the cake real cleanly, it helps to slightly warm up the side of the pan. I find the best way to do this is by delicately heating it with a propane torch or warm cloth. If you choose to use a propane torch, make sure that you maintain a good distance from that pan and that you don't stay in the same spot for more than a few seconds; keep that flame moving, or you may end up melting the cake!
Nutrition
Calories: 539kcal | Carbohydrates: 44g | Protein: 9g | Fat: 40g | Saturated Fat: 24g | Cholesterol: 1mg | Sodium: 122mg | Potassium: 536mg | Fiber: 6g | Sugar: 23g | Vitamin A: 26IU | Vitamin C: 1mg | Calcium: 72mg | Iron: 6mg