
Making your own Ghee at home – Much easier than you think!

Making your own ghee is probably much easier than you thought. This step by step tutorial will take you right through the entire process. See for yourself!

Ghee is by far my favorite fat to cook with! It’s just like butter, except all the milk solids and water have been removed from it, so you’re left with nothing but pure, good for you fat that not only tastes fantastic but also has a really high smoke point, on top of being shelf stable. You can use it just like you would butter, too!
Making your own ghee at home is a simple task that can be accomplished very quickly and easily. All you need to do is get your hands on some good quality organic or grass-fed butter (which again, isn’t all that easy to do if you’re in Canada but is at least feasible, unlike getting your hands on the finished product…) and you’re good to go.
Chances are, you’ll end up saving LOADS of money in the process and, as an added bonus, your home will be filled with such an intoxicating aroma after you’re done, you’ll almost want to cry.
For that reason alone, you might never want to buy store-bought ever again… (IF you have that option, that is!)
So what do you say we make a batch together? You’ll see, you really don’t need much at all and we’ll be done in no time!
Here’s what you’ll need to make your own ghee at home:
Equipment:
- A medium saucepan, preferably one with a heavy bottom
- A large spoon to stir
- A fine meshed sieve
- Several layers of cheesecloth to line your sieve
- A large bowl or measuring cup to receive the ghee (preferably one that has a pouring spout)
- One or two glass jars to store your ghee in
Ingredients:
- The best quality UNSALTED* butter you can get your hands on (organic if that’s all you can get but grass-fed is much preferred)
*if you use salted butter, your ghee might end up being WAY too salty. Better stick with unsalted.
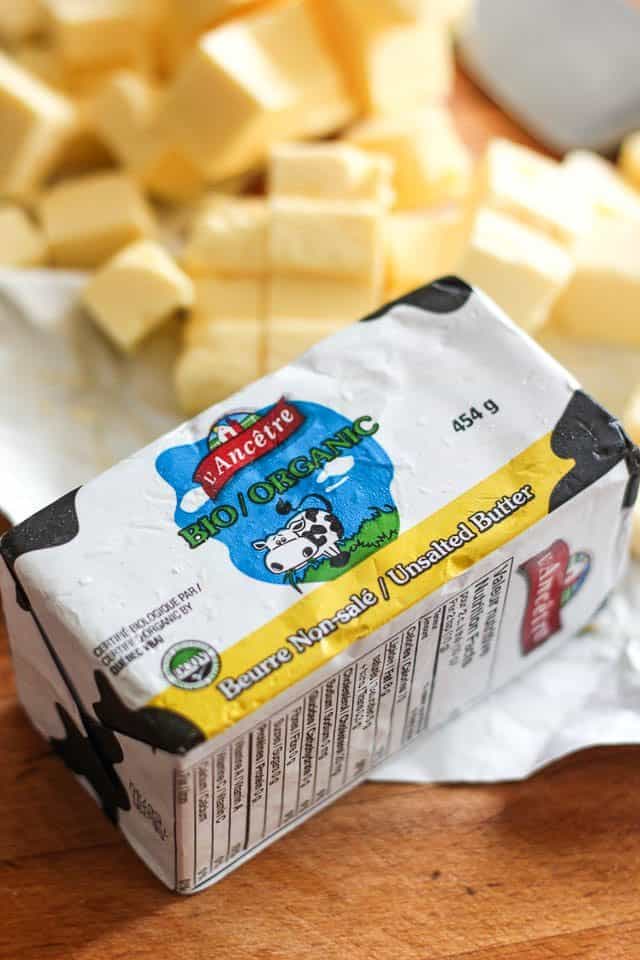
Start with one or two pounds of the best quality butter you can find, depending on how big a batch you want to make. One pound of butter will fill a 1 pint Mason jar almost to the top.
Here in Canada, grass-fed butter is practically impossible to find due to regulations on dairy products and other agricultural restrictions, so I had to settle for organic. That’s the best one can get here, unless they happen to know a good farmer! But if you’re lucky enough to have grass-fed easily available where you are then by all means, go for it.
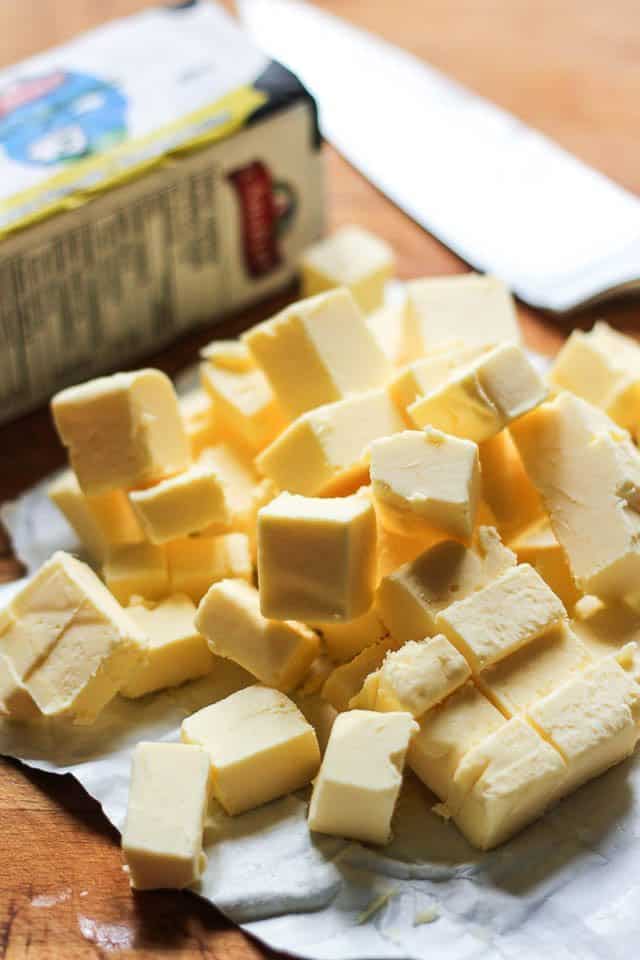
Cut your butter into roughly one inch by one inch squares. This will help your butter melt faster and more evenly.
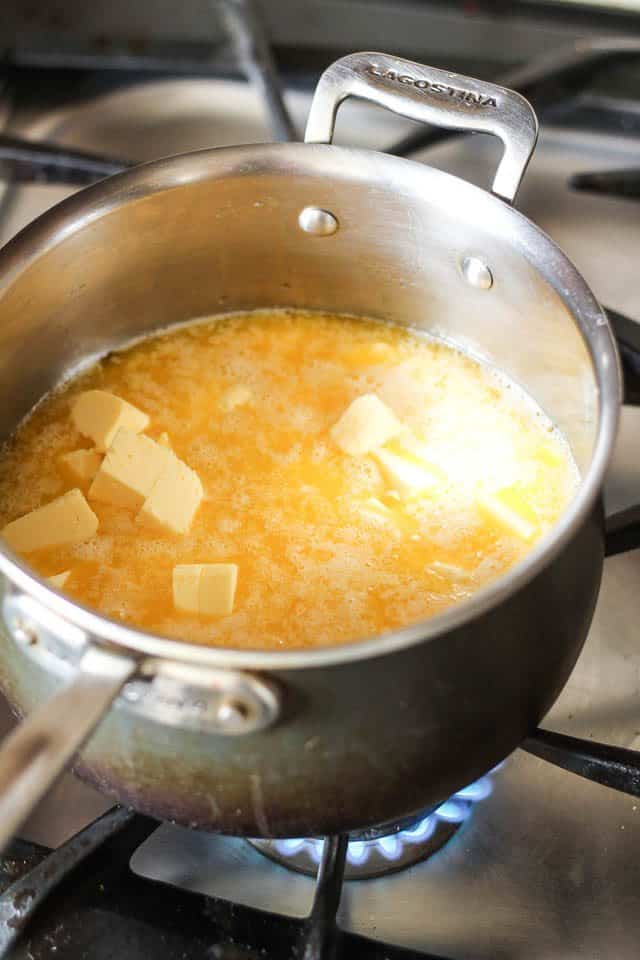
Set your butter to melt over medium heat, stirring it gently from time to time.
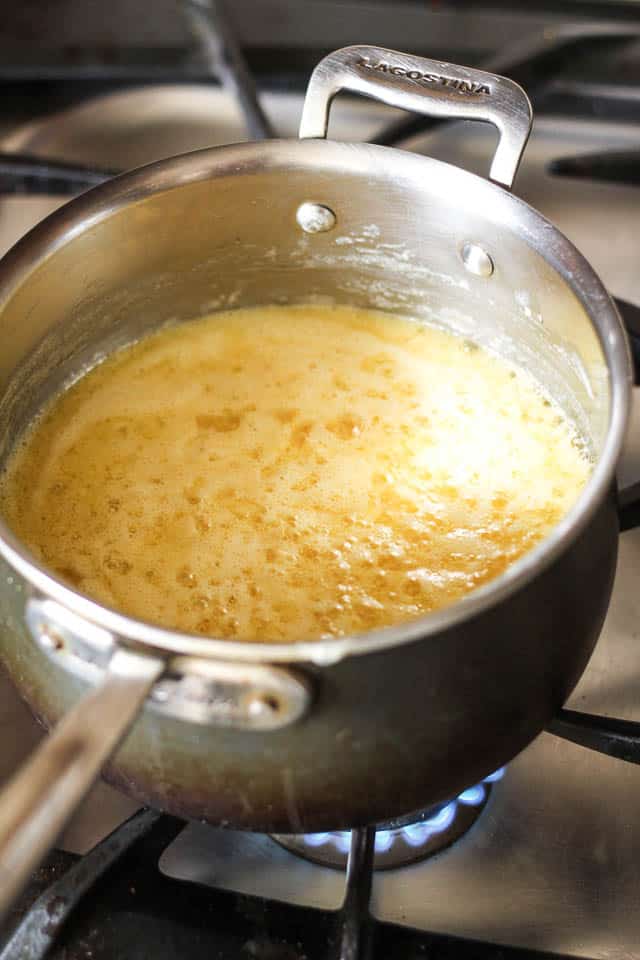
Pretty soon, you’ll see a thick, white foam start to form at the surface. Notice how bright yellow and opaque the butter is at this stage of the process.

Keep stirring until your butter starts to simmer, at which point you’ll want to turn the heat down to medium-low.

For the next 5 minutes or so, you won’t be doing much stirring. Just let the butter simmer and watch the bubbles emerge from that thick foam, increasing in size and number.
As the bubbling increases, you’ll notice that the foam will become thinner and the bubbles will become bigger and clearer.
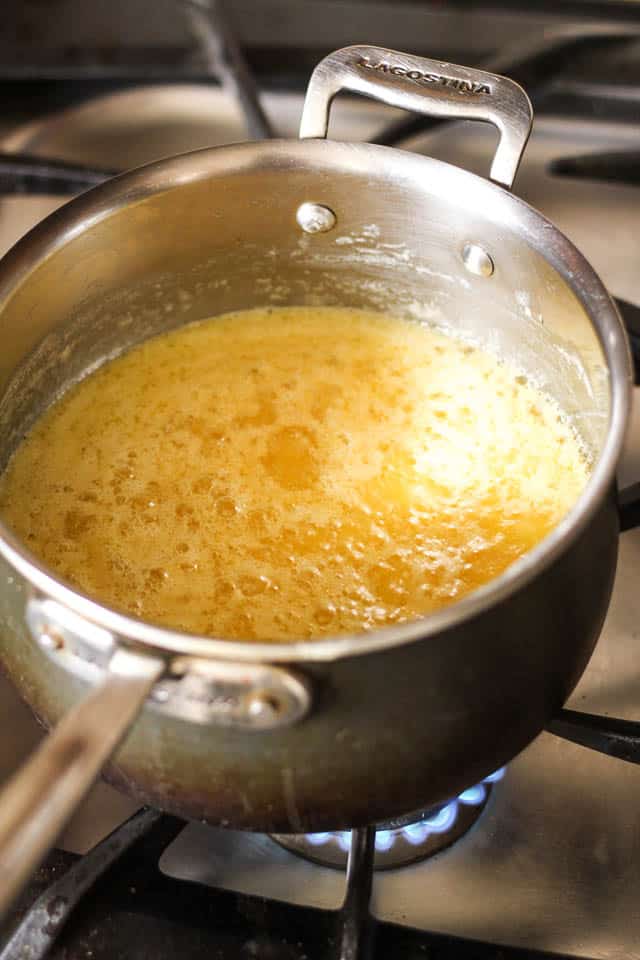
Soon, the milk solids will start to curdle and attach the sides of the pan. That is completely normal and desirable. Just scrape the sides of the pan from time to time to help those milk solids sink to the bottom.
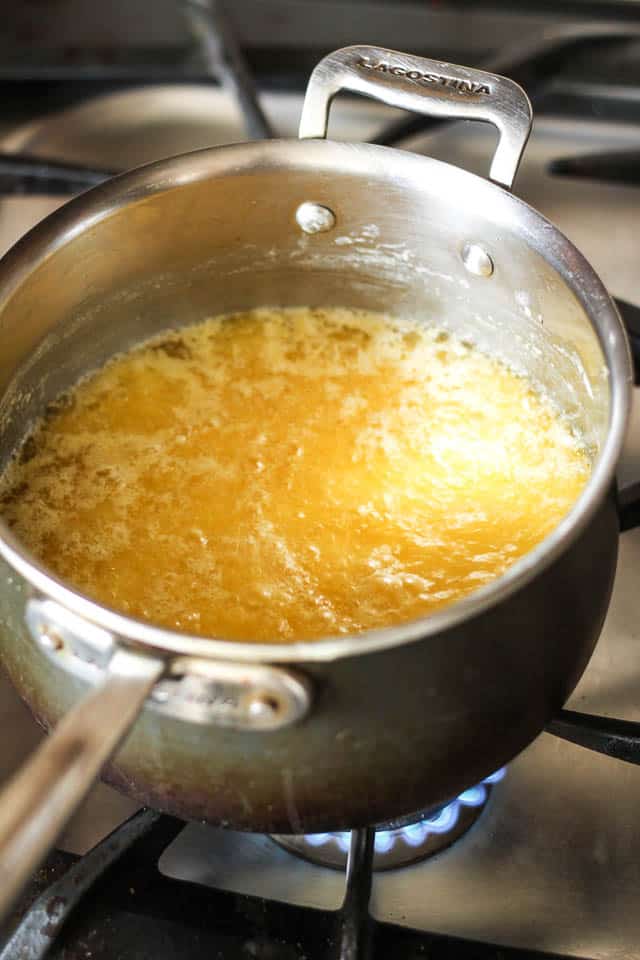
As the milk solids sink to the bottom, you will notice that your butter is beginning to clear up.
It will get more and more translucent, the bubbles will get larger and the foam will eventually completely disappear.
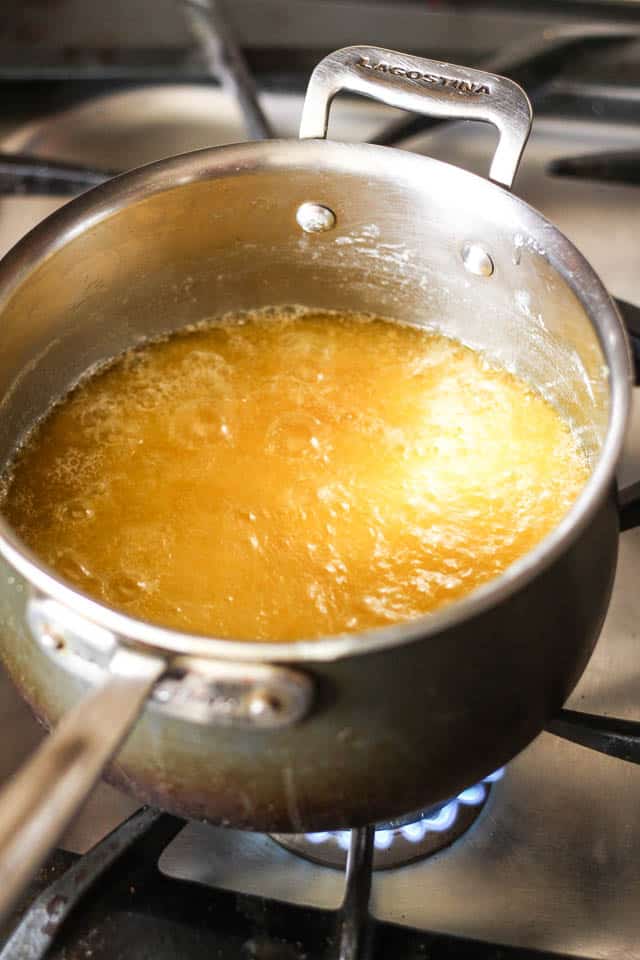
Your butter will start to take a nice golden coloration as the milk solids, which are now at the bottom, begin to brown.
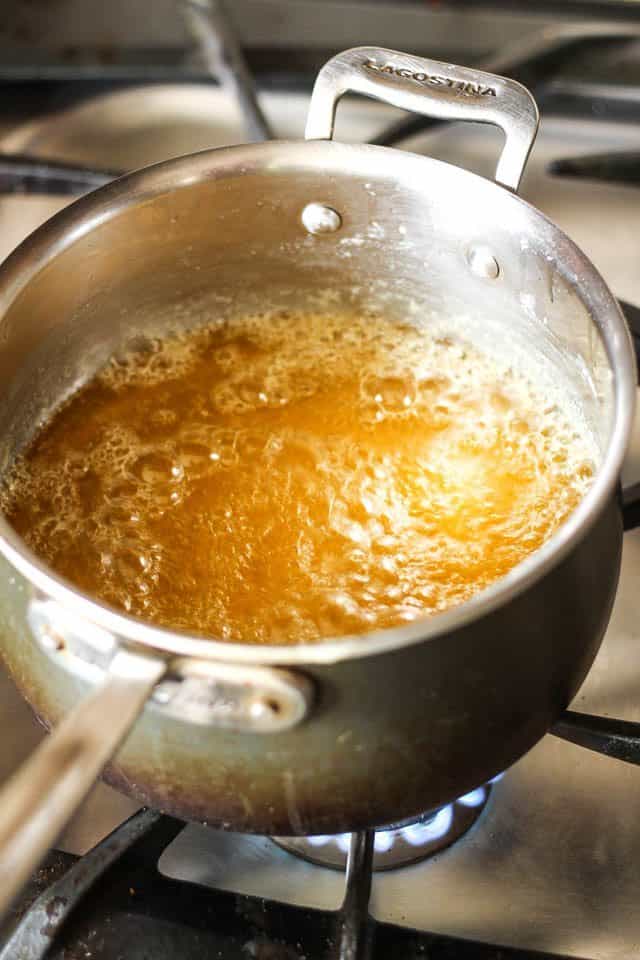
Keep a close eye on your butter and keep stirring, scraping the sides and bottom so the milk solids don’t attach to the pan and burn.
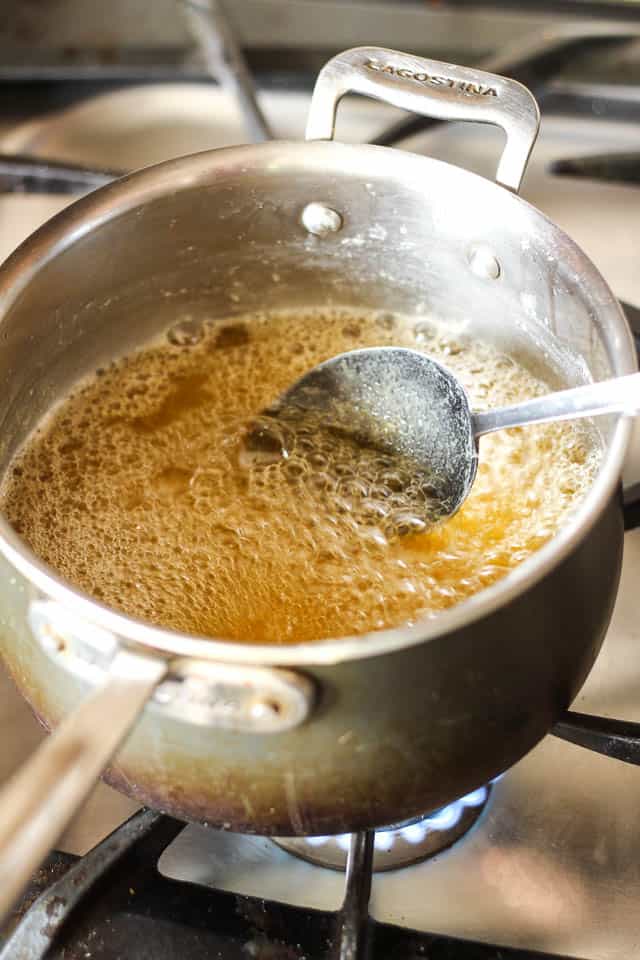
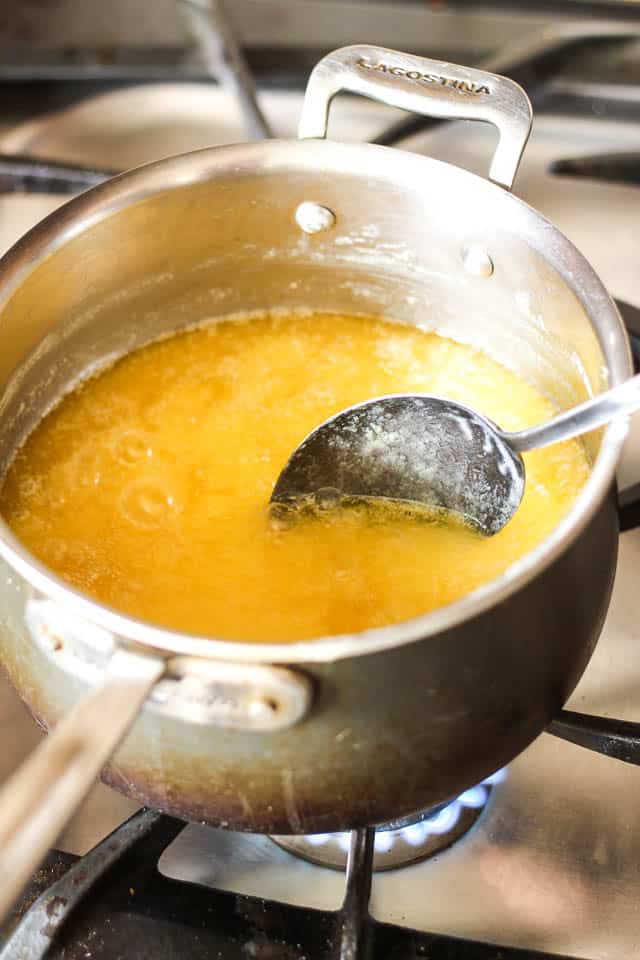
Notice how big the bubbles are getting? Oh yeah! We’re almost there… Watch this really closely now!
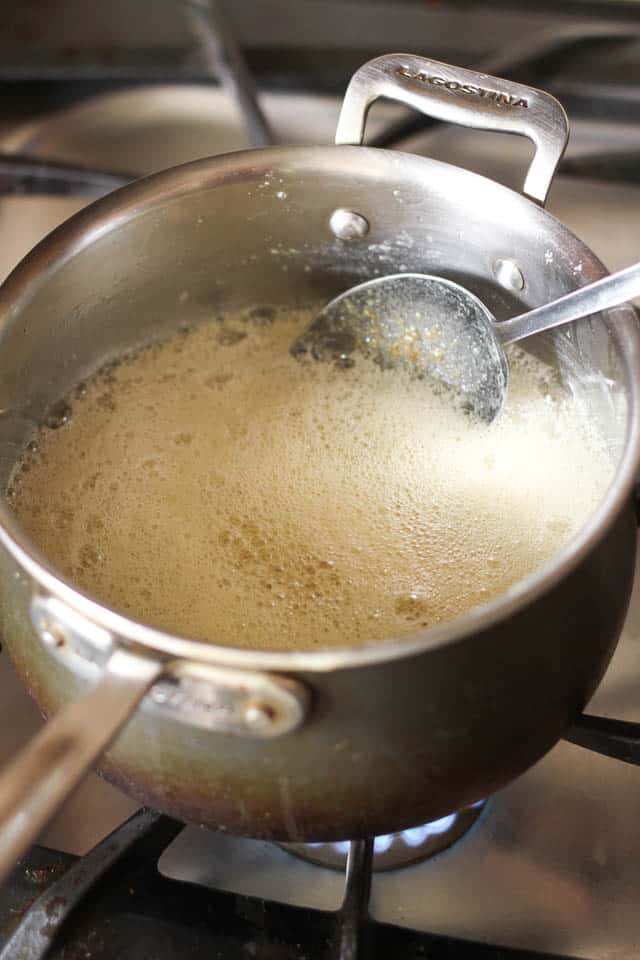
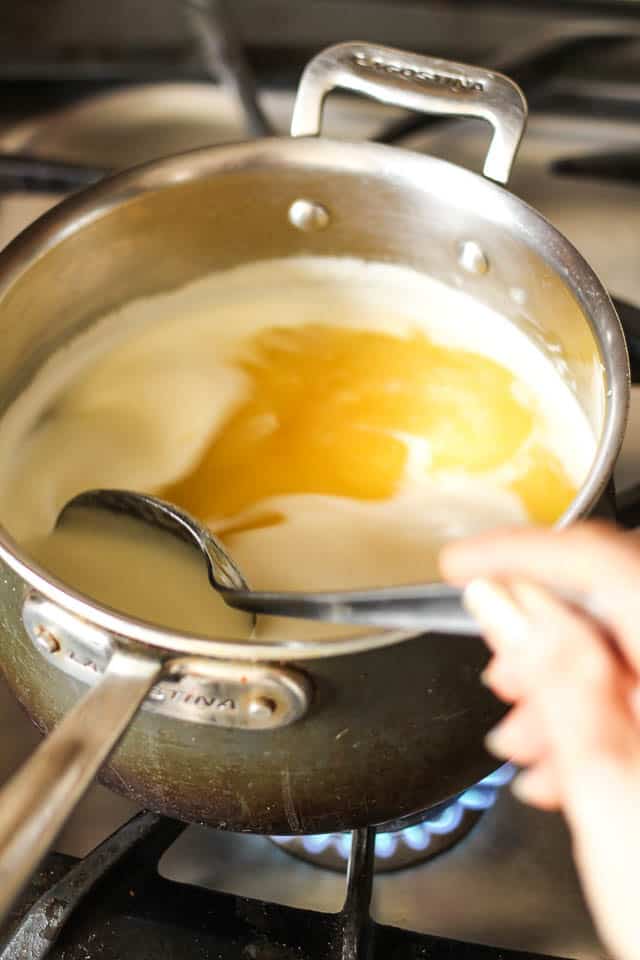
That, right there! That’s what you are looking for! See how the butter just started foaming for a second time? This is the indication that your ghee is now ready to be strained.
Now you want take it off the heat and let that foam settle for a few seconds.
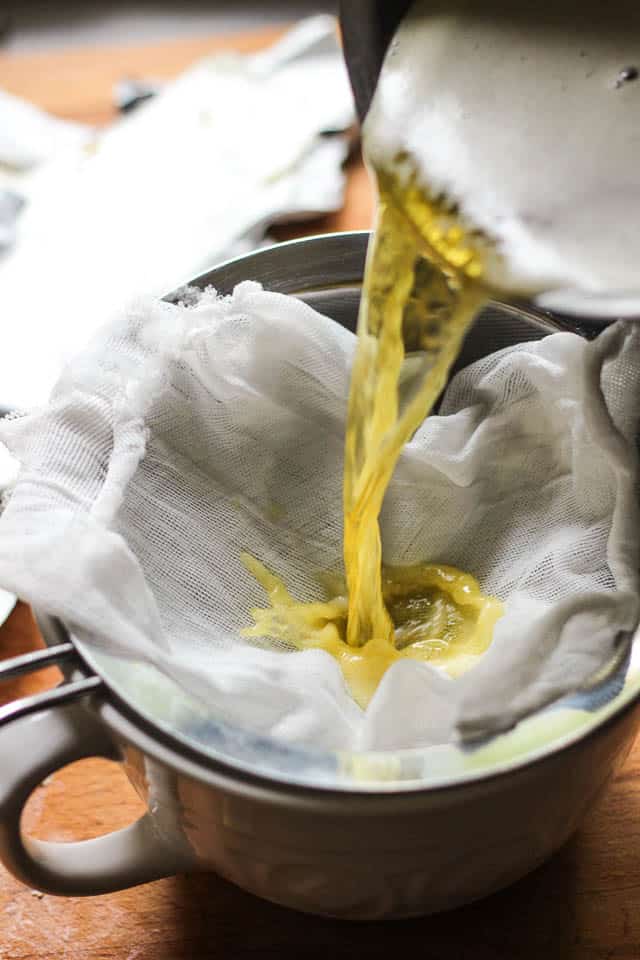
Line your sieve with several layers of cheesecloth and set that over a large bowl, preferably one that is equipped with a pouring spout. Pour your ghee right in!
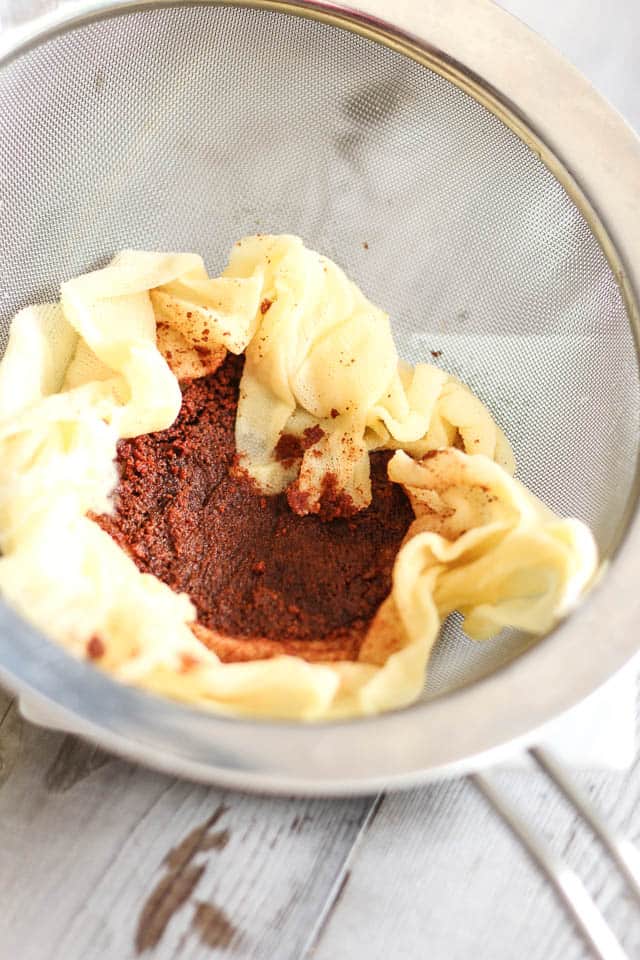
These are the milk solids that get left behind. You will want to discard this.
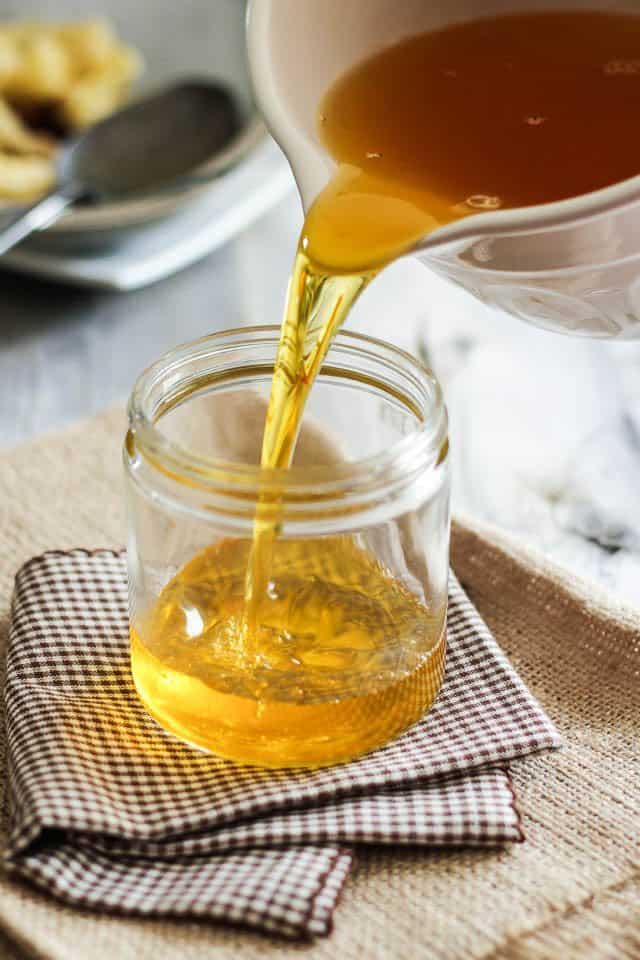
Now transfer your beautiful filtered ghee into a glass jar. There is a chance that you might need a tissue at this point, to wipe off the tears from the corner of your eyes.
The smell alone will probably make you weep for joy!
And what about the color. Have you ever seen a color so beautiful? Liquid gold is what it is!
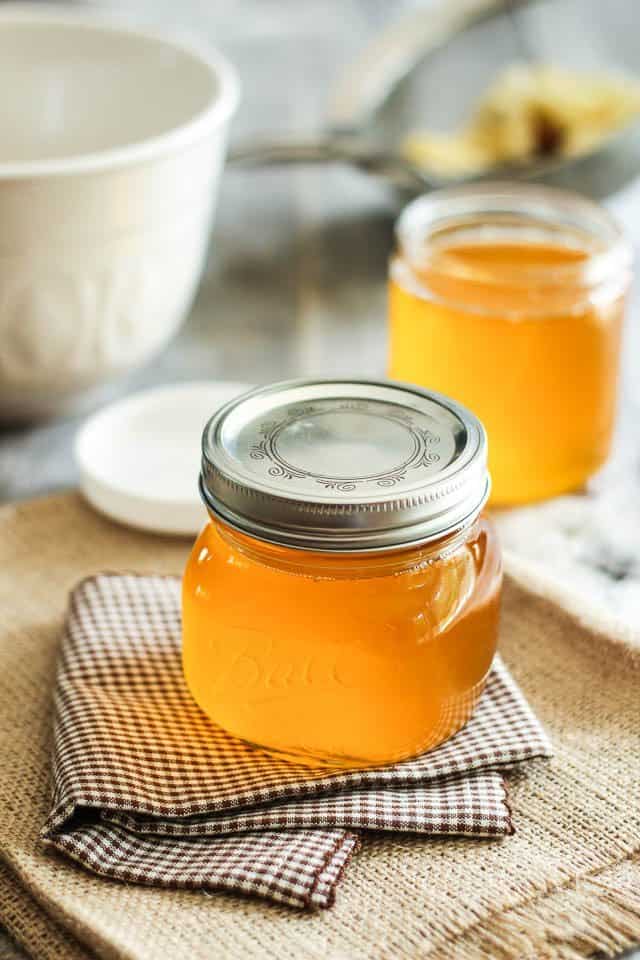
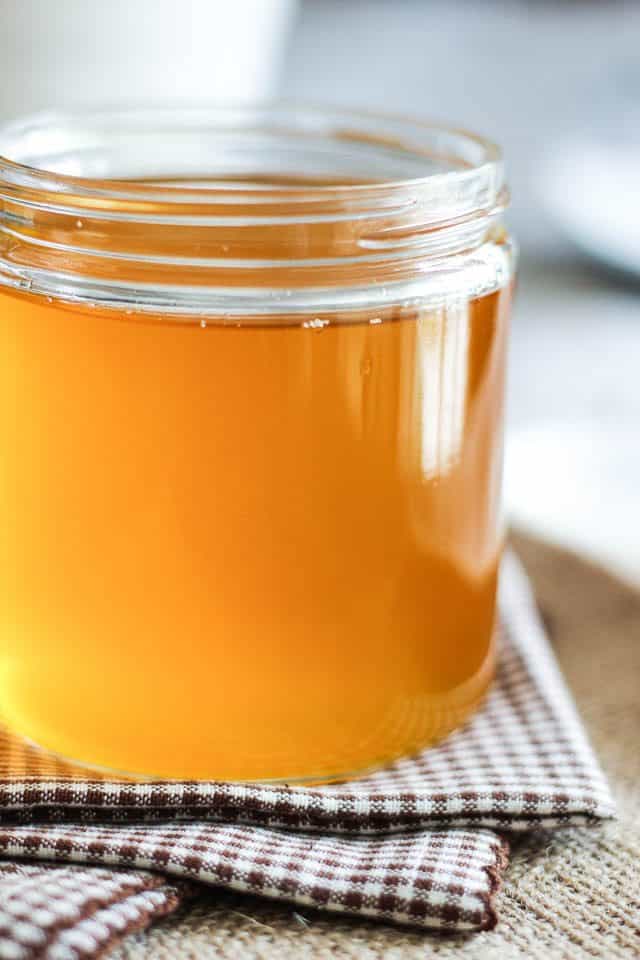
Cover your jars loosely and let your precious ghee set for several hours at room temperature. This generally takes a full day, if not more… I know, be patient!
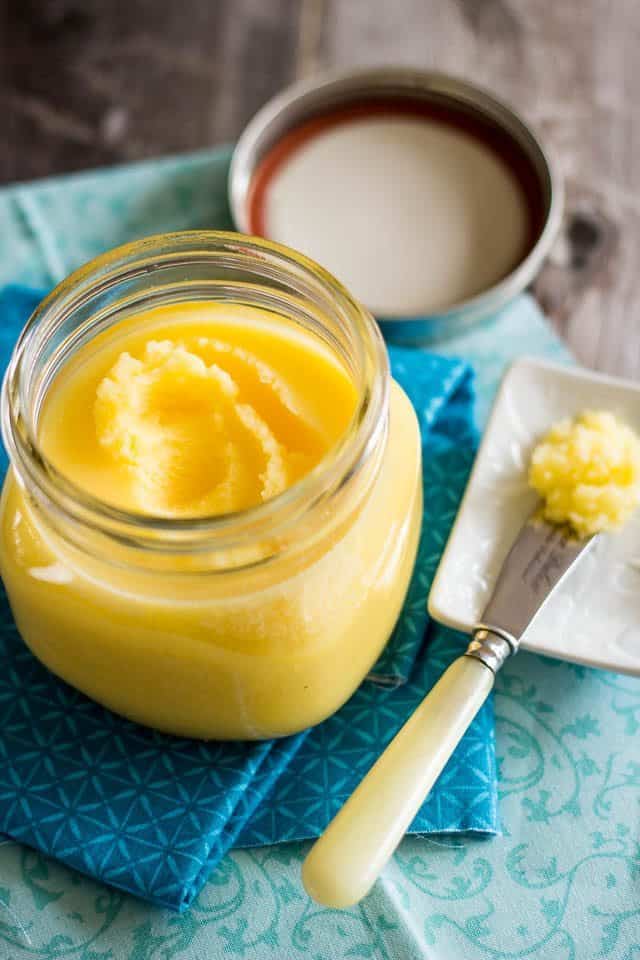
And there you have it. Your beautiful home made ghee is now ready to use. Have you ever seen such a beautiful shade of yellow? And talk about creaaaaamy.
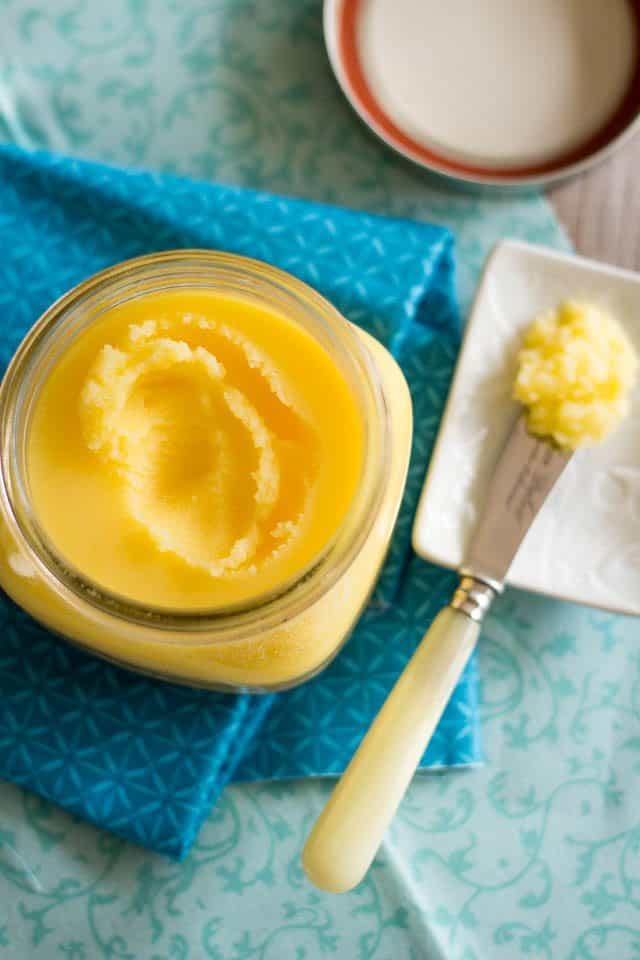
Now, get your nose closer to that screen. Can you smell this? INTOXICATING!
Oh! I’m telling you. I die every single time I stick my nose into that jar. Every.Single.Time.
Homemade Ghee
Ingredients
- 1 or 2 pounds of the best quality UNSALTED butter you can get your hands on, *see note
Equipment
- A medium saucepan, preferably one with a heavy bottom
- A large spoon to stir
- A fine meshed sieve
- Several layers of cheesecloth to line your sieve
- A large bowl or measuring cup to receive the ghee, preferably one that has a pouring spout
- 1 pint mason type glass jar to store your ghee in
Instructions
- Cut your butter into roughly one inch by one inch squares. This will help your butter melt faster and more evenly.
- Set your butter to melt over medium heat, stirring it gently from time to time.
- Pretty soon, you'll see a thick, white foam start to form at the surface. At this point, your butter will be bright yellow and opaque.
- Keep stirring until your butter starts to simmer, at which point you'll want to turn the heat down to medium-low. For the next 5 minutes or so, you won't be doing much stirring.
- Just let the butter simmer and watch the bubbles emerge from that thick foam, increasing in size and number. As the bubbling increases, you'll notice that the foam will become thinner and the bubbles will become bigger and clearer. Soon, the milk solids will start to curdle and attach the sides of the pan. That is completely normal and desirable. Just scrape the sides of the pan from time to time to help those milk solids sink to the bottom.
- As the milk solids sink to the bottom, you will notice that your butter is beginning to clear up. It will get more and more translucent, the bubbles will get larger and the foam will eventually completely disappear. Your butter will start to take a nice golden coloration as the milk solids, which are now at the bottom, begin to brown. Keep a close eye on your butter and keep stirring, scraping the sides and bottom so the milk solids don't attach to the pan and burn.
- Eventually, the bubbles will start to get much bigger; means we're almost there, so watch really closely now! We're waiting for the butter to start foaming a second time. When that happens, it'll be the indication that your ghee is ready to be strained.
- As soon as your butter starts foaming for a second time, take it off the heat and let that foam settle for a few seconds.
- Line your sieve with several layers of cheesecloth and set that over a large bowl, preferably one that is equipped with a pouring spout, and then pour your ghee right in!
- Transfer your beautiful filtered ghee into a glass jar (you can discard the milk solids that got left behind in the sieve).
- Cover your jar loosely and let your precious ghee set for several hours at room temperature. This generally takes a full day, if not more... I know, be patient!
- Your ghee will keep in the pantry (no need to refrigerate) for up to several months.
Notes
Nutrition
If you’ve tried this recipe, please take a minute to rate the recipe and let me know how things went for you in the comments below. It’s always such a pleasure to hear from you!
You can also FOLLOW ME on PINTEREST, FACEBOOK, INSTAGRAM and TWITTER for more delicious, healthy recipes!


454 Comments on “Making your own Ghee at home – Much easier than you think!”
It’s been quite a while since I’ve made ghee and I’ve only done it once (under my mothers direction…..o.k. fine, she made it.) thank you, I can’t wait to make ghee again, for the first time 😉 So wonderful for adding flavor and high heat cooking!
I’ve not made ghee but I do make clarified butter somewhat regularly. I’ve found that making onion soup and caramelizing the sweet onions in clarified butter makes for great onion soup. I think I should try making the soup with ghee. I’m fortunate to have a deli sized meat slicer and we also have copper All-clad pots and skillets. They are the older models with the copper on the outside. We also have the gas Thermadore commercial stove top with 6 burners and a George Foreman type griddle. We buy a whole fillet from Sam’s Club and I trim it out removing the bulk of the fat and any gristle. I then freeze chunks of the fillet and then slice the meat across the grain and package in smaller 1 quart Ziplock bags. Cooking the shaved beef fillet in clarified butter on the griddle along with onions and green peppers thin sliced makes for incredible fajitas or the beginning of great steak subs. I need to make both the onion soup and the fajitas using ghee once I run out of the clarified butter I just made. I’ve read that depending on the quality of the butter, 10 ounces per 16 ounces of butter is a typical yield. My results thus far have been closer to the 10 ounce yield. We have bought the Irish butter but I’ve never made clarified butter with it. Based on reading the comments, I expect that using ghee will improve an already incredible taste.
Isn’t ghee and clarified butter the same thing?
I believe so!
Ghee is clarified butter with the milk solids browned at the end, so the ghee takes on the nutty flavor of the browned milk solids.
I’ve made this recipe 3 times now and it’s turned out wonderful each time. Recipe is easy to follow and it only took about 15 minutes on an electric stove so I’m not sure why it’s taking some people 2 hours. The only bad thing is that it’s so delicious I could eat it straight from the jar!
Thanks for that, Cindy! 15 minutes sounds about right, and I so totally hear you about wanting to eat the stuff straight from the jar. Me, I would drink it while it’s still warm, it just smells SOOOOO good! 🙂
You, my dear are too too darling, what great contagious narration.☺☺☺☺.
Irs been decans since I made any, thanks for the recipe.
I was thinking the same thing and cannot wait to make this asap. Thank you for the recipes and the laughter
This recipe was so easy to follow. The photos really helped me know where I was in the process. It did take me longer than 15 minutes but I didn’t want to burn it and kept my temp too low at first. As far as eating it right out of the jar, I totally get it. I was eating the salty brown solids and then I was licking the cheese cloth, lol. Thanks!
Thank you Melissa! Happy to hear you found the photos helpful! And I so totally hear you about wanting to lick that cheesecloth! 😀
” I so totally hear you about wanting to eat the stuff straight from the jar”
Oh god, yes. That butterscotch flavour…. so good
Hey dear I tried your recipe today n used organic butter but mine turned a lil too dark
Can u guide a lil with what would have gone wrong
I suspect that you let it cook a little too long… did you take it off the heat immediately when it started foaming for the second time?
Can you tell do I refrigerate it after it cools down?
Please see step 12…
Is this also called clarified butter?
Yes ghee is the hindi word for basically clarified butter.,made in every Indian household regular for centuries
With just clarified butter it is not cooked quite so long and does not have the added taste of the browned butter solids. That’s why someone made a comment here that it only took a short time to make compared to the 2 hours to properly make ghee.
thank you !!! It looks wonderful and so easy!! starting the whole 30 again need that ghee!!!!
I saw that they sell ghee at La Moisson from one company. Not sure if you have seen it. 🙂 🙂
Erm… yeah! I have seen it, but it sort of costs an arm and a leg, plus one or two fingers. I can’t remember how much it was going for, but I can definitely tell that it was NOT affordable! Even the butter (which I got there) at $11.49 for a pound isn’t exactly what I would call affordable… but trust me, it was still way cheaper than buying the finished product! So I think I’ll stick to making my own (or ordering it from the States, until Canada wisens up a little!) 😉
Ooh Sonia, ouch. $11 for organic butter. I just paid under $5 at Trader Joe’s. I am making this now so I doubt I will get an answer in time but how long does it take from start to finish?
I accidentally bought salted, I thought for sure I had unsalted. Oh well, using it anyway as it is not worth the trip back. This batch, I’ll just use for veges and other savory uses. Next time I’ll pay better attention.
The first time I made it I bought salted by mistake. It worked beautifully. I made it a few days ago out of unsalted Kerry gold from Costco and sad to say burned it. My mistake too high heat. Remade it just now and it has turned out a beautiful golden color and smells so good. Be sure to keep heat on the low side.
In my experience, the salt foes out with the toasted milk solids; I have tasted no difference between using salted and unsalted butter in the finished product. By making my own I get a 5X return on my money; if I could do this in the rest of my life, I would be rich.
Is it possible to flavor ghee? For instance with orange from Irish Soda Bread or tarragon and chive for baking a turkey?
I suppose so! I would simply infuse it after right after it’s been strained, or mix the herbs / aromatics in after it’s completely set. Now you got me wanting to make flavored ghee… sounds so delicious!
Me too! And I just finished making a batch. The pictures helped a lot but it took a
Long time. I think I could have had the heat higher but did not want to burn it. Thanks for sharing!
Yes, absolutely! My mother used to throw in a few moringa (drumstick) leaves some time before taking the ghee off the heat. The aroma reaches a whole new level!
This blog post contains a recipe with with flavors: http://www.sharmispassions.com/2011/12/how-to-make-ghee-from-butter-homemade.html
moi je le fais souvent a l ail,,,
Haha! Moi je m’en sers souvent dans les desserts, alors pas d’ail ici! Plus, en ajoutant de l’ail, le ghee devient périssable, alors il devrait préférablement être gardé au réfrégirateur. Mais j’avoue que l’idée est pas folle pantoute! 😉
j en fais un mini a l ail, et le reste régulier,,,,,juste pour dire j en ai un peu a l ail et le garde sur le comptoir il n a jamais péri 😉 mon ghee ce matin super beau et bon merci 😉
Tu ajoutes ton ail à la toute fin?
oui a la toute fin,,,quand je fait une livre je me fait un pot masson régulier et un mini avec ail et persil 😉
The American dairy industry uses BST it is banned in Canada.
Just used this recipe. Indeed weeped a bit! Perfect pictures and instructions, end results looks identical too 😉
Thank you!
Thank YOU, Payam. Your kind feedback is greatly appreciated! 🙂
Being of Egyptian descent, I have been making ghee for years to use for specific recipes, but your detailed and poetic description, and the photos, take this to a whole new level! I’ll remember you next time I make some
Awww, thank you so much Nahed. I take this as a real special compliment! You just made my day! 🙂
Nahed said it all. I read an article about Ghee and thought I would get some. Then I saw that you can D.I.Y. The pictures make it easy to follow the directions and the commentary is heartwarming and amusing. I will keep your site in mind for future ideas. Thanks for giving me a good laugh
Bruce
Awww, thank you so much for that, Bruce. You just totally made my day! 🙂
i’ve seen ghee called for in some recipes, but have never bought, made or used it. i may have to make some and dig out those recipes and give it a try!
What the heck is ghee?:) What do you use it for?:)
Ghee is like Indian butter , we almost use it in temperings , curries for enhanced flavor of the dish. Ghee is fat but it is healthy when used it in limited quantities . In India , all the desserts traditionally require ghee . I heard somewhere that ghee is lot better than butter , and has long shelf life at room temperature than butter.
I would love to know more about what you would use ghee for – and how it relates to healthy cooking. I am new to your blog and excited to learn more!
Love the step by step on ghee. Can’t live without ghee.
There’s something about home made ghee, it’s the best. Growing up, mom would get fresh butter from a lady who milked her cows and made butter, that was out of the world fresh and absolutely yum.
Oh, the dream! How I wish I had access to such milk. I would most certainly try my hand at making my own butter, and cheese, and yogurt!
You can make butter with whipping cream. It is delicious, and use the buttermilk the seperates out for pancakes. It takes about 20 minutes in a stand mixer. Really yummy!
Great idea, Amanda! Why did I never think of that?? I’m a huge consumer of buttermilk, too! I’ll definitely be doing that in the future! Thanks for the tip!!
This is old but maybe you will still see it. You can make utterly fabulous creme fraiche, butter and buttermilk by inoculating your cream with a little (live cultures) buttermilk overnight. Here’s the steps:
1) Thoroughly stir together 1 tablespoon buttermilk with 2 pints heavy (whipping) cream in a clean glass jar.
2) Place a clean lid on the jar and let stand overnight at about 70 degrees fahrenheit (room temperature). In the morning the cream will be thicker and slightly sour. You now have creme fraiche! Set aside any you want to use in desserts or toppings.
3) Use an electric mixer to beat the remaining creme fraiche. It will go through the typical stages for whipped cream: first soft peaks, then firm peaks, then clotted, then it will curdle and separate into butter and buttermilk.
4) Use a plastic rice paddle or a flat wooden or bamboo spoon to press as much of the buttermilk out of the butter as you can. Drain the buttermilk off and set it aside.
5) slowly run very cold running water over the butter as you knead, stir and press it, to wash out any remaining buttermilk. Press the butter into a glass jam jar and use in everything!
I so want to make this Sonia, you make it look so simple with the step-by-step pictures.
Brilliant!!!!
Then by all means, make some! Then email me to thank me when your home smells so intoxicatingly good! 🙂
Hi Sonia
I’ve just been reading THE recipe and am very impressed.
Just wanted to know if a recipe calls for ghee, can I still use just ordinary grass fed cow butter? I am thinking of making ghee but am running out of time. Panicking a bit. Cheers Joan
In most cases, yes you can Joan. But really, there’s no need to panic. Making ghee is really super easy. Soon you’ll be making it with your eyes closed!
Great instructions Sonia! I always get confused when it comes to the right time to strain the ghee. The pictures of different stages are really helpful and I think i’ll give it a try again. I love love butter but ghee has a nuttiness that butter doesn’t have. Plus, who can say no to the wonderful aroma of simmering ghee 😉
Thank you Jenny, that’s very kind of you to say. I sure hope that you’ll whip up a batch, if only to embalm the house. I think even chocolate cake has nothing on ghee as far as aroma is concerned…
So, for people who choose to leave the browned bits (milk solids) in the reduced butter.. is that what they call “browned butter” that tastes so decadent in various baked goods?
For people who are not lactic averse, I suggest saving the browned solids to add to baked goods or sauces to give them an incredible deep flavour boost. That stuff is GOLD!
I am VERY new to ghee! How long does ghee last? Does it require refrigeration? Sorry if these are silly questions.
Not at all, Sarah. Those aren’t silly questions! Since all the milk protein has been removed from ghee, all you are left with is pure fat, which does not require refrigeration and will keep in the cupboard for a very long time too, as in for several months, if not years. However, I dare you to keep it that long! Indeed, it tastes so good that you’ll probably want to use it in everything, and even eat it by the “fingerful” sometimes… 🙂
Thank you for your response. I have been afraid of making it. I am a visual girl and your pics give the right amount of “walk through” to make this process less scary.
I stumbled across your blog today & feel so inspired to make all kinds of wonderful new recipes!!! I cannot eat dairy, but wonder if gee if alright because the milk solids are removed. I’ll have to look into this but my fingers are definitely crossed. Thanks for your recipes & keep up the great posts:)
Ghee is very much suitable for the lactose intolerant indeed, Lisa, since all milk protein have been removed from it. While there may remain trace amounts, lactose and casein are present in ghee in such small quantity that they are not usually a cause for concern for those with lactose or casein intolerance. In other words, you should be fine! 😉
Thanks for your kind words, by the way. I truly appreciate them! 🙂
If you have eliminated dairy from your diet for at least a month, or 3 if possible, and feel your body is doing well, try some ghee and see if you react to it. Eat it for 2 days, 1-2 times a day. Then wait 3 days to see if any reaction pops up. If not, you can keep trying to eat it, in moderate amounts. Sometimes a reaction will take a while to build up so be aware for a few weeks after you start consuming it readily.
Once your gut is healed, dairy is often fine, in moderate amounts. Especially ghee but also maybe butter, and then going up the scale–heavy cream, sour cream, cheese and even kefir & yogurt. But even then I would stick with raw pastured milk products.
And yes, it’s obscene how much pastured (organic) animal products cost. Absolutely unaffordable for 80% of the population. We eat factory-farmed meat and have a friend who sells us her pastured raw milk for $3 a gallon, thank God. I have recently found a local source for pastured eggs who doesn’t understand the precious commodity she has so her price is only $2 a dozen! Yay!
2 bucks a dozen? Oh my! That’s a steal! And I thought my farm eggs were dirt cheap at $4 a dozen. Now if only I could find a source for raw milk…
Thanks so much for this. I was about to order some organic ghee online when I found your post (I am in Canada, too). So I bought myself some butter and got to it. Your instructions made it easy and fun.:-)
Good to hear, Jocelyne! Thank you for taking the time to let me know 🙂
The best tutorial for ghee!!! Thank you!
thank u so much for the ghee recipe…
I have to watch my fat intake very closely because my gall bladder doesn’t function at full capacity. It is what they call lazy at breaking down fats. Does ghee affect the gall bladder you think? Right now i use olive oil and coconut oil to cook with. And i love your piece on coconut butter! I will be trying this right away.
I am truly sorry but I have no idea! I wouldn’t want to give you advice on something I know nothing about…
You made me real curious, though… I have to read up on that condition, now! If I find out anything, I’ll share with you for sure!
Thank you for this detailed post Sonia! I am a corporate Nutritionist in Ontario promoting the primal/paleo lifestyle and I am so happy to have found your blog! Can’t wait to try some of your recipes 🙂
That is awesome, Nicole! What a great job you have! Glad to hear you like this place, and please, if you ever do try some of my recipes, make sure you let me know how they turned out. It’s always such a pleasure for me to get feedback on my recipes! Keep on spreading the good word! 🙂
Sonia,
Thank you for the step by step of making ghee. However, mine turned out a dark brown colour 🙁 and I am not sure where I went wrong as I followed the recipe very closely. It doesn’t taste burned, is it salvageable?
Am I supposed to remove the foam?
How long is it supposed to be on the fire in total?
If it doesn’t taste burned, France-Mary, I figure it’s still good to eat. The whole process usually takes about 25 to 30 minutes and you’re not supposed to remove the foam, it just disappears on its own. The key is to stop right when your butter starts foaming for a second time.
The colour is beige now that it has set at room temperature. It smells evenly, almost like butterscotch. Although it has solidified, it doesn’t spread like butter and has a grainy appearance (it has not been put in the fridge).
I am wondering whether it is a sign that there are still milk solids present.
Then it is definitely not burned… actually, it sounds just perfect. As for the grainy texture, apparently it happens sometimes when the ghee drops in temperature too quickly. I’d have to read up more on the subject, but from what I understand, it does not affect the quality of the product in the least and does not indicate the presence of milk solids. Only the texture isn’t as creamy. I think you could just re-melt it and have it cool down in a slightly warmer area? Just a thought…
The grainy texture is considered perfect for ghee. Thats what most people desire.. :). Sonia awesome post. I tried making ghee today and your pictures helped me a lot in determining what stage I am at..specially when to stop.. 🙂
Really? I didn’t know that about the grainy texture. Very good to know though, thanks for passing on the information. I’m really glad that you found my post and pictures helpful, too. Thank you for taking the time to let me know, Manisha. That’s really super nice of you.
Thank you again Sonia. I will take your advise. It’s nice to know that I don’t have to trow it out. Hopefully, my next attempt will turn out as gorgeous as yours 🙂
The reason I asked about the foam is that on other recipes I have read they advised to remove the foam. I’m sure like anything else, different routes lead to the same end result. I find your recipe very well detailed and simple to follow, so I will stick with that.
I just ended up with a quart and a half of homemade ghee for $4.20. Wow I have been buying small half cup jars for $8.00 what a savings, and it was so easy to make THANK YOU. Do you have any other recipies for dairy free products such as sour cream or cream or powdered milk substitute for baking? I have been very sick and just found out that I have to be dairy-free and soy free and because of a latex allergy free of almost all fruits.
*Fist Bump* Yay for that, Charlene! Glad your ghee making experience was a complete success! As for your other recipe inquiries, I’m sorry, I can’t be of much help with that… I’ve many a dairy free recipe on my site, but no dairy substitutes. Sorry about that!
This is such wonderful presentation and pictures that made me jump on the ghee making right away. I’d been postponing this for so many months and didn’t realise the obscene amount of money that I could save just by doing some stirring and smelling now and then.. Here I come, saying bye bye store bought not-so-fresh ghee, Hello, homemade awesome GHEEEEE… I’m soooo happy to pour the ghee I MADE into a jar for the first time, although my mom’s an expert in it. THANKS a bunch Sonia.. The awesome clicks did it, the easy confidence that came clear through the pics.
Awww, thank you so much for taking the time to leave such awesome feedback, Jay. You have no idea just how much I appreciate that! 🙂 Happy ghee making days ahead for you! YAY! (and seriously… the smell, right? BONUS!) 😀
Could I just use a few paper towels when draining it? I don’t have cheesecloth…
I suppose so, although paper towels would probably absorb much more of the precious ghee…
If you have old cotton sheets/pillow cases etc that you no longer use or have holes in etc, cut them in to pieces and use that.
Just did it! – pictures helped, thanks.
Smell is amazing 🙂
But I am wondering… Is it possible to overcook the butter ?
You might not be reading comments on this post anymore but just wanted to say THANKS!!
My ghee is all set and cooling now. I did it!!
Pictures, yes, but also comments very clear – I am so happy because I had read so many fussy procedures and burned a batch ages ago, which made me shy away. Now this will be a regular, cherished process in my kitchen.
For anyone else hesitating, please know – if I can do it, you can do it.
About the tears of joy when pouring into my
Mason jar – I drowned them in spoonfuls of warm, browned milk solids!!! Mmmmm!
I am still reading comments, KP, and thanks much for your awesome feedback! I sincerely appreciate it, and I’m super happy to hear that you found my post helpful. Soon, you’ll be making ghee with your eyes closed! 🙂
Hi Sonia, I have seen various recipes for making ghee and they all say that we must remove the foam when the butter starts foaming. Do you remove it or not? Thanks for your very descriptive recipe and the photos.
I haven’t removed it, Lynne. There is no need, really!
Thanks for such a descriptive post on the art of making ghee. I am often experimenting with Ayurvedic recipes that call for it but have never made it myself. But it can be really pricey so making your own is a great alternative.
Pleasure is all mine, Martha. Hope you have fun making it! 😀
How long will the Ghee last??? In the Mason jar??
Months, Matthew… months!
Thank you for the detailed description and photos to support! I get ghee now! Hot Ghee’d Popcorn used to be my go-to for adding good fat and quick energy (am Keto currently), but I’m no longer eating grains. Chopped, sauteed cauliflower is the closest I’ve come so far. Do you have any ideas for what to ‘Ghee’ as a snack-type food? Not to mention that I really miss it on video nights at home.
Never been much of a popcorn fan myself… in fact, I’m not really one to sit myself down with a bowl of munchies if I’m gonna watch a movie. I never really understood that need that people have to munch on something while watching TV, so I’m sorry I can’t be of much help here. I’m thinking maybe Kale chips would be a good option for you, I’m sure you could give them a good ghee treatment…
I made this for the first time today and I must say your instructions are spot on, very pleased with end result
Awesome, real happy to hear! Thanks for letting me know, too. I truly appreciate that! 🙂
The leftovers look delish. Wonder if it could be added to cookie batter or something.
Probably, yes. For someone who consumes dairy, they must be pretty tasty indeed! For me, however, removing the milk solids is why I’m clarifying the butter in the first place, so unfortunately, I can’t really consider reintroducing them into another recipe…
Thank you!
I have been eating a paleo like diet for over two years, but recently have begun an elimination and testing of dairy and eggs. It has cleared up some serious tendonitis in my thigh, which is wonderful, but I miss my grass fed butter! I have found ghee at Trader Joe’s but it is neither grass fed nor organic. Now I can enjoy my butter again!
Your descriptions and photos were perfect. I had consulted with my Indian friend a few days ago, and your process seemed to most closely mimic her own. Thank you!! It went smoothly and easily.
Looking forward to using it in my cooking.
Oh my, really? Well that is pure music to my ears, Judy, thank you so much for telling me that! You just made my day! And glad I was able to help you make your very own ghee, too. 🙂
Hi Sonia! Great post! Would you mind if I share the link to this post on my blog post about ghee? I’m new to the blogging world so am not sure about the “blog etiquette” on sharing info 🙂
I wanted to end my post with a how to make your own ghee recipe, and yours looks beautiful!
Please go right ahead, Katie! You can even use a picture if you want to, so long as you don’t post the actual recipe on your site but rather direct people to my blog in order to get it.
Thanks Sonia!
Do you know if I can use ghee in the place of regular butter for someone who can’t have lactose? I’ve never tried making ghee before, and I am sure that it’s strange that I’ll be using goat’s milk butter, but that’s just what I do since we have a good milk goat. Thanks for posting this!
Ghee is safe to use for those who are lactose intolerant, Christina, because it has been stripped of all traces of the milk protein. It can very well be used in place of regular butter in most recipes, with very few exceptions (probably more in the baking department). I’m sure that it will be even tastier with goats milk (big fan of goat anything, here!) 😀
Hi Sonia, what a great post on making Ghee. For many years I was with an Indian man and I ate Indian food for about 8 years. I learned to cook many Indian foods and Ghee is a staple that is used in many recipes. I no longer eat that way but miss it. However, with today’s food preparation I use butter and olive oil for all cooking. I have health issues and although I can’t change everything with another in the household I can make small changes that have already helped me. I LOVE GHEE and for some reason have been thinking about it for the past few weeks. When that happens I believe I’m being lead to something to help me improve my health. What can be better than a purified butter? I actually didn’t know just how healthy Ghee really is until today. I’m really grateful I read not only your recipe but the comments all the way through. Everyone is right I went to check another recipe and it said remove the foam on top and that is just a lot of work and as you said not needed to be done. I made Ghee once a very long time ago so now I am grateful to have your recipe and will be making it. Where I live I can buy it anywhere and have many options but making it feels rewarding and the smell is heavenly. I really believe Ghee is really good for the gut and I hope that more people read your post and get into using pure butter. I believe we have been given everything we need for health on earth and it is a matter of learning how to use all the abundance that we have available to us. Thank you and have a great day!!!
You are so right, Eva. All the food that we need, Mother Nature provides for us. Somehow, we managed to get this all screwed up.
And ghee in the making does smell heavenly!!! 🙂
This post was very helpful to me today. Your pictures were better than any other ghee post I found. I have an electric stove so I think I kept the heat too low and it took forever. It finally finished when I turned it up to medium heat.
I usually get 2 qts raw cream from my co-op. usually they are good for coffee and ice cream for 2 weeks but one jar in the 2nd fridge became too “cheesy” too soon. I left it in the 1st fridge for a while. Raw cream is good for a long time but it gets funkier tasting. Sometimes it reminds me of goat cheese, which I dislike. I put old cream into quiche, cheese sauces or make ranch dressing or dip. I didn’t have time to mess with it. It might have been 6 weeks old. I skimmed off the top a little and churned it into butter in my food processor. I didn’t work too hard to get the buttermilk out because I followed your steps and made ghee! I’m so glad I didn’t have to throw it out! I think the funky flavor might have cooked off as the ghee started to smell nutty.
Lucky you, Valerie, for having access to all that raw dairy. I really wish! Your ghee must be absolutely top notch. Glad I kinda helped make it happen! 🙂
Great tutorial on making ghee! I’ve made it a few times, but the last time it didn’t set correctly. When I poured it in the container it was a perfect golden color, but it never really solidified until I put it in the fridge. Once it became solid, I left it out and it then got soft/liquidy again. Any ideas on why that happened? I’m using Kerrygold butter and followed your instructions to the T. Last time it came out great. Of course, it’s still usable, but just curious why it it didn’t set.
Really I have no idea, Karen. Is it particularly warm in the house? Of course, the external temperature greatly influences the texture of ghee. During the really warm days of summer, it gets very very soft, whereas in the winter, it’s much firmer… Other than that, I really can’t think of anything, sorry!
Thanks. I’m not particularly worried about it…the ghee still tastes great and it melts in the pan anyway, so no big deal. I’ll try it again and see how it goes. Yes, right now my house is warm, but not particularly so.
Wow, another winner! (I made mayo for the first time last week.)
I just made ghee for the first time, following your outstanding tutorial.
Thank you for doing the testing, and posting clear, concise instructions.
My kitchen smells heavenly, and I can’t wait to taste my new creation!
That’s simply awesome, Carol! Thank YOU for taking the time to leave the great feedback. I hope you’re enjoying your very own homemade ghee! 😀
I was just thinking this is the absolute best instructional pictorial that I have ever read concerning the homemaking of ghee. I thoroughly enjoyed it, and it was obvious that a whole lot of love and passion were inserted. 🙂 Thank you.
Why thank YOU so very much for your kind words, Andrea. You certainly are one real gem! Glad you found the post helpful! 🙂
I am blessed to have my own jersey, so I get lots of milk and enough cream to make butter every week . Arthritis in my fingers makes it tough to work all the buttermilk out of the butter. Now I don’t have to work it so hard… I make ghee and it lasts forever . Thanks for the pictographs…makes it so much easier to understand the seperate stages. I keep busy making homemade Greek yogurt and ghee. Checking out your other recipes. 🙂
Lucky you, Josephine, I wish I had such easy access to raw milk, if only to make my own butter, sour cream and yogurt. I would perhaps try my hand at making a few simple cheeses, too!
I’m glad that you are fining this post useful! 🙂
I love this post. You are done a great job. I LEARN A NEW THING FROM YOUR SITE. keEp It.
I never knew i can make ghee from butter too 😀 love to see your post. I make ghee from raw milk cream (balaae/malaae)· All i need to do is to collect thick cream from milk and when i get a large amount i simply put it in a karahi and place it on low flame, when cream starts burning ghee separates from it automatically 🙂
Oh, and I didn’t know you could make ghee from raw cream. Now I am definitely wanting to try that!
Thanks for the detailed post and pictures. I’m among the fortunate ones I guess, with easy access to ghee in nearby stores – tins and jars of all sizes, different brands, organic, you name it 🙂 I have never made ghee at home, but I remember my grandmother making it. She collected cream off milk (cow’s milk) everyday and stored it in the fridge. When the pot of cream was full, she’d cook it in a thick-bottomed pan to make ghee.
On Ghee Making Day, all of us grandkids would wait eagerly for the treat of sugar mixed with browned milk solids. It would have broken our hearts if the milk solids got discarded!
Ghee made from fresh raw cream has got to be DIVINE! I really hope that I get to give that a try, someday!
Your instructions and photos are divine! Being from india, ghee is a staple and Indian grocers stack them in ample quantity but nothing like knowing exactly what goes in. Growing up, mom would boil milk and make ghee from cream. I never paid much attention (being a guy) but in the US those experiences are sorely missed. Thanks for the phenomenal instructions. We hardly ever buy ghee from outside. During the last boil, you can sprinkle water on the ghee, that will give it a very desirable texture. Although my mom does not like doing that.
Awww, thank you so much for your kind words, Nihar! I take them as a MAJOR compliment!
And seriously, sprinkle water over the ghee during the last boil will give it a better texture? I definitely have to try that! I’m curious, though… why doesn’t your mom like doing it if it resulted in a finer product?
Sorry. Just saw your reply while going over the pics again to make sure the bubbling pot in front of me is doing what it is supposed to. She says it reduces the shelf life. I have also heard of adding rock salt to precipitate the solids.
I love how you write, Sonia! I’m going to try making Ghee, and thank you for the fantastic pictures, and your enthusiasm! 🙂
Awww, thank you very much, Billie. That is incredibly nice of you to say! 🙂 Have fun making the ghee and if you have any questions, you know where to find me. I’m never too far from this place… 😉
Wow. Just found you. This is great. I will be following you.
Awesome! Thank you so much, Jeneen! Glad to have you on board! 😀
Sonia,
Impressive article. Excellent writing. I felt like I was in the kitchen seeing everything live. Love the way you introduce the topic, and the neat finishing and presentation. It is a WOW! My mother used to do something similar but with the aid of bulgur (smashed dried wheat). It helped by absorbing the water content of the butter. But your way really impressed me. Had a look at your recipes. Every single one is a piece of art. Love your gorgeous finishing touches very much.
Oh my, thank you so much Ahmad, you’re a real gem! What amazingly kind words, you really had me flush big time here. Seriously, you just made my day. Thank you! 😀
The best ghee tutorial!! Spot on about waiting for the butter to froth up the 2nd time. I forgot this step once and had to throw my “ghee” out because it tasted burnt. Never again! Thank-you!
Aww, thanks so much, Connie. That is so very nice of you to say. Glad you find my tutorial so helpful. Throwing out ghee is such a tragedy. I really hope you never ever have to do this again!
OK, done and it is perfect. It took about 35 minutes from start to finish.
YAY! Real happy to hear, Beth! And how’s the salt situation? Is it too salty or is it tolerable?
And 35 minutes sounds about right. Just enough time to infuse the entire house with the most intoxicating aroma. Lucky you! 🙂
Well, I wouldn’t use it for baking but it works for cooking. I will not make the mistake twice. 🙂
Good to know that it’s at least usable!
If there are a few bubbles on the top of my strained ghee, is that a bad thing?
A few bubbles shouldn’t matter at all, Andrea. It’s the milk solids that you really want gone! I say your ghee will be just fine!
Do you refrigerate the Ghee after it it has thickened all day?
Ghee does not need to be refrigerated, Whitney.
I was trying to find a way to convert butter to Ghee. Basically i am from Kerala state of India and in my child hood days i remember my mom making the Ghee and the beautiful aroma that take me to heaven ,she use the same process you have mentioned above but she use home made butter made from the curd . But after moving to US i was afraid of buying Ghee sold in the Desi shops ,something stopped me, but was looking for an alternative .This is awesome i tried it turned out beautifully . Being a bachelor this helps me a lot to add more aroma to my Malabar cuisines. Happy cooking
So happy to hear, and thanks a bunch for sharing. This just put a huge smile on my face. Happy cooking to you! 🙂
I live in Brazil and just discovered Euovedic Cuisine. I am doing a nutrition euovedic course with a well know therapist…. Some people in the course were seliing Gee, but I thought it was far too expensive, so I researched the web for a recipes and found a few, but for some reason, I felt this recipe was written with so much love and care, so I decided to follow the steps and try to make Gee…. I was right, it was amazing how clear and easy the steps were explained and the photos are exactly what it looked like in my kitchen… The result is amazing, beautiful Golden Gee !!! Thank you very much….
Awww, thank YOU Moody for taking the time to leave such amazing feedback. I’m really happy to hear that your ghee making experience was real positive and that I was in it for a little something. 🙂
Hi Sonia,
I have just made my first jar of ghee and it is now proudly sitting on my kitchen counter, waiting to set.
It is looking gorgeously golden and, should I say, perfect!
The instructions were so amazingly clear and the photos helped tremendously.
As much as I am finding it fascinating to watch it morph, I am getting impatient and really eager to taste it!
So, I am having a break from work – and going in and out of the kitchen! – and heading off to the gym – I will pick up some nice spelt bread on my way back..
Thanks for sharing this amazing recipe.
Thank you for sharing this recipe. I just made my first ghee following your great directions 🙂
xo
L.
*HIGH FIVE* 😀
That was… ridiculously easy. Thank you for making what I assumed would difficult such an easy task! The pictures helped so much. Yay ghee cooking time!
The pleasure is all mine, Cohen. Glad to have made your life easier! Enjoy the [homemade] ghee! 🙂
Sonya
Thanks for the wonderfully clear instructions and photos. (Much better than the first lot I followed!) There were brown milk solids in the bottom when I poured out the ghee. One question: my ghee is browner than golden which my wife says means I burned it and I shouldn’t use it. Is that true?
Not at all, Joe! In fact, you just made brown butter… it’s super delicious and perfectly safe to eat!
Oh this stuff is amazing. It was so easy too. I want to bathe in it!!!!
HAHAHA! Bet it would make your skin super smooth! And you would smell deliciously good… 😉
I was wondering if you could, and if it would be beneficial at all, to actually can the ghee. I love the idea of making this, but I generally prefer to make a lot of one thing at one time, and i’m not sure my small family could use very much before it went bad. We generally can everything we can get our hands on, but I wasn’t sure if I could can ghee, and/or if I should. Also, can this be used for butter replacement in baking recipes (cookies/cakes)? I keep hearing conflicting reports. My family isn’t lactose intolerant, if that matters. Thanks in advance!
Ghee does not need to be canned, Caroline. Once it’s been clarified, the butter is practically rid of all traces of lactose, which makes it shelf stable. It can be stored at room temperature for months and will not go rancid on you. Also, ghee is the ultimate butter replacement in any recipe, even for those who suffer from lactose intolerance.
Hope this helps!
I just made my first batch of ghee following your directions, and it worked the way your photos showed it would. Love the presentation of your process and directions. It made the whole process very easy – surprisingly easy! Now I just have to work on the patience….can’t wait to try it!
Thank you so much for your kind words, Susan. Glad my post helped and hope that ghee is to your liking! 🙂
Hi Sonia,
I made this Wednesday night and it appeared to make it through all of the steps as shown on your tutorial, but it is not hardening. I got the brown bits on the bottom of the pan and it poured out like clear liquid gold! The color looks great and it smells amazing…however, it remains soupy. I used Kerrygold’s grass-fed unsalted butter.
I just checked it this morning, 36 hours since pouring into jars, still a thick soup consistency. Did I do something wrong? I live in Florida and oftentimes humidity can be to blame in certain recipes, but we are enjoying cooler days right now, so I don’t think that is it. Should I place in frig? Please help: )
Wow, wow, wow, wow….did I mention wow??? I’ve just made my first ever batch of ghee. My house does smell amazing, and it was so simple to make!! Can’t wait to try it! Hope it hurries up and cools down!! Thanks for all the advice and step by step photos, it was all spot on!! I’m going to try making the cashew butter next!!
AWESOME! So happy to hear, Beth. Thank you so much for taking the time to leave such great feedback, too! YOU, my friend, are a real gem! Enjoy the ghee… and the cashew butter!!! (careful with that last one, though… it’s HIGHLY addictive!) 😉
Boy did I have a problem I waited and waited and then waited some more. There were absolutely no milk solids, It went through all the stages and I guess I should have taken it off but was looking for those solids otherwise what was there to strain off. So ….. I turned it up maybe I wasn’t cooking it at a high enough temperature? I waited some more gave it a stir it melted my silicone stirrer! Started smelling like I was deep frying in oil so took it off the heat must have burned it, smells awful and guess I will have to throw it away. Still no milk solids??? Wondering what went wrong.
Sonia! I’ve mage this twice. One was all wrong, but this time sweets, I got it!!! GODDESS! And that’s all I’m going to say!
Thank you Ebony, you’re a real gem! Glad to hear you nailed it! 🙂
I just finished my 2nd try at ghee. First attempt using a different recipe came out cloudy and not so golden. Using this recipe, it came out exactly like the photos! It is gorgeous and clear. Thank you for this great step by step tutorial.
*HIGH FIVE* Happy to hear your ghee turned out great, Keena! Thanks for taking the time to let me know! 🙂
Thank you for the step by step easy to follow directions and pretty pictures. Question, is it normal that a pound of butter shrinks down to just two small mason jars of ghee?
A pound of butter will typically yield about 1½ to 2 cups of ghee
Very nice..thanks fot the great information! Looks lovely, we will try it here in Chile (where to find Ghee is harder than to find Pandas)…
Thanks
Sanjay and Cinthia
Chile
I just made my first three pints of ghee today. Your instructions are spot on too! It’s amazing to watch the butter just do its own thing without barely any intervention whatsoever; it’s also fun to make.
I have a ton more butter to go through, so I need to get some more canning jars.
Thank you so much for time putting this together. The Ghee I make will save us a gob of money, and the food that I make with it will be awesome!
Cheers!!
Aw, thank you so much for your kind words, Steve! Glad my instructions were helpful to you, and enjoy all that ghee! LUCKY! 😀
Just finished making my first batch and I cannot wait to try it! Thank you so much for sharing the recipe and process.
Pleasure is all mine, Dawn. Enjoy your beautiful ghee!
You have the best recipes! Thanks for sharing them. I’m glad I found you on Pinterest.
Thank you so much Rebecca, that is very nice of you to say! Glad you found me too! 🙂
Hi Sonia,
Wonderful post and photos! I can’t wait to make ghee!! I have one question… do you store ghee at room temperature or in the fridge? Thanks again.
Ghee can be stored at room temperature for several months, Mary.
Thanks for your kind words! 🙂
I greatly appreciate all the pictures at each stage of the process. Thank you so much for this nice touch to the instructions. This will help me and my boys in making this.
I’ve been craving ghee for two years since I last had it at a friend’s place. I was determined to make my own and now I know how! Thanks so much !!
I have a question though.. I made it for the first time yesterday and I didn’t realise until this morning when it solidified in the jar, but I have let some milk solids slip in the jar and as accumulated at the bottom (very little though). Would that be a problem if I let it sit in my cupboard? Or should I keep it in the fridge?
I think I would store it in the fridge, Marie, just to be on the safe side. Or transfer it to another jar, while leaving the milk solids behind! 🙂
Yay! Beautiful ghee for my little girl! This was my first time making it – I couldn’t have done it without your pictures. Thanks so much! Once I start baking with it, I will direct my readers here to learn to make it themselves. Thanks again!
Happy to help, Erin! And thank you for sharing the love with your readers, I greatly appreciate that! 🙂
I made this for the first time Wednesday night and your directions were amazingly accurate. It was so simple thanks to your pictures and comments. Thanks so much for making this such an amazing experience! I am using it as a ghee detox but can’t wait to find other uses for ghee!
So happy to hear that you found my post most helpful, Stephanie. Thanks so much for your super kind feedback, I greatly appreciate it! 🙂
And ghee, you can use just like you would butter, and then some. It’s my favorite cooking fat. Confers such a rich, buttery taste to everything you cook in it! And it can handle the heat, too, so you can even use it for steaks. Can you say yum? 🙂
Hi Sonia
I made my ghee yesterday and it has gone grainy and still liquid in form. I mean it warm here in Qld but my store bought one was solid.
Do you think I should boil it again?
It may need a little bit more time to set if it’s especially warm out, Daliah… If it has gone grainy, melting it and letting it set again could solve the problem. It’s happened to me once and I gave it a good whiz with my stick blender while it was still fairly soft. That did the trick for me.
Hope this helps!
I have been buying ghee, a little nervous about making it myself. Today I decided to give it a try. Your instructions and pictures detailed every step of the process perfectly and now I have beautiful ghee at half the price! Thank you!
You are very welcome, Christine! Glad to hear your experience was a success and that I had a little part to play in that success! Thanks a bunch for letting me know, too. I greatly appreciate that! 🙂
I turned 70 in Nov. and just my first batch. Actually I think mine iis more just clarified butter but still worth the effort. I’ll use your method next time though.
WOW. Thank you ,thank you, thank you, thank you. Used your recipe for making ghee and what a result. Beautiful colour and fantastic aroma. Used it in a Kahari recipe and I have to say it’s the best curry I have ever made. Great easy to follow recipe with enthusiastic comments that merit the result. Thanks again.
All the best from Wales,
Michael.
Awwww, thank you so much for your sweet and kind feedback, Michael! You are a true gem!
Happy to hear I was able to help you make your very own ghee and had a small role to play in the elaboration of the world’s best curry ever! 🙂
Just made a batch with welsh butter michael. Excellent.
I’m in the process of making some right now..wish me luck
Good luck, Tracy! Hope it turned out great! 🙂
You don’t have to throw away the milk solids ,traditionally in India these solids are accompanied with some white rice and little salt , yummieee yummm .. !!
But for those of us on the paleo diet that don’t consume dairy, or those that are lactose intolerant, the whole purpose of turning butter into ghee is to get rid of those milk solids…
Ofcourse in that case , You have to miss that yummie treat 🙂
I love ghee and want to try making it myself! Question though. I don’t have cheesecloth. Is there anything else I could use instead? Another site mentioned coffee filters. When I do find cheesecloth, do I throw it away after or can it be washed and reused? Thanks so much.
Not sure about coffee filters, Jennifer… I’ve never tried them personally but I get the feeling they would be a tad too dense to allow the fat to go through. You can get cheesecloth on Amazon and most kitchen supplies stores carry it, too. It is single use, but it costs close to nothing, so it’s no big deal. Or, you could use a nut milk bag if you wanted to. Now that one you could definitely wash and reuse.
I made my first batch yesterday using your blog. It came out perfectly! I found the cheesecloth at Target in the kitchen utensil aisle. I also got a pretty jar on sale there to store it in. My only advise to those that are confused about when to strain, is that when it foams a second time, there are a lot less bubbles because the water is almost completely cooked out. I waited just a minute or two until there bubbles were almost gone. It came out lovely….so much yumminess! I was advised to use ghee instead of butter to help heal my gut from a low grade food allergy to egg whites. I may invest in the nut bag so I can just wash it. Great idea!
Glad to hear your ghee came out perfect, Sue! If you’re going to make it regularly, then I say yes, you should definitely invest in a nut bag. You will not regret it! 😀
THANK YOU!!! 1) For a recipe for home made ghee, and 2) for being Canadian and acknowledging that not all of us live in America, land of easily obtained Paleo-friendly foods, and at good prices to boot! Sorry, but as much as I like some other bloggers, too, it does get annoying that they don’t get it, but almost rub it in your face, even if it’s just because they’re oblivious… Anyway, my husband has now made ghee at least 3 times, and instead of having to drive a half hour one way, special trip, to pay $27 for 227g of ghee, we can go to Zehrs right here in town, get 500g of organic butter for less than $10, and make our own! So much more affordable, which is great cause we’re poor, lol! And you’re right, it does smell soooo lovely. Could I suggest you edit the recipe to include approximately how long the process takes? My husband and I were a bit worried it would take a long time, even though now we know it doesn’t 🙂 could help out first timers from having to sift through the comments where you tell the one gal it takes 25-30 minutes.
Good point, Holly! I will definitely make a note to look into that!
And really??!?!? $27 for 227g of ghee? That is insane!
So here is the problem I am having making ghee. Everything goes as you describe and the ghee is golden but a little undercooked. I leave it alone for five minutes, and – BOOM – suddenly the milk solids have gone from milky to burned to a crisp. The ghee at that point takes on a slightly burned flavor (but it is still very good).
I don’t understand why the ghee goes from undercooked to overcooked so rapidly. I’m not sure if there is an overheating issue here, but it is not boiling rapidly. The bubbles just lightly rise as in your example.
Is there any specific guidance on temperature and maybe a “do not exceed” temperature?
There are no specific temperatures, really… making ghee is something that you do by “look” and “feel”, hence the many many pictures. Theoretically, as long as you keep scraping the bottom and sides and keep a good eye on it, then remove it from the heat and strain as soon as you get that final foaming action, nothing should be burning on you. Perhaps if you tried lowering the heat a little bit? Especially toward the end of the process… I’m thinking that might help some.
Thank you for this! Just made some and it only cost $4.50. Im going to make your Spaghetti squash with Mushroom sauce tonight!
*HIGH FIVE* Hope you like the spaghetti squash dish! 🙂
Appreciate the recipe & comments, but, really – I’m going blind trying to read the pale, faint gray type.
Best ghee tutorial I’ve ever come across. In fact, I didn’t know that I had made it wrong several times before I found your website! Thank you! Even my kids were going up to the ghee container to smell the deliciousness!
Awww, thank you Charla! That is so incredibly nice of you to say! I can picture your kids, noses deep in the jar to get the most of the delicious fragrance. What a beautiful sight! 🙂
Great tutorial! Mine came out looking exactly like yours!
Thank you!!
*HIGH FIVE*
Thank you so much for this I made my ghee using your wonderful and well detailed directions. I used Kerry gold grass fed butter which I found out has about 2g salt per 100g, I was sceptical about using it as I was looking to buy unsalted butter, but it worked out good as only the residue was salty. My whole house smells like butterscotch! ?
I left the butter about 5 more minutes after your last picture & mine came out brown & so tasty. I guess this is brown butter? Thank you so much you’ve made my day.
Awesome! Glad to hear! I certainly hope that this will be the first of many batches to come. 😀
Very interesting blog. A lot of blogs I see these days don’t really provide anything that attract others, but I’m most definitely interested in this one. Just thought that I would post and let you know.
Do you store this in the fridge or just at room temp on the counter? How long before it goes bad? Can’t wait to make this!
Ghee is shelf stable and can be kept for several months in the pantry.
Hi there! I’ve used your recipe over and over again, and so far have gotten my ghee almost identical to each step in your pictures. I switched brands of butter and followed the same recipe that I always do. I noticed that this batch was VERY foamy at the beginning and I had to scrape off a lot while it was bubbling. At the end, when it was time to strain it, there were no milk solids like normal. So I put it back on the burner for a while until it bubbles real good (no foam this time) and when I strained a second time, there was still no milk solids! Could this be from scraping it all off at the beginning? Like I said, I switched brands so I’m not sure if that’s a factor. Any insight would be much appreciated!!
I’m no expert on the subject, Jen, and I’ve never had anything like that happen to me, but I suppose that by skimming some off in the beginning, you end up with less milk solids at the end. To have none at all, though, is a bit surprising! Did you still get that amazing golden color and caramel fragrance?
Thanks for the amazing blog! I’ve been researching making Ghee and while your instructions say approx. 30(ish) minutes, a few others say 4 to 6 hours! I’m on the Whole30 and want to make sure I’m doing everything by the book 🙂 Your site s amazingly easy to follow and I appreciate that!
Thank you!!!!
4 to 6 hours???? Why? How? Trust me, 30 minutes is plenty of time to make ghee from start to finish.
Kudos on doing the Whole30. I’ve done it a few times and it’s been a life changing experience for me. Have fun doing it, that’s what’s important! Oh, and thank you for your kind words, too! I greatly appreciate them! 🙂
I just tried it and Two hands aren’t enough for me to wipe away my tears of joy today ! Can’t thank you enough for sharing this. Staying abroad we know how much we miss home made ghee and here now I have the best tasted ghee ever in just 15 minutes ! Wow..thank you once again !
So very happy to hear, Manisha! Thanks for taking the time to share your joy with me, that’s like pure gold to me. You’re a real gem! 🙂
I just made my first batch of Ghee and I think it turned out great. Would post a pic but don’t know how. Thank you so much it using organic butter.
Glad to hear it turned out great, Sabrina! You can post a pic to my Facebook page, if you want! I’d be happy if you did! 🙂
I just finished my first batch and can’t wait to use it to cook yesterday. Also, I must say I’m glaf to have find a blog from Québec with paleo recipes because you’re right, we don’t have acces to all the same products as those in the states.
Thanks for the tutorial.
AHAHAHA tomorrow, not yesterday! I’m not a time traveller! lol
Hahaha! Gotcha! So you’re paleo and you’re from the area? How cool is that!!! We really are a minority here in Québec. Where are you from, Zoé?
I’m in Longueuil 🙂
Do you write in english for more exposure, or are you anglophone? (That way I might comment in french next time if I know you speak it 😛 )
Je suis Québécoise absolument pure-laine, Zoé. Te gêne surtout pas pour commenter en français! 🙂
Your recipe is good. I didn’t cook GHEE before, so I’ll try it tomorrow…
Thanks for the recipe, keep it up….
I used your recipe a while back and my ghee turned out perfect and delicious. Was very pleased with the results.
: )
Just last week, i tried it again and the ghee was not coagulating like it ought to. It had been super hot that day so i figured that it was just due to the weather and so I put the 2 jars of ghee into the refrig to firm up.
I went to use one of of the jars today and when the ghee came to room temperature, it was soupy and not at all like my previous experience.
: (
When I bought the organic / pasture raised butter, the package said that it was “cultured” butter. As that was the only choice to purchase, I thought it would be fine.
Do you think the cultured butter made a difference?
Ghee doesn’t do well when placed in the fridge to firm up; the drastic change in temperature causes it to separate and become grainy. My suggestion would be to melt it again and let it set at room temperature. It might refuse to set until it gets cooler out, but it should get there eventually…
Hi Sonia!
I`ve been a huge ghee-fan for the last 7-8 months. After struggeling with candidiadis, leaky gut and milkallergy (amongst other allergys), I found ghee to be extremely helpful. My skin cleared up and became more plump, hair more shiny, it stabilized the gut, and it really feels like pure medisine. I have one question tho, seeing that you answer them so well..;
Yesterday I burnt my ghee a tad too much. It smelled burnt, but after filtering it it really just smelled yummy. But, I´m worried that the milksolids wich had turned black and very small specked, had been able to seep through the filter, that the separating prosess maybe got ruined. Do you know if there is a higher amount of milkproteins in burnt ghee? It looked clear to me, and has a light brownish colour when cooled. But I still worry, because of the very fine, black milksolids. I would really appreciate your p.o.v, have searched the whole internet for an answer without any luck 😉
Hugs
I don’t think you should worry about it Suzanne, maybe what you could do is filter it a second time, or use several layers of cheesecloth when filtering, that way you would really be able to catch all of the particles, no matter how tiny. Even if milk solids were left behind, their amount would be extremely negligible.
*struggling *allergies
Sorry for any other misspells.. I´m Norwegian and doesn`t practise my English too often ;D
Thanks for showing the process and giving details. I looked at several sites for making ghee before attempting. Afterwards, I had been wondering if I had actually made ghee . Apparently, the cooking temperatures were to low in the recommended time allotted. All I had was foam; no solids (mine turned a creamy yellow when cooled. None of the other sites showed.). Guess I’ll have a second go at it!
Ha! Hope it works out better for you that second time around. Let me know how things went! 🙂
Hi
We have made ghee for years and several generations. Its customary in my ayurvedic family to add moringa leaves chopped up just when the ghee is 5 minutes away from being done. We never used sieves or cheese cloths to strain the ghee, instead just poured the clear liquid from the top into jars and used the milk solids in porridges, stirfry and curry for extra flavor. Never throw away the solids, they are tasty, flavorful and nutritious.
Hi Sonia!!
Thanks for the great instructions. One of my fondest memories growing up is waking up to mom making ghee most Sunday mornings (still love waking up to the smell when I visit my parents once a month :O) ).
The brown bits/milk solids-you don’t have to discard them. Next time try this: scrape the milk solids from the bottom of the pan, add some sugar, mix the milk solids and sugar slightly and eat away!! I know it sounds kind of weird but those milk solids are the best thing EVER!! I usually add sugar and roll them into tiny balls and munch of them. They are bitter on their own so adding the sugar is essential.
how do you know when it starts to simmer, go long does that usually take?
Hi Sonia! Beautiful pics and tutorial! 2 questions please. 1) I did not get any brown bits at all. I LOVE browned butter and was waiting for that. My butter was really boiling for at least 20 minutes but maybe that’s not long enough? 2) I let the ghee mostly harden in the bowl I strained it into before placing it in jars (I thought the look would be better) and now I’m glad I did because I had runny milkish liquid at the bottom of the collection jar which I poured out before placing the partially hardened ghee in the smaller ball jars. What was that? If I had poured the hot ghee into jars right away, this liquid would have ended up at the bottom of those small jars too I’m imagining…. Thanks sooo much and I really want to master this!
My guess is you didn’t let it boil long enough. Did you wait for that second foaming? That part is absolutely crucial. You don’t want to take the butter off the stove until it has foamed for a second time.
Thank you so much for this! This visuals really help. I’ve been scared to try this, but now that I know what I’m looking for I’m hoping I can muddle through okay!
Me again – I just noticed I got a much higher yield for my 4 sticks of butter – almost spilling at the brim of my 2-cup Pyrex measuring cup when I strained it. I do think I cooked it the right amount though – everything else matched up great.
Thanks again.
This has to be the best step-by-step instructions I’ve seen. The pictures help immensely! I’m not sure what happened but I used to open this page on my iPad when making my ghee but now the page crashes and I have to use my laptop. There appears to be an ad trying to open when using the iPad.
Thanks Jerry, real happy to hear that you are enjoying my tutorial! 😀
As for the page not loading for you, it’s probably a local issue with your iPad. Have you tried clearing your cache, maybe? Sometimes that helps…
Followed instructions exactly and mine came out kinda brown and burnt :/. Will have to toss.
Real sorry to hear, Jen! 🙁
I made this ghee yesterday an it won’t set up completely. Its part liquid and part solid. Should I cook it again?
Sometimes, ghee can take quite a while to set, especially during the warmer days of summer… if you tend to keep your house fairly warm, it can happen too. Be patient, it should set eventually (and if it doesn’t, you can always send it for a short trip to the fridge, but that may cause it to “crystallize” a little…)
Maybe I cooked it to long. It’s a vibrant yellow like yours just loose.
As a dairy technologist I can say don’t stop fire when large bubbles are coming while you are making ghee, alow it to rise the temperature about more than 120°C at this temperature small bubble will be formed and that bubbles will blast with craking sound, don’t worry about it and when surface appearance will be cleared after that you can move the pan from fire. Then if you want small gritty texture you can for rapid cooling but if you want large gritty texture you can apply slow cooling at room temperature. Be crezy be healthy always guys.
This is a great guide that has lead me to make two successful batches of ghee. However, I must disagree with discarding the milk solids that are left. Another recipe site suggests mixing it with almond flour and a bit of honey to make a fudge-like treat. I tried that with my first batch, and it was delicious!
My Boyfriend made me a batch of Ghee a few weeks back, but I’m running a bit short as there’s so many different uses for it. So today I made my first batch following your instructions and found the whole process therapeutic, watching the bubbles change throughout, then those tiny bubbles often turning into larger bubbles and bursting into smaller bubbles again, with a fantastic result. Shame we can’t share our results.
So Thank You very much.
I just want to do that all over again now.
Thank YOU so very much for that beautiful testimony, Julie. Now you had me wanting to make ghee! 🙂
You can share your results on my FB page if you want. I’d sure would love to see!
Even better! I’ve made it so you can share your results right here!
Excellent, this is my finished Ghee.
Liquid gold!!! 🙂
I made another batch of Ghee last night as I had run out of the last batch. This time I did nothing to it, I just stood back and watched the process.
This time I used President butter, it’s quite a pricey butter, but it was on special offer. I also cooked the butter for a little longer this time.
Happy New Year
Looks PERFECT! Enjoy! 😀
Happy New Year to you also!
Do you ever flavor your Ghee while making it? There is a roasted garlic ghee at the store, but if I can make it, that would be awesome!
I never tried it, Megan… so I’m afraid I won’t be able to help much. Sorry about that!
Hi Sonia! I am so excited to try this recipe. Does it need to be refrigerated?
Not at all, Kristi!
I attempted to make this tonight but it never bubbled up the way your pictures indicated. Could it be that I had the temperature too low? Mine isn’t quite as clear as your finished product.
I’m guessing that would be the case, Deb… try increasing the temperature next time.
Hi Sonia, thank you so much for your detailed explanation and all the photos! I was nervous to make it on my own, wondering if I would accidentally burn it, but your photos really helped reassure me that I was on the right track. Have yet to try it but I’m betting it will be fabulous 🙂 Thanks!
You’ll see, Jenn, ghee is quite easy and fun to make, plus, it smells soooo incredibly good. Soon you’ll be making it with your eyes closed!
I’d love to try this in some recipes, but what is correlation of ghee to butter?
For instance if a recipe calls for a cup of butter, should I use a cup of ghee? or less?
You can replace butter with ghee in a 1 to 1 ratio in pretty much all recipes, John.
Is there a difference between ghee and clarified butter? At work we’ve always set butter out overnight on the turned off grill.By morning the butter and milk solids have separated even though the butter hasnt simmered. When seperating it we are left with the clear butter fat but also the liquidy white milk solids. Does simmering the butter as you do change the flavor?
Simmering the butter definitely changes the flavor. It gets a very nutty, almost caramel-like aroma. Totally worth the trouble, I tell ya!
Hubby was thrilled to see i was making Ghee this morning. Worked just as you described. I strained it using my coffee pour over method, dripping directly into my storage jar. Just a little too easy! Thanks for sharing…
Well that 3 times it didn’t work and just burnt the butter – 750g butter.
When I tried this the first time it worked perfectly. I was using organic butter. These 3 times, non organic butter.
I’ll try one more time with organic and see what happens…
Funny ‘cuz I’ve made this countless times with both organic and non organic butter and never had it burn on me. The trick is to remove it from heat as soon as that second foaming starts to happen and filter it without delay. Hopefully your next attempt with organic butter will be a success. Keep me posted!
The three times I did it, it foamed up initially then the bubbles started to come through and there it sat, gradually burning…
I’ll try again and let you know
Thank you so much. My husband started to notice that butter was giving him some digestive related discomfort. Then I came across your wonderful recipe. I was nervous to make homemade Ghee but I could not bring myself to pay the ridiculous prices. But because your instructions were so clear and easy to follow, and your pictures accompanied them, I just had to give it a try. I’m very glad I did. Again, thanks! I’m bookmarking your site. Cheers! A fellow Canadian.
You are very welcome, and thank you much for taking the time to leave such great feedback. I really appreciate it! 🙂
WOW! I am SO glad I made this! I just recently started using ghee and enjoy it. I had some butter in my freezer I wanted to use and decided to try my hand at making it. It was so easy – thanks to your great instructions and amazing photos. I first noticed how much more golden it looked than the store-bought variety. After pouring it through the cheesecloth, I took a taste off the back of the spatula. What? Mind. Blown. It is a zillion times better than the stuff I’d purchased. It has more of an authentic butter flavor combined with lovely roasted notes. This stuff is truly better tasting than butter and better than the readymade ghee I’ve tried. And, on top of that, MUCH cheaper, even when using a good butter. The cheapest I could find ghee was on Amazon at $.93 an ounce. And, to get it that low, I would have to buy a 4 pack of 13-ounce jars making it a purchase of over $50. I don’t need that much on hand, frankly. Or, I could buy it locally at $7.99 for the 7.5- ounce making it $1.07 per ounce. With my favorite organic butter, ($4.54) it comes out to $.28 an ounce! And, it yields a nice 16-ounce batch – perfect. So, I am getting a quality and taste that is far superior and at about 1/3 the cost. Ummm…what can I say? Thank you!
Hi Sonia,
Your blog is very Healthy and Helpful.
Thanks for sharing this information with us.
Hi Sonia,
Since reading this, I have made several batches of ghee and it is one of my favorite things on the planet. I have always done it just as directed and use the same brand of butter each time. However, this last time, it separated. I have a grainy layer and an oily layer and when you put it on bread or something, the grainy layer doesn’t really sink in. It still tastes great and is usable. But, not the beautiful results I’d been getting. I have tried to find the answer to this online with no success. I kept wondering if I didn’t cook it long enough or cooked it too long. But, I didn’t do anything differently and it frothed the second time. Please let me know if you have any words of wisdom.
Thanks,
Jillian
I don’t know why it does that, really Jillian! I wish I had a clear answer for you, but unfortunately, I don’t. I’ve had that happen to me a few times, too. It always seems to be happening when it’s particularly warm out and the ghee never has a chance to completely set. Then, not only does it remain sort of runny, but it’s also grainy/oily. Try re-melting it and letting it set again; this method has worked for me before. Or, just make a fresh batch and keep the faulty one for cooking… that’s what I tend to do!
Thanks so much! I bet that’s it. I kept reading people saying it was the brand of butter, but my brand has never changed and always turned out. We are in the midst of a Texas heat wave and there is only so much the AC can do at 108, so I think you are right. I wonder if sticking it in the fridge to cool works? I’m guessing that may cool it too quickly. I will try re-melting. Thanks again!
You’re absolutely right, Jillian: if you were to stick it in the fridge, it would probably become grainy because it cooled too quickly… I guess the only way around that would be not to make ghee when it’s too warm out, or have high-end temperature control devices installed in our houses! 😉
And don’t worry about the double posting… I deleted the duplicate. I’m the one who’s sorry you had to write it twice!
Sounds great. It’s definitely makes the best tasting curries ever! You just need to be careful not to burn the butter…
Hi Sonia. Love your site and ghee receipe. I made it for the second time today. My milk solids don’t look as dark as yours. Also after I strained it there is a tiny bit of foam left. Is this ok or did I not cook it long enough. I was afraid of burning it. I appreciate your guidance.
Funny but I was looking for ghee at the grocery today and none was to be found anywhere. I had no idea you could make your own. I thought it was something special. What is the difference in ghee and clarified butter? Thanks for the detailed directions. I think I will just try to make my own.
They’re pretty much one and the same, Vivian! Good luck making your own. You’ll see, it’s super easy!
Whenever I use a recipe or technique I find online, I always try to say thanks! So thank you! My ghee turned out beautifully. Can’t wait to use it for making a traditional lamb curry at the weekend.
You are very welcome, Sophie, and thank YOU very much for taking the time to thank me! I sincerely appreciate it. Enjoy the lamb curry… sounds delish!
Thank you for this well-written recipe, Sonia. I had tried to follow another one and was confused about a number of things. Yours was extremely easy to follow and I now have a quart of beautiful ghee to show for my efforts.
I have enjoyed ghee for many years, but never tried to make it before today. It will be a regular activity from now on.
I am new to your blog and fairly new to the Paleo lifestyle so I look forward to benefitting from your recipe creations.
You are very welcome, Sandra! Glad to hear my instructions worked well for you and that you will now be making your own ghee on a regular basis. Smells amazing, doesn’t it? I hope you find many more recipes to inspire you and if you ever have any questions, please don’t hesitate to ask. I’m never too far away from my computer! 😉
I was so excited to try this but unfortunately the foam never disappeared, the butter burned and I am left with a pot of black liquid. I don’t know what went wrong :/
Do you mean the second foam or the initial foam, Veronica?
The initial foam didn’t disappear and it quickly went from clear with milk solids on the bottom to all black.
I want to give it another try but don’t know what do do differently as I followed the instructions this time
I really don’t know what to tell you, Veronica. You say that it went from clear to all black, so the first foam did eventually disappear… as to what the second foaming never occurred, that would be a complete mystery. In all the (numerous!) batches that I made, I never once had that happen to me. I would definitely give it another try, but keep a real close eye on things, stir often, scrape a lot, and if you see that those brown bits are starting to turn real dark before a second foaming has had a chance to form, then just take it off the heat and strain promptly.
Best of luck and let me know how it went! 🙂
can I use shea butter to make the ghee oil since the butter must be plant based and organic
I’m afraid not, Derpog. Shea butter is a completely different product that has absolutely nothing to do with regular butter…
Hi Sonia
I made the ghee on an electric stove, heavy-bottomed pan. I was waiting for it to turn clear and it never seemed to happen…so I waited. It was still and foamy on top when I noticed a burnt smell. So I took it off the stove. I now have a jar of cola-colored (browned?) butter. Can i still use it? Smells good, if slightly burnt. Any idea why it never turned clear? Thanks.
Quite frankly, Gina, I have no idea! Did you stir at all during the process? You can definitely still use the butter if it tastes good. I really wouldn’t see why not. Make sure you strain all the burnt parts and you should be good to go.
my ghee did not have burnt looking milk solids when I strained it. I had to take it off the stove because it was starting to foam a second time. I will know by tomorrow night if it becomes solid. It looks good, just like yours
I wanted to know if the cream you used is the same cream that can be collected after boiling milk. A heavy layer that settles on top after it boils and cools down.
Not sure what cream you are talking about, Roshni?
Just made this and it’s gorgeous. Been wanting to make ghee for a long time but was intimidated by the process. Can’t believe how easy it was and including cleanup only took about 30 minutes. I do see a few bubbles at the top of the jar. Hoping that’s ok. Thanks for the step-by-step instructions. I’ll definitely be making again.
So very happy to hear that this was a success for you, Dawn. The tiny little bubbles at the top of the jar won’t do any harm, don’t worry about it. Soon, you’ll be making ghee with your eyes closed! 🙂
i die Every.Single.Time too 🙂
Hello Sonia,
I tried your receipe. First thing I learned: use a pound of butter, no less, a smaller amount will be overheated easily. Anyhow, I first meltd my block of butter in the microwave, that makes things far easier. The 250 grams went into a pan, everything worked well to the point where the second foaming starts, here, it overheated slightly and the lactose, etc. turned dark brown on me…
Tried a second time with 500 grams of butter, same process, the window from lightly browned proteins and sugar to burnt is far wider, maybe a minute instead of a few seconds.
As you said, it smells intoxicating. Like caramel taking a bath in butter. My girl walked in and asked me what the heck im cooking at a quarter to twelve in the night, she can´t sleep anymore because it smells so good 🙂
Caramel taking a bath in butter!! LOVE IT!!
Thank you for all the great feedback, Andreas. I’d never tried making ghee with less than a pound of butter, so good to know that small quantities don’t work all that great. Thanks for specifying that!
Thanks for the excellent instruction. I’ve realized after making a pound of it this morning, that, previously I’d been running the heat too hot.
This time, I cooked it at well under medium and then finished off at about a fifth of the temp. rating. It worked very well.
Not bad for a grumpy old man.
Hi. I’ve made this once before and the smell really is divine…my husband will sneak some straight out of the jar whenever I’m using it! I’m planning to make it again soon and realized the butter I bought this time is an organic pasture butter but is “lightly salted.” Will this be ok?
I’m not sure, Joy… I guess it all depends on what you’re planning on doing with your ghee. If you’ll be using it mainly for cooking (as opposed to baking) then I guess you’ll be fine. You’ll only need to adjust the amount of salt that you add to your dishes accordingly. If it were me, I would totally go for it.
Thank you! I’ll give it a try! I mainly use it for cooking and adding it to veggies anyways ????
Awesome! Let me know how it turned out! 🙂
it’s mid-night and I’m trying to make ghee for the first time. followed your instructions and with the pictures it came out perfect. THOSE PICTURES ARE AMAZING AT SHOWING HOW EACH STEP IS ARRIVED AT.
You are making ghee in the middle of the night? RIGHT ON!!!! My kinda guy! I’m glad your ghee came out every bit as expected and that the pictures helped a great deal.
Thanks a bunch for your kind words, by the way. I sincerely appreciate them! 🙂
Can you put ghee in a pressure canner for long term storage? Thanks!
If stored properly, ghee will keep for months without the need for canning, Dean. But I’m sure that it could be done, still. I just have never done it myself, so I’m afraid I wouldn’t be of much help in that department.
Quick question…..in the other ghee recipes I’ve read they skim off the foam after the ‘first’ foaming but it doesn’t seem like you do. Is it necessary? Can you explain? Thanks!
Thank-you, thank-you, thank-you. Every time I have tried to make ghee, I have burnt it in the oven. I knew I could do “it” withbyour recipe. I now havw 6 beautiful pints of ghee on my counter for about 4 dollars more than the cost of one. I live with little money and am allergic to the milk solids. I had to take my own pictures to show everyone who will listen to me at the bus tomorrow. Your pictures were what made me know I could do this. With gratitude from a friend of Bill’s
You are very welcome, Cynthiac! I’ve no doubt that you’ll soon be making ghee with your eyes closed. 🙂
Thank you for such great instructions! I just made my first batch. It turned out great! Much better than spending 8.99 for a 12oz jar here in Northern Wisconsin, which btw didn’t have organic or grass fed on the label anywhere. If I could post a pic, I would. It’s beautiful and smells heavenly indeed!
Haha! Happy to help, Alice! 😀
I use ghee in my diet and it really helps me to maintain good health. I feel a lot better and my skin problems are also cured by using ghee.
Thanks for sharing this easy method to making ghee.
I made ghee tonight for the first time. Your tutorial and recipe were right on. My ghee came out perfectly. Thank you!
Real happy to hear, Anita, and thanks a bunch for the awesome feedback! I greatly appreciate it! 🙂
How long does this process take?
It seems to vary depending on equipment used, Elizabeth, but it never takes me much more than 15-20 minutes from start to finish…
I haven’t been making Ghee long but I ran across an article making it in a Crock Pot, so that’s what I do, it’s a very easy way to do it.
I wish you would compare the pros and cons of the two methods.
I’d truly like to know.
I’m gonna try your method next time but I just made a quart today, so it will be awhile.
Ghee is a great product!
I cook my eggs in it, it’s great for making grilled cheese, I’m gonna try putting some in my biscuits and Cornbread.
My wife likes to use it, as well.
I have a cooking page on Facebook, redneckcooking & unclebuddysez, which I’d love for you to post on.
I haven’t gotten to post much lately due to extreme illness but I am doing better now., and will be posting more.
If you post on my page, please include include all your info so my followers can follow you.
I have about 900 followers so far, and would love to acquaint them with your blog.
Thank you,
Buddy Simmons
Unclebuddysez
Redneckcooking
Buddy simmons.com
Simple and delicious! Thank you, turned out perfectly.
Happy to hear! Thanks for taking the time to let me know! 🙂
Hi Sonia, Great recipe thank you. It progressed exactly as you said, however I didn’t need tissues as I was in a state of bliss and still am. I keep going back to the jar to smell the aroma, yumo. Thanks for the amazing effort you went to with perfect photos, such detail, well done. Mjx
Thanks so much for the awesome feedback, Megan, you rock! The pleasure is all mine, and enjoy your ghee 🙂
Its a five star for sure….
I just made this am a little worried it didnt turn out! I used 2lb of Kerrygold unsalted. Seemed to take forever to get that thick foam and then forever for that foam to disappear. When i strained it, it didn’t seem to have that much solids and they were not that dark brown color as they are in your picture. What could i have done wrong?! I hope it is still usable. It smells delish.
bonjour , à toi, désire tout simplement te dire que je fais mon ghee depuis un bout,,la première fois l ai acheter,,he boy,,pas donner,,, et apres commencer a fouiller sur «google » trouver la facon le faire et facile wow !! pourquoi payer pres 20.00 quand pour 12,00 $ ta du meilleur et maison
j en ai jamais rachetée…par curiosité j ai chercher encore recette de ghee, arriver sur la tienne,,,,moi j écumais la mousse jusqu il y en aie plus,,,la tienne étant moins compliquer j ai essayée,,,et adopté !!! merci
Thats a very detail recipe, Thank You. While growing up in india, we were taught to minimize waste. After making ghee, don’t throw the leftover in the cheesecloth. If its not burnt, add little sugar to it, spread it on bread/ roti and have a tasty snack. As a kid I used to look forward to this snack more than the ghee. 🙂
Thank you so much for posting this with the pictures and the whole process patiently outlined! I just made my first batch of ghee thanks to you! It does smell heavenly…
You are very welcome, Virginia! The pleasure is all mine!
Just tried the recipe for the first time and was shocked how quickly it came together. After reading about local brand of ghee, which is said to be cooked for 48 hours, I expected it to take at least 5 hours and almost burnt it altogether after 20 min.
Good to hear, Renata. And soon, you’ll be making the stuff with your eyes closed!
My whole house smells like Movie Theater Popcorn!!-
Thank you SO much for this recipe! Detailing the process with pictures helped me SO much (I found your site after my first attempt at making ghee was an epic failure). Second attempt, thanks to you, is GOLD! ????????
Thank you very much for giving so much information. I had tried many a time but always failed. I have understood where I was lacking, now the steps are cleared. I would also like some your suggestion on this http://bit.ly/2nsqtZA. Kindly respond.
Great article! Thanks for sharing!
Thank you so much for the step by step pictures! I was a bit intimidated to make this, but it went so smooth. I didn’t have cheesecloth so I used a cloth kitchen towel and paper towel on top. Hoping that’s okay! My house smells amazing and I’m so excited to try it tomorrow. Thank you for such an easy guide to follow!
Your recipe is so easy to follow. Thank you for sharing it. I made my first batch a week ago and I noticed today that it is grainy. It melts smoothly but in a more solid state it feels grainy. Did I not cook it long enough? Or did I not strain it properly? I strained it twice.
Apparently, the grainy texture can happen sometimes when the ghee drops in temperature too quickly. I’d have to read up more on the subject, but from what I understand, it does not affect the quality of the product in the least and does not indicate the presence of milk solids either. Only the texture isn’t as creamy.
Maybe you could just re-melt it and have it cool down in a slightly warmer area? Just a thought…
I will try that. Thank you!
Sonia ~ I made ghee quite by accident. I was making clarified butter once and I wandered out of the kitchen and left it on the stove. It burned. It was wonderful. One thing I do differently now that I make it on purpose is instead of filtering it through cheesecloth, I filter it through a super fine “permanent” coffee filter that is made for electric coffee makers. That way I don’t have to throw away any cheesecloth and I think that’s more eco-friendly.
I’m very much glad and excited too as I’ve made Ghee by myself for first time and it tastes delicious. Your tips and guide are really very helpful. Thank You.
So easy, thank you! First time ghee has ever worked for me!
*HIGH FIVE* 🙂
I have just found your Ghee instructions, I am going to do this….it sounds great. Everyone seems to think so too. Thank you Sonia….
first of all thank you for the laughter!!!! your comments are great.. and they just kept coming! secondly, thanks for the very clearly instructed and photo documented recipe!
Hahaha, you are very welcome, Kellie! Pleasure is all mine! 🙂
Usually my mother does the ghee in the house, I vaguely remember she said it’s ready when it stops popping. The best butter I could find around here (I live in Switzerland) is made also with cream. So when I looked at your pictures and to what I had in the pan, I was scared never to get ghee. But like there is a cliché that the Swiss are slow, so is their butter. Took me about 20-30 minutes,but I’m there with my golden treasure. Yummy!!! Thanks for the step by step explanation!
These are by far the most thorough and easiest instructions no fail instructions I’ve encountered. I have them bookmarked, and every time I make ghee, I call them up and follow them religiously. The photos are especially valuable, and when my ghee gains a particular form or color, I know exactly what to do next. Many thanks for a great set of instructions. Jim
Many thanks to you for your kind words, Jim! So very happy to hear that my post is helping! 🙂 <3
Hi,
Some use left over burned residue of this desi ghee. Is it healthy to use it please advise.
Thanks,
Asia
I’ve followed your recipe 6 times his year. The last 2 would not solidify…not sure what my br wrong.
I wish I had a clear answer for you, Dan, but unfortunately, I don’t. I’ve had that happen to me a few times, too. It always seems to be happening when it’s particularly warm out and the ghee never seems to be able to completely set… You could always try throwing it in the fridge, but doing that may cause it to become grainy, as that tends to happen when ghee cools down too quickly. It doesn’t affect the quality of the product in the least, though, only the texture won’t be as creamy.
Hope this helps!
Sonia, thank you for your instructional on making ghee. I have tried before with less than stoar results using instructions from my local health food store. Your instructions are far more detailed and I appreciate those details!
I just purchased some Amish butter, 2 lbs to be exact. I will be making this recipe today and hopefully I will see fabulous results.
I’ve no doubt that you will, Cynthia. You’ll see, it’s easy as pie, really! 🙂
Thank you for your very helpful visual Ghee recipe. Made ghee for the first time today and if it wasn’t for your pictures I wouldn’t have made it through. I now have liquid hold sitting on my bench. Yay!
HIGH FIVE!!! 😀
Nice.
I made clarified butter from salted butter. I tasted very little salt in the ghee, but maybe my tongue deceives me. The milk solids definitely taste very briny, though.
Maybe butter behaves differently south of the 49th parallel, hm. Salt is water soluble, not fat soluble, accounting for my low salt ghee.
Yeah, I guess you’re right, Jeffrey. All the salt would definitely have a tendency to cling to the milk protein and stay in the solids that sink to the bottom… Still, I think that unsalted butter is always a better option!
Super simple to follow directions…I am no Martha S. so I have been ordering off Amazon. But took you advice and tried it today. With your directions and 2 friends advice…I did it. But when you say takes a day or so are taking about to solidify? That part no one mentioned to me. It’s been liquid for hours? Thanks
It may take a while to solidify, indeed, depending on the ambient temperature.
This is the BEST instructions I’ve found for making ghee! Thank you so much for your step by step photos, it really helps to know what it should look like. For some reason I never get any solids sticking to the side of the pan, but the ghee is still awesome.
Real happy to hear, Kaz! Thanks so much for the kind words, too! 🙂
I was pleased to see someone takes the time to describe actually making ghee. So many times I see people describing making clarified butter and calling it ghee! Clarified butter does not brown the milk solids and therefore does not have the depth of flavor nor the layers of flavor present in Ghee. Some having problems may be pushing it too fast at too high of a temperature. Too hot too fast will change the makeup and not for the good and could be the problem with graininess. I am wondering how Ghee would be with a fermented(or a kefir) butter other than changing the health aspect of it because of the heat to make it. It could be an interesting flavor, though it could be a disaster I guess.
Thanks again for posting proper directions and on good detail with pictures!
Thank you Curt for your great insight! I’m really not sure about using fermented butter… I tend to lean towards the “disaster” side, but please, if you ever decide to give it a try, do let me know what came out of it! 🙂
Thank you so much for sharing!!! The last time when I made ghee, I burnt it. LOL. This time I followed your instructions and the ghee turned out perfect. Very easy to follow!! Thanks again 🙂
*HIGH FIVE* Happy to hear, Anuja! And the good news is, it gets easier every time! 🙂
Very informative and extremely important when you live abroad i must say !!!! The money i pay for ghee is massive coz I have always known its health benifits but making it from milk and curd always seemed a difficult task altogether and after all the milk I get in gulf is not the same as grass-fed healthy cow”s milk back in Kerala !! you just opened my eyes to a whole new world.. ….now lemme see where my car keys are .. am rushing to the store to buy the organic butter if not the free-grazing cow butter 🙂
Where do you live that you can’t get ghee or even grass-fed butter? You repeated ‘here in Canada you can’t get…’ but Canada is a big place!
Some places I know have ghee: Safeway, SaveOn, Sobey’s, Superstore -lots!, Choices, Whole Foods. Apx $8/400g
Places that have grass-fed butter: Superstore, Costco, Choices, Whole Foods, Save On. Apx $8. These are only places I’ve been and bought at. There will be more. Neither are hard to find in Canada although it may be true in your area.
Oh My goddess! I am fortunate to have access to dairy cows so used fresh cream, made my butter then made this ghee. Words cannot describe the creaminess. It’s like eating hugs, smiles and happiness. Sooooooooo good. Used the buttermilk from the butter making process to make scones and once the ghee was set I slathered it on……life is so hard 😉 hahaha.
You are a fun read! I live in PA and purchase raw butter from an Amish farmer. I will try this today. No more store bought ghee for me anymore.
Thank you so much.
Haha! Thank YOU so much Heidi! Real happy I could help 🙂
Hi I just made the ghee according to Ur instructions,n thanks a million!!!
You are so very welcome, Mary! 🙂
We made ghee for generations (I’m Indian) but I’d forgotten how my mum made it. Your recipe turns out ghee that tastes just like Mum’s! A very high accolade indeed. One thing though, we used the solids too. A teaspoonful in soups and sauces (don’t salt if you used salted butter) and voila! Magical burnt butter taste that’s driving foodies crazy these days. I didn’t darken let my solids darken to the level of yours though.
Thanks for that, Shila! I an seriously flattered! 🙂
Wonderful way of describing the entire process. I would try this. Was awestruck by the way you have written. Good job. !!
Why thank you so much for your super kind words, Vidya. Happy to hear you found the post helpful!
Just amazing instructions! My parents would make it and send it to me. I was always hesitant thinking it is a complex process but you restored confidence in me that this is so so worth making at home!! I love ghee and no store-bought brand comes close to the homemade version. Thank you, thank you!
Aw, but thank you so much for your kind words, really! I am truly flattered. Glad you enjoyed the post and found it useful! 🙂
I love your simple easy to follow directions it turned out beautifully
I can’t wait to try this on my own!! And your comments had me laughing 😂
Haha! Thanks Kathryne! Happy to hear! 🙂
I love it!!
Its so delicious, and perfect for my morning coffee with ghee. Thank you for the pictures and the step-by-step description.
Even though I printed the recipe, the pictures in your tutorial make ALL the difference, giving me the confidence to know that all is well as the process unfolds! Thank you so much!
AWESOME!!!! So glad you found it helpful, Lou! Thanks for taking the time to let me know, too. I greatly appreciate that!
I tried it for the first time, and the smell is amazing, and the colour…Mmmm
Thank you for the receipt, it is easy to follow, and it came out just like you said.
You are very welcome, June! Glad the instructions helped, and thanks a bunch for your awesome feedback! 🙂
Milk solids need not be discarded…you can use it to make a traditional Indian sweet..just add some wheat flour and sauté it and add some sugar and sauté again for fe minutes..you can roll the mixture into small balls ..this is food that every Indian kid fights for..
Thank You et Merci for sharing this, i’ve been curious about ghee but to cheap to buy.
Just used regular no name butter, came out wonderful. I tasted the brown stuff and loved it so no tossing for me.
Hope to find new ideas from you in 2020, have a wonderful year.
Hello. Is it safe to pour the hot ghee into glass bottles??I remember an incident where a lady poured prepared hot ghee into a glass bottle and it exploded which caused a visit to the hospital for burns.
Mason jars type glass containers are the best to use because they are made to sustain the heat.
I make mine a little differently as I have an Aga range with a gas oven. I load all my butter into a Creuset oven, pop the lid on and place in the oven over night. The heat from the pilot will clarify the butter and the milk/water will settle to the bottom. I skim the butter off the top and into a second pan. I finish it by heating it on the stove top and browning any stray milk solids, water or buttermilk. I strain and bottle it as per your post!
Follow the instructions exactly my butters process went completely different and I was unable to follow the steps. Because I couldn’t tell what was happening and the butter did not follow the process outlined here it just ended up a bunch of burnt crap that I had to throw away.
Real sorry to hear, Eric. It’s hard to tell what went wrong… Perhaps the heat was too high, or the pan too thin?
This is the best Ghee recipe I’ve found on line. It’s quicker than some and works beautifully. Very easy to use. I used two pounds of butter and it produced around 2.5 pints of ghee.
Real happy to hear. And thank you very much for your awesome feedback, I greatly appreciate it! 🙂
Love love love this recipe. Been making it for over a year! Always comes out perfect and I agree that the smell is So hard to resist
Awesome! So very happy to hear, Sandy! 🙂
Wonderfully delicious ghee recipe. I learned how to make ghee with this exact recipe. I have made and used ghee for 2 years now. I will never go back to regular butter.
Thank you for a complete, easy to follow demonstration. Everybody that cooks should try this. And, yes, I eat it right from the jar and on everything possible!!!
You are so very welcome, Gayle! I’m very happy that you found the post useful, and thanks a bunch for taking the time to let me know, too. I greatly appreciate it! 🙂
An amazing recipe, very detailed. Thank you! Always use this one when making ghee.
Real happy to hear! Thank YOU Maya, for the awesome feedback! 🙂
Very clear instructions with graphics. It was a cakewalk to do Trina. THANK YOU!!!
Perfect! Excellent pictures!
Hello! Getting ready to make this recipe but I still have a small question. After the process is completed, do we cover the jars while still warm? Or do we have to wait until the liquid cools down instead?
Thanks!
Cover the jars loosely…
Very good description with pictures.
Hey, one question if you don’t mind, I’ve made this a number of times now, and it always takes me at least an hour. If I try to go faster, it boils too hard and wants to splatter out of my saucepan even with a shield. I do 2.5 lbs at a time (10 sticks) and use an induction burner at about 280 degrees until I can gradually increase the temp toward the end without boiling too hard. Any suggestions for speeding it up? I see some that say it takes only 20 minutes!!! BTW, I’m hooked on skimming the solids off the side before they settle and burn. I use them in my coffee Every morning – about 1/2 tsp, delish! Thanks for the great description, I had the same reaction when I first smelled that caramelly toffee-like aroma, and it lingers in the jar as well! Awesome stuff!
I’m guessing that bigger batches take longer to make… so the best way to speed up the process would be to make smaller batches! An hour is a really long time, though. It’s never taken me this long, and from what I hear, induction is faster than electric or gas. Maybe use a bigger pot so you can crank up the heat without having the butter splatter all over the place?
I love this recipe. I have made it at least a dozen times. It usually takes 30-45 min, but I don’t cut up the butter. I also burned it once so I use a lower temperature. It is sooo much better than the store bought, and less than 1/2 the price. My son cannot have dairy , but he can eat this!
Glad to hear, Sara! Thanks for sharing your experience, as well as for the awesome feedback!
Such a great idea. I never thought of making my own ghee to store in the pantry. You know, the more we can do without our fridges and freezers the better. Thank you so much for your clear and precise directions.
Hi soniya…
I love your website.I see all your recipes and I like you more than anyone.I want more beautiful recipes.
Very clear thanks will try it out now!
Just followed your instructions for my first batch of ghee. Thanks for the details and pictures. One question that would make it easier next time, can you state the temperature at the medium and medium low points. I use an induction cooktop which can be changed 5 degree incrementally. I was afraid to cook too high which some people stated was their only problem and I adjusted more than I should. Thanks again
This is the best recipe I have used for homemade butter. The combination of pictures and the narrative is very precise. It is a much better than format than using videos. Thank You!
I meant homemade ghee, of course
Thank you for your great feedback and stellar review, Ajit! I greatly appreciate them! 🙂
Yours is my go to recipe for making ghee. While I’ve made ghee numerous times over the past few years I always refer back to your instructions because of the clear guidelines and beautiful photographs you’ve taken of each stage in the making. You’ve made it practically foolproof. And have given me the confidence when I wasn’t sure I could make it successfully.
Of course there is a learning curve and mine was about knowing how to control the heat. Too low, it takes a long time to witness the stages and too high, well, it just burns.
Thank you for sharing. I’ll keep coming back!
Hi Sonia, I have been making this ghee recipe since 2013 and have never looked back. My partner and I use ghee in almost everything, including once in my homemade soap. In Switzerland and in German speaking countries there is a line of foods called „Demeter“, which means they were cultivated after anthroposophical methods ( after Rudolph Steiner). That means, the cows are grass fed, everything is organic, all plants and animals live their normal, natural lives. This is the butter I use most of the time, and make large batches of 2-3 kg ( 4-6 lbs) at a time. Have found that the amount of butter used is approximately proportional to the time it takes. 2 kg takes about zwo hours. 1-1/2kg takes about 1-1/2 hours. So one lb of butter (454g) would take about 1/2 hour or less. Thank you, ghee did change our lives. We still use butter from time to time, but ghee has become our new cooking oil of choice. Best wishes, Emily
You are so very welcome, Emily! The pleasure is all mine, really!
I’ve made this several times! Love the pictures. They reassure me every time.
Hi Sonia, what a wonderful narration of each of the steps involved with the pictures that no one following this recipe, can go wrong! Hats off to your detailing! I just made beautiful golden colored ghee from the butter I made from the cream I collected from my milk. I feel so so happy and the whole house is fragrant! I have made ghee even before but this is the best and it tastes soo good. Thanks a lot for the recipe with all the details! Looking forward to trying many more of your recipes.
Thank you Manju. So glad you found the post helpful!
Lovely recipe, nice and easy to follow and your pictures are great, was able to match them with what’s happening on my stove. THANK YOU!!!
This is the BEST ghee recipe (for me) that I’ve read on the net. I’m over the moon with my results. Clear details, complete with pictures and I don’t have to skim the foam. I did that once and what a great loss of finished product. This time I saved the cheesecloth, gathered the edges and put a closing clip at the top to keep the solids inside. I plan on using this to ‘butter’ (I should probably say ‘ghee’) my baking pans, it’s covered in ghee. If I’m wrong please let me know.
I have used this recipe several times to make beautiful, healthful ghee. Thank you. I have watched several other videos on making ghee, and one change I follow is not to stir the bottom, as I don’t want to stir up the milk solids. I do stir around the top and sides to encourage the milk solids to sink.
Ok, I followed all your directions (pics were super helpful, btw!). When I poured it out, there was almost no brown gunk at all in the cheesecloth, though there was a layer of it on the bottom of the pot. Is that OK? Did I not cook it long enough? Is it still considered clarified? It’s nearly as deep amber as yours, but maybe not quite as much. Thanks!
All sounds good to me. I think you did just fine, Janice!