
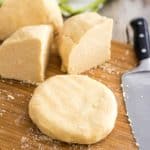
Paleo Pie Crust
I’m not gonna lie to you.
Paleo crust is a bitch to work with. And I really mean that. In fact, you can even capitalize that B.
Without gluten to hold it together, it wants to rip and break and fall to pieces and it will probably have you swear and curse like nobody’s business.
Mind you, I’m probably not the best person in the world to sing the praises of pie dough, as I’ve always profoundly despised making / working with the stuff. Yes, even the one that has gluten in it, which happens to be a real charm to work with compared to this stuff.
BUT, if you asked me whether I was planning on ever making this again, my answer would be, without so much as a second of hesitation: YOU FRIGGIN’ BET!
This stuff is truly DA BOMB!
Despite the presence of a faint, barely discernible coconut-y taste, this pie crust is pretty true to the real thing. Flaky, crispy, melt-in-your-mouth crusty goodness.
Trust me, you really ougha give it a try. Just pop your favorite cd in, or go for a good yoga or meditation session before you start and you should be fine.

First, freeze and grate your lard with a box grater.
If you wanted to give a little bit more of a buttery rich flavor to your pie crust, you could replace about half a cup of lard with ghee. Just freeze and grate it in the same fashion.
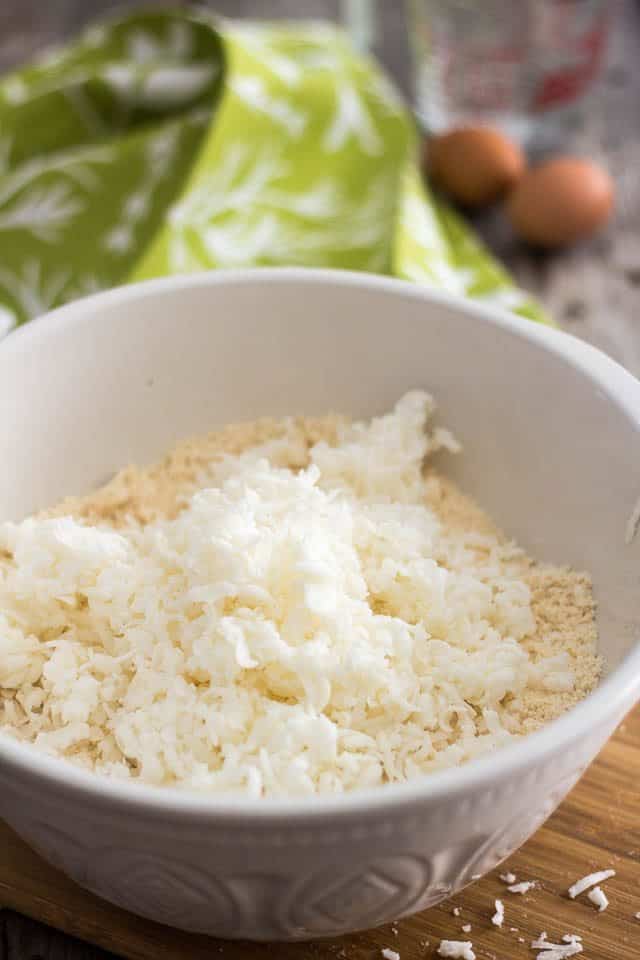
Add dry ingredients to a large mixing bowl and delicately place grated lard on top.
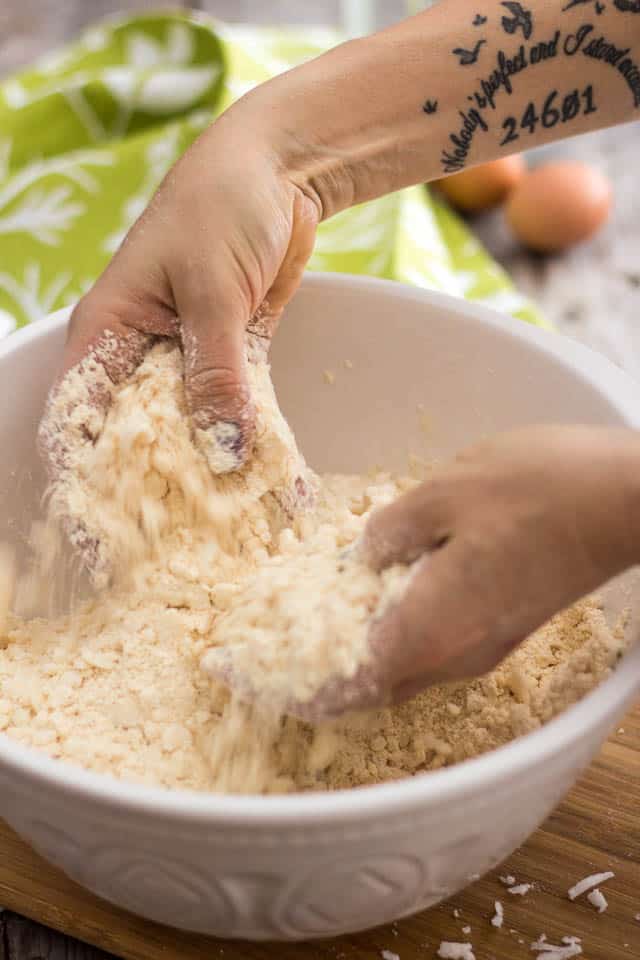
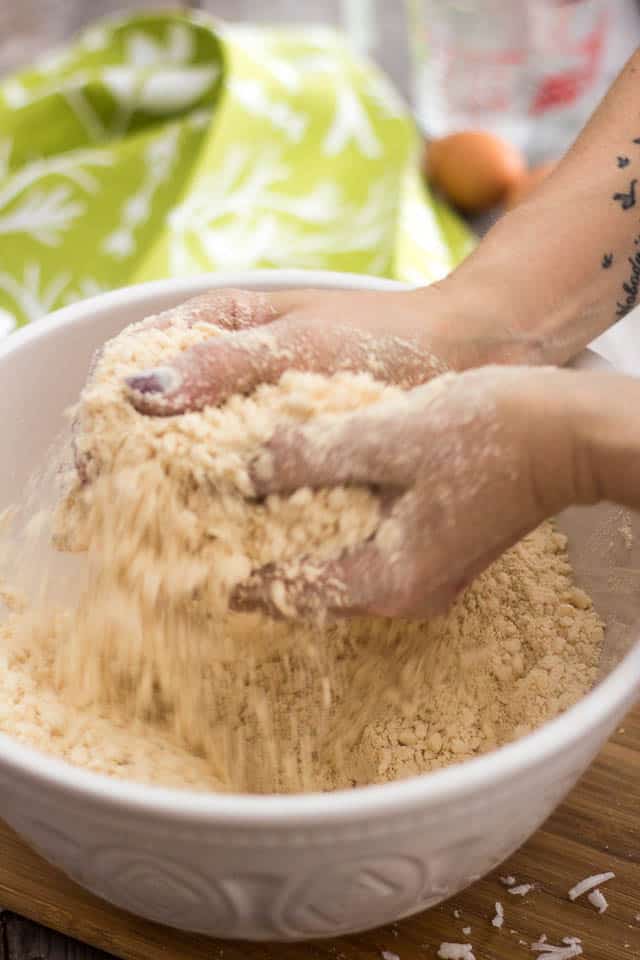
Using your fingers, gently mix and rub the flours and fat together until the mixture resembles fine bread crumbs with a few larger pieces.
You really want to sort of delicately roll the mixture between your palms and fingers, so that the ingredients rub and grind against each other.
Think of this of something similar to washing your hands without your hands ever actually touching.
That is actually the only cool part in the process of making dough. Well, according to me, anyway. I could do this for hours, if it weren’t for the fact that it heats up the fat. So yeah, you don’t want to be overdoing this. In fact, you never want to be overdoing anything when it comes to making pie dough.

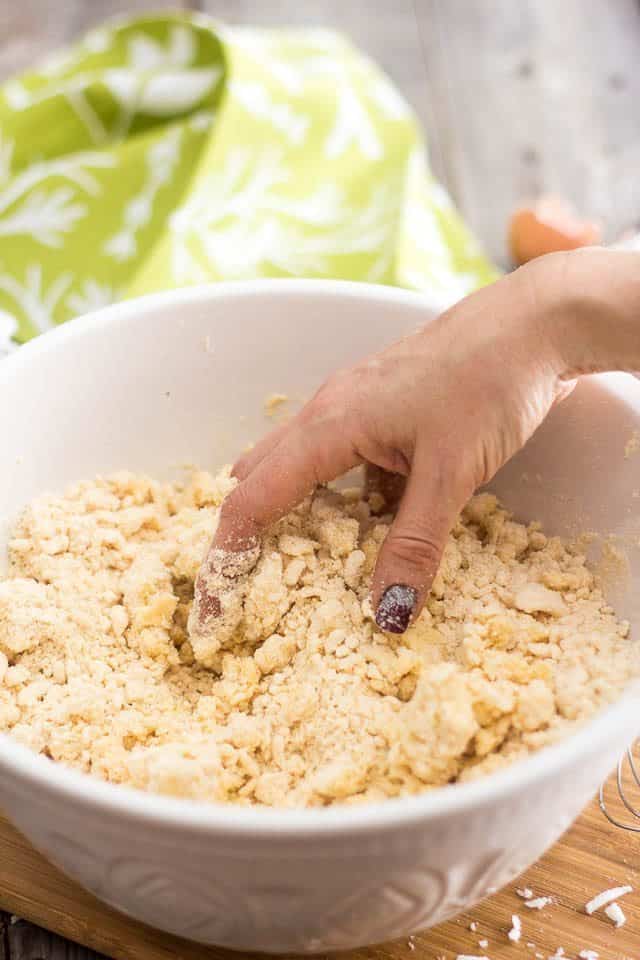
Once you got your flour / fat mixture down to the right consistency, mix water, vinegar and eggs together in a large measuring cup.
Make a little well in the middle of your flour and pour your egg mixture right in.
Again, stir briskly and delicately with your fingers…
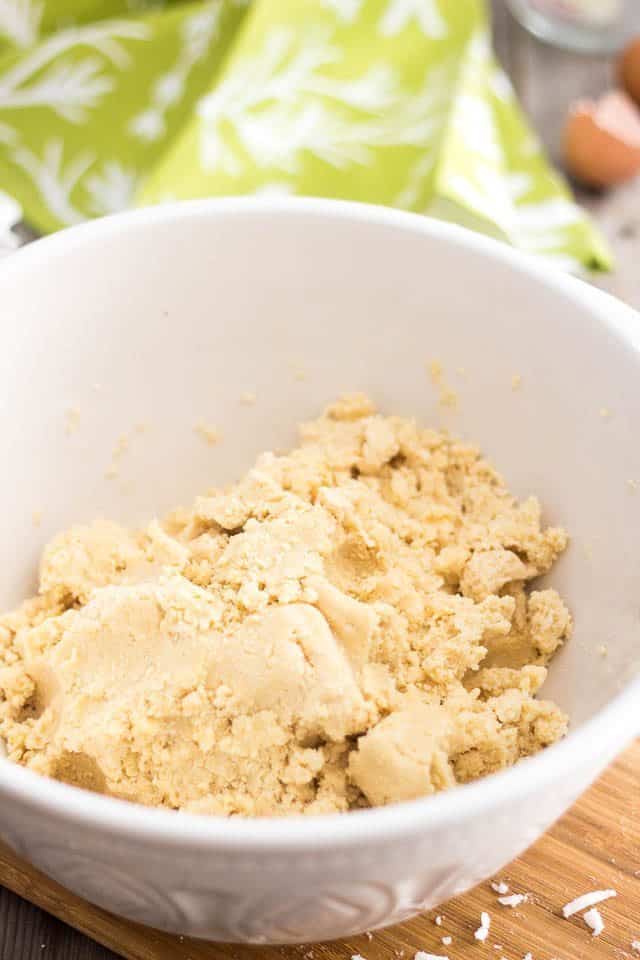
…until some sort of a ragged dough forms.
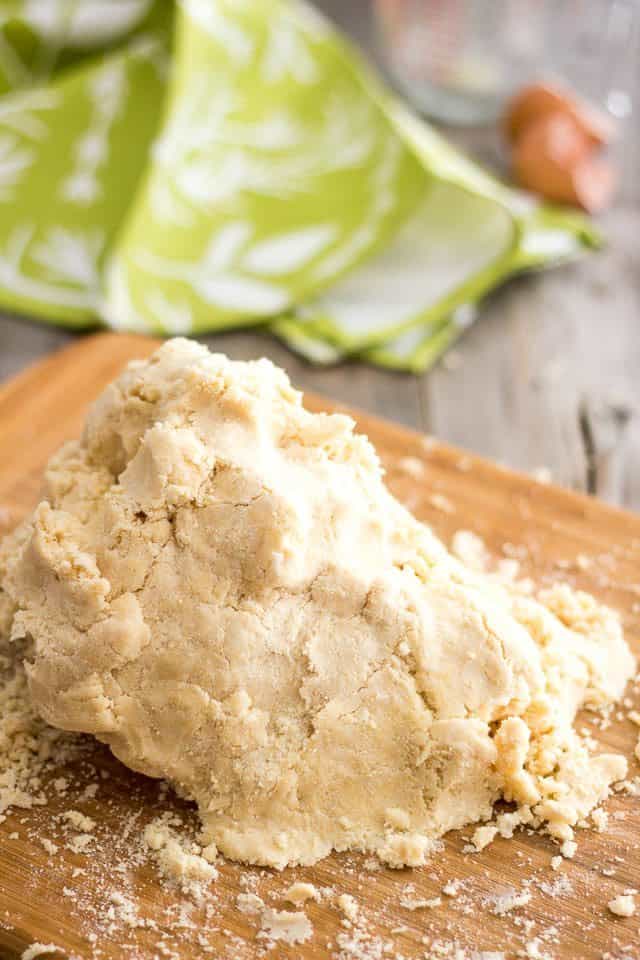
Turn that dough over onto a clean working surface, such as a counter or a wooden cutting board.
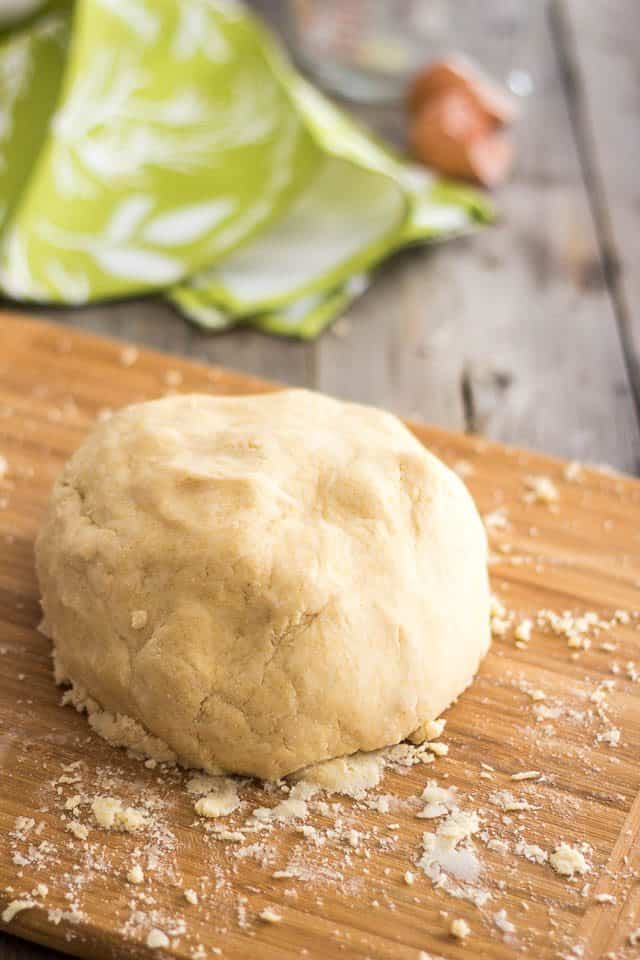
Press the dough into a ball while being careful not to overwork it.
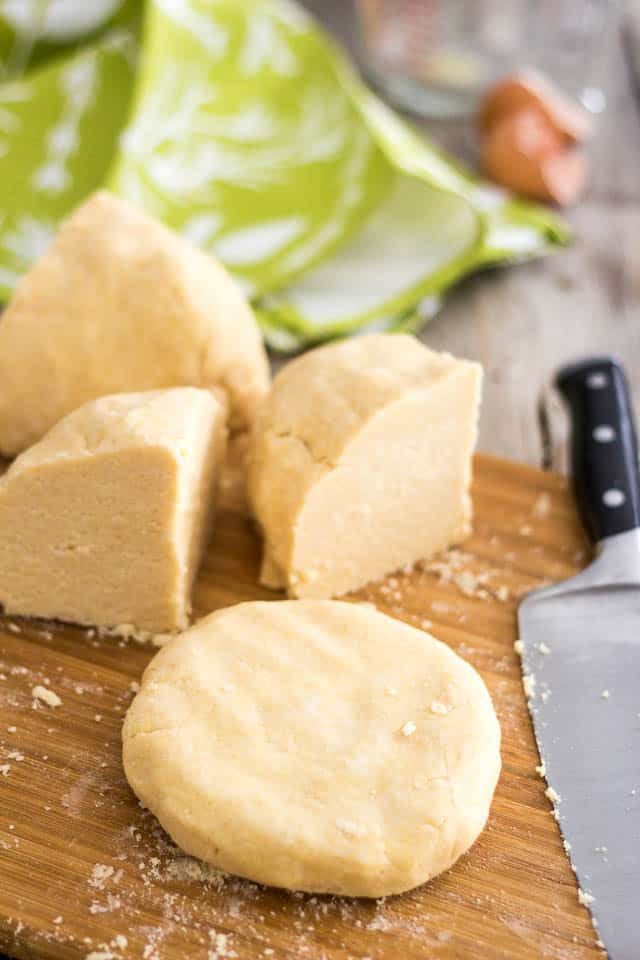
Cut that ball into 4 wedges and press each wedge into a flat disc
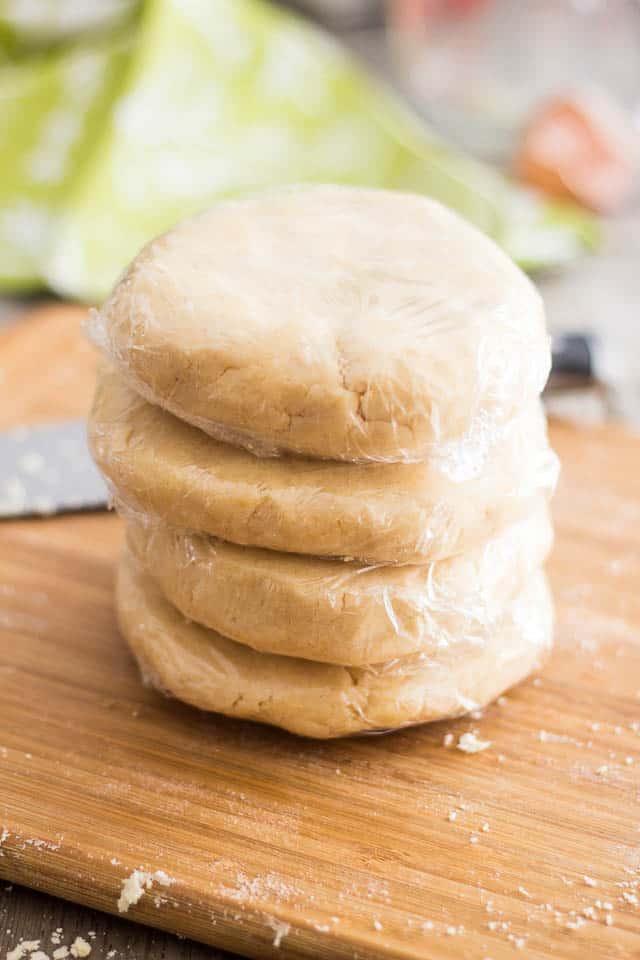
Wrap each disc individually with plastic film and send to the fridge for about 30 minutes.
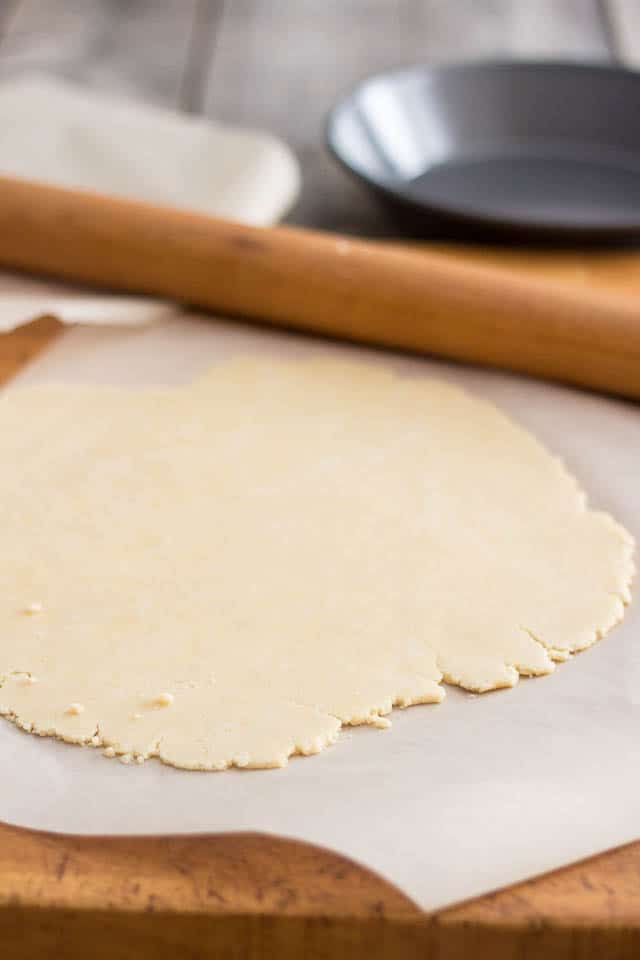
I find this pastry rolls best between 2 sheets of parchment paper. Make sure you let it sit on the counter for at least 30 minutes before you use it to give it a chance to get back to room temperature.
I know, it’s weird. You need to refrigerate this for a half hour then leave on the counter for another half hour. Don’t ask. That’s just the way it is… Pie dough is funny like that. One of the reasons why I have no patience for it… But I’m telling you, if you attempt to roll this while it’s cold, it’ll only crack on you like it’s trying to auto-destroy or something. And if you don’t refrigerate it, it’ll be way too soft.
So be patient. Wait. Making pie dough is a food of love!
While rolling your dough, don’t forget to give it a flip every once in a while.
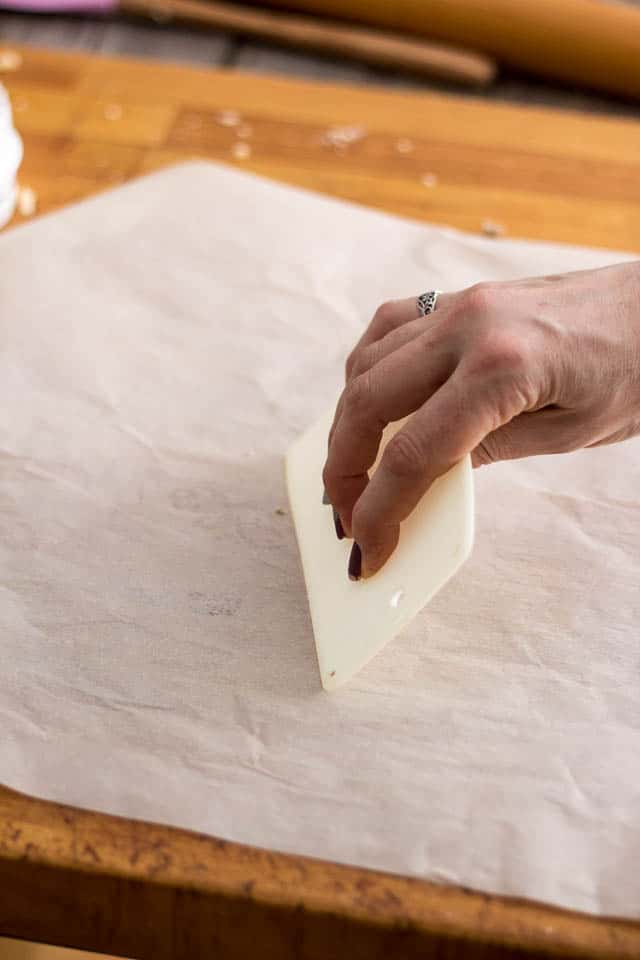
And when you feel that the dough starts to adhere to the paper and refuses to expand any further, peel off the paper off, scrape it clean with a plastic scraper if necessary and place it right back over the dough.
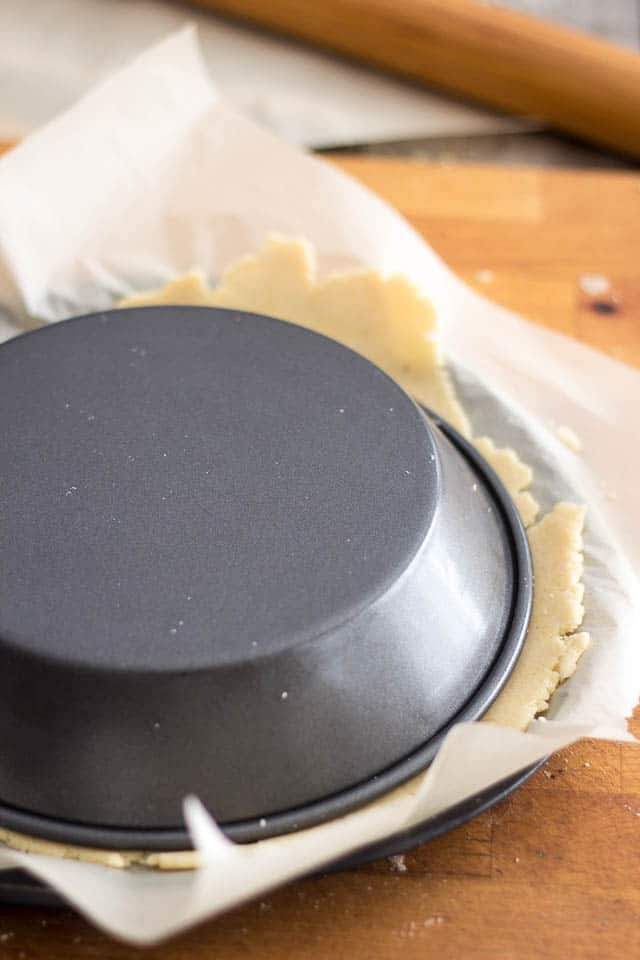
When your disk is large enough to fit into your pie dish, slide it with the parchment paper onto a pizza plate.
Peel off top paper and place pie dish over the dough. Flip the whole thing upside down so the dough falls right into the pie dish.
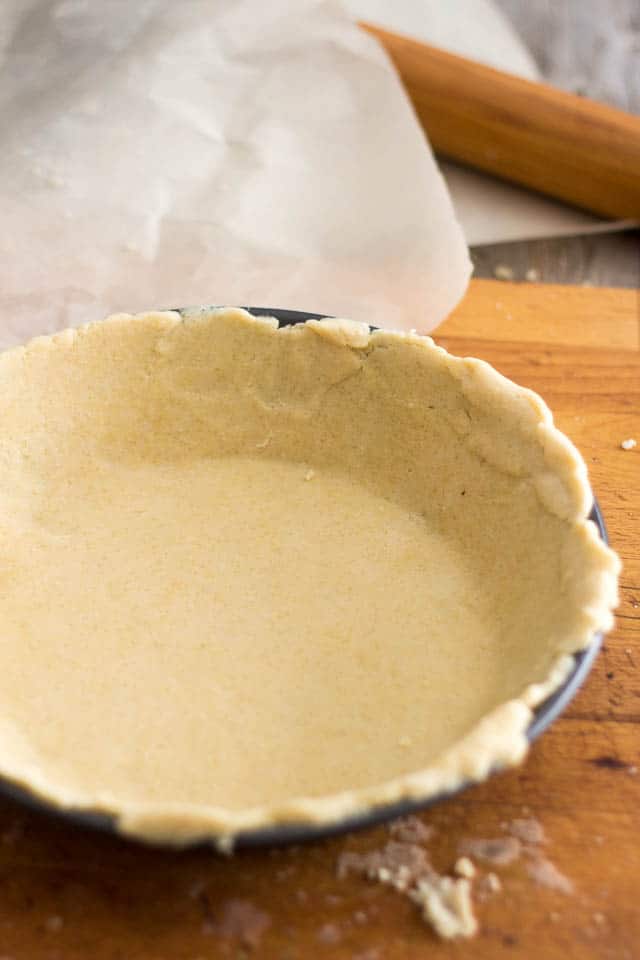
Peel off parchment paper, reposition dough if necessary and fix inevitable cracks and tears.
Not so bad, after all, is it? I’d say this pie shell is looking pretty decent! Just be thankful for the fact that pictures don’t record sound…
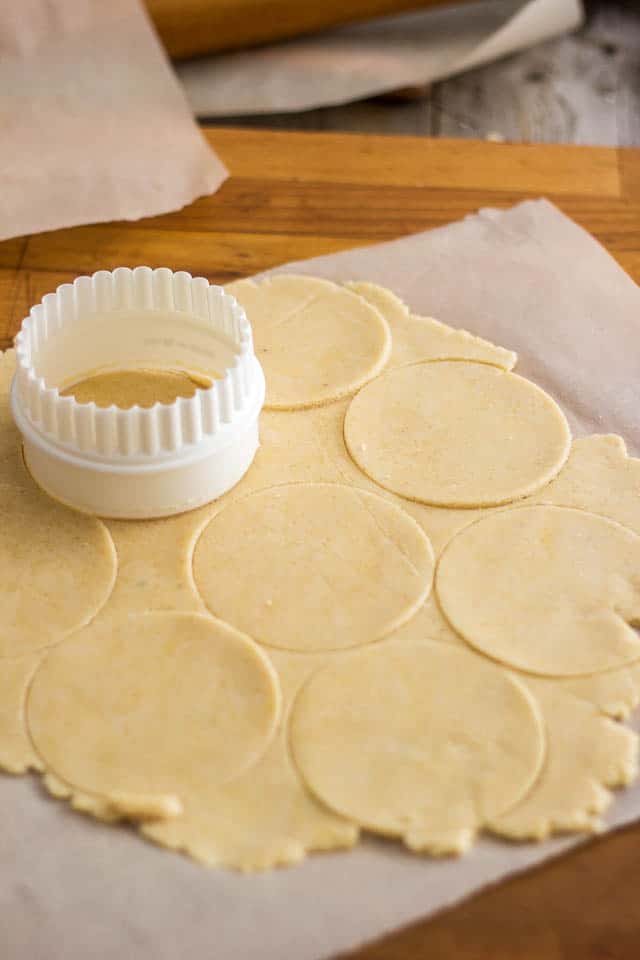
If individual pies is what you are after, you can most certainly do that too.
Simply cut out small disks in the dough with the help of a cookie cutter of the appropriate size
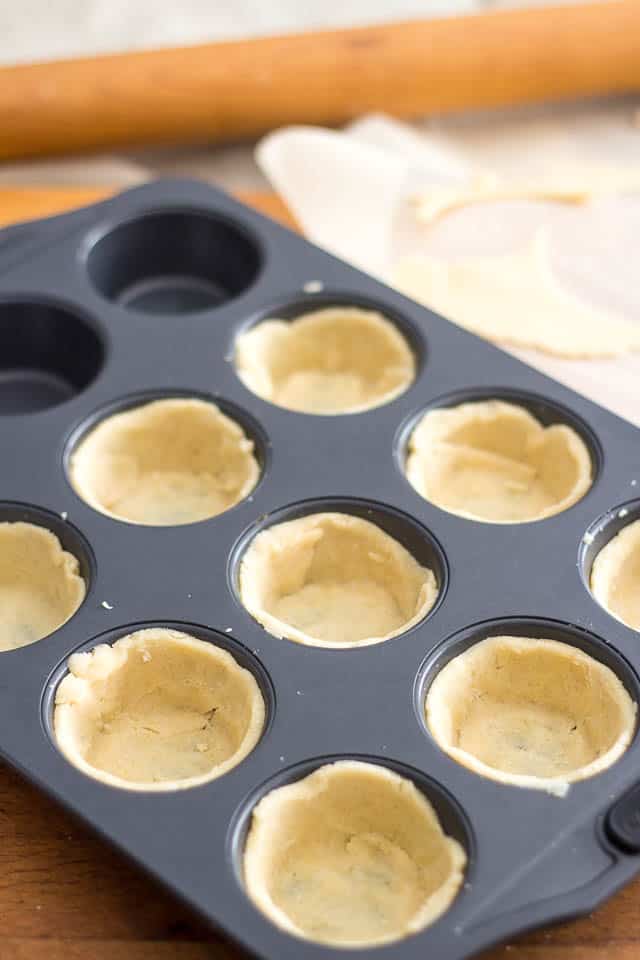
Fit the disks into individual pie dishes or muffin pan.
Be warned, though. Despite being smaller, these disks crack and tear just as much, if not more, than the full size deal. But, as you can see, they are very easily fixed. Simply position the dough right and press on those cracks: they will virtually disappear.
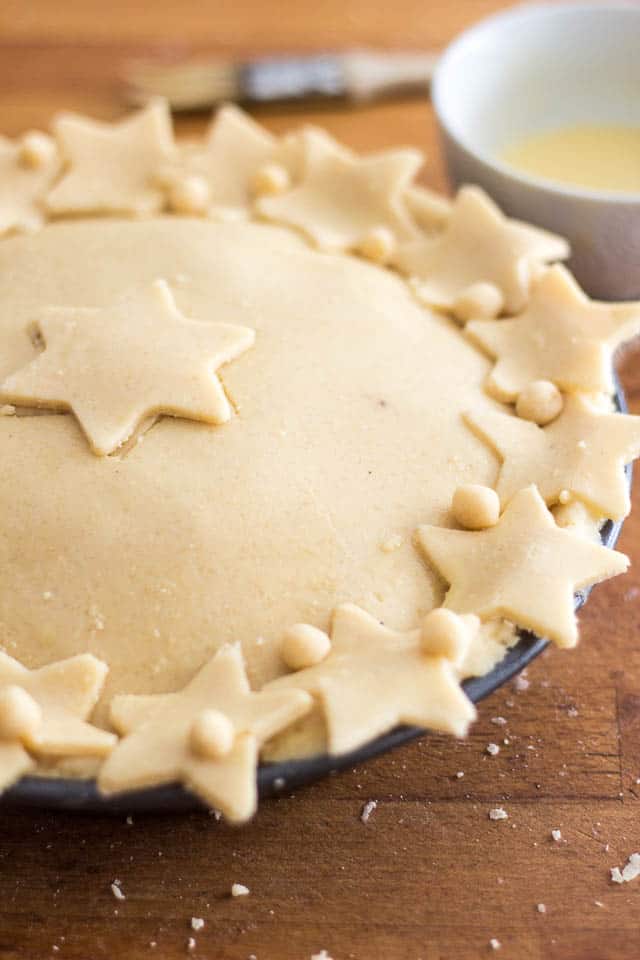
And finally, here’s the finished product! See? It’s even possible to make pretty designs.
Sure, this pie dough will try your patience, but I think that you’ll find it all worth your while in the end. And very rewarding, too!
Oh, and did I mention deliciously tasty? Oh yeah! That too!
Paleo Pie Crust
Ingredients
- 2 cups almond flour, sifted
- 2 cups coconut flour, sifted
- 1 cup tapioca starch
- 1 tsp Himalayan or fine sea salt
- 2 cups lard, frozen and grated
- 1/2 cup icy cold water
- 2 whole eggs
- 2 tsp white vinegar
Instructions
- In a large bowl, whisk flours, tapioca starch and salt. Add grated lard and, using your fingers, gently mix and rub it in until the mixture resembles fine crumbs with a few larger pieces.
- In a measuring cup, whisk water, vinegar and eggs together. Pour over dry ingredients, stirring briskly with your fingers until some kind of a ragged dough starts to form.
- Turn onto a working surface and gently press into a ball.
- Cut into 4 wedges and, while being careful not to overwork the dough, form each wedge into a disc. Wrap in plastic film and refrigerate until chilled, about 30 minutes (At this point, you can safely refrigerate the dough for up to 3 days.)
- Take pastry out of the fridge at least 30 minutes prior to rolling it to give it a chance to come back to room temperature. This will help it roll better and not crack so much.
- Roll out pastry between 2 sheets of parchment paper. Take care to flip it over from time to time and when you feel that the dough starts to adhere to the paper and not expand all that good, peel the paper off, scrape it clean with a plastic scraper if necessary and place it back over the dough.
- When disk is large enough to fit into your pie dish, slide it with the parchment paper onto a pizza plate. Peel off top paper and place pie dish over the dough. Flip the whole thing upside down so the dough falls right into the pie dish. Peel off parchment paper, reposition dough if necessary and fix inevitable cracks and breakage.
- For top crust, if using, simply turn the disk over the pie filling while it still has the bottom parchment paper attached to it, then peel it off once the disk is in the right position. Press down and seal both layers by pinching the edges together. For better adherence, brush the bottom edge with beaten egg, coconut milk or a mixture of both before adding the top layer.
- Brush egg / coconut milk mixture all over the top crust (if using) and bake in 400°F oven for about 18-20 minutes or until golden brown.
Nutrition
If you’ve tried this recipe, please take a minute to rate the recipe and let me know how things went for you in the comments below. It’s always such a pleasure to hear from you!
You can also FOLLOW ME on PINTEREST, FACEBOOK, INSTAGRAM and TWITTER for more delicious, healthy recipes!


118 Comments on “Paleo Pie Crust”
This looks awesome! The stars are really cute also. And, this is really random, but I just wanted to ask – is your 24601 tattoo a reference to Les Mis?
Thank you very much Erin and yes, you are totally right: this would be Jean Valjean’s prison number! I see you’re a fan, too! 🙂
its seems to be a healthy foods its probably recommended by any dietitions.
Hello. I am a student at the University of Texas at Austin. Fell in love with your blog. Your personality gleams through your words & I appreciate that! Anyway! I want to make mini chicken pot pies. I was going to just cut your recipe in half because I didn’t think I needed that much dough. Is this idea plausible? Also can I use vegetable shortening instead of lard? Lastly, I don’t have any ghee. Can I add butter for a richer butterier taste? Thanks for your help!!
Best
Maria
You can very well cut it in half, Maria, that will not be a problem. However, I cannot recommend using the abomination of a product that is vegetable shortening! 😉 I would probably work, I just can’t recommend using it… As for butter, you could most certainly replace some of the fat with it, but I wouldn’t do more than half.
Oh, and thank you very much for your kind words, Maria. I greatly appreciate them! 🙂
I agree with you about pie crust. All my life I dreaded tackling it, and it was always an ordeal – worsened by the effortless pie crust making, of my mother and my best friend. Since you admitted the reality of pie crust, I might venture to try your recipe, because you have addressed all the pitfalls. Pray for me, folks!
Hahaha! Good luck, Leslie! Please share your experience! 🙂
Wait a sec woman…what about that awesome tat? Is it new or you never showed it off before? Looks rad.
OK, now I have to go back to the beginning of the post because I stopped reading it the moment I saw the tattoo on your forearm…sorry…
Ah, but I did show it off! This was my 40th birthday present to myself. I posted this on the day I got it, and a few days later, I posted a picture of the completed project after it had had a chance to heal a bit and my daughter had come for a visit.
I take it you like it? It’s one of my favorites! 😀
I’ve finally managed to read the post and look at the recipe without being distracted – too much- by that awesome tat.
It’s true that this crust looks like a lot of work, but man this looks like the real thing. No doubt about that. And I’m betting that it tastes even better than it looks…
Honestly? It’s amazing! And my… thank you so much for all the nice compliments on my tat! You’re just so sweet! 🙂
a perfect pie ,looks beautiful!happy new year,Sonia!
Thank you Simona and Happy New Year to you too! 😀
FINALLY! A crust that I can feel good about. Confession: I am not a huge “normal pie” fan. I just like the crust. So, when I make “pies” they are really just crusts…with no filling. Now, I can make two, because they are healthy! yesssss.
Uh oh! If you are such a huge fan of pie crust, I feel it is my duty to warn you that this crust is also extremely good… raw! I never cared for raw pie dough before, but this one is different, I swear. I couldn’t stop eating it. So there. Consider yourself warned! 😉
this sounds like an amazing pie crust!
Thank you, Dina! 🙂
Is it possible to prebake this crust? My brother-in-law is GF and I’m in charge of making pie for his birthday. I’ve never done a crust without flour and this is the best looking one I’ve come across! I’m making a custard pie that requires a partially prebaked crust. With a normal crust I’d line it with foil and cook it for 20 minutes or so before filling it. Do you think that would work with this?
Absolutely, Becca! This handles just like normal pie dough, except it wants to break to a million pieces… but it’s very well worth the patchwork, trust me!
Wonderful! I’m excited to try it.
Cool! Let me know how it goes! 😀
Can we use butter or coconut mixed with but to replace lard?
I don’t know, Tiffany, to be honest, I’ve never tried it, but I hear coconut oil works great in pie dough, so I wouldn’t see why not. Just make sure you freeze the fats before adding them to the flour mixture. If you do try it, please let me know how it went, and I will do the same! 🙂
Butter and coconut oil is what I meant! Lol
This crust recipe is really good…I served it to my non-Paleo friends and they licked the plate clean! I didn’t have lard, so I substituted butter and it still worked out. I rolled it between sheets of waxed paper, and it mostly stayed together when I flipped it into the pie dish. Thanks!
Great tips, Angela. I’ll have to try that! And thanks a bunch for the awesome feedback, too. I immensely appreciate your taking the time to share your experience! 🙂
I’m trying out a new Lemon Tart recipe for our 3rd Annual Pie & Pie party (bring a homemade pizza pie or dessert pie to share with friends) and the crust is a mix of regular flour and macadamia nuts. I am considering swapping out the regular flour for coconut flour, sub those macadamia nuts for the almond flour and then following your recipe the rest of the way through. Thoughts?
I’m not sure, Allison. Guess I’d have to see your recipe, but why not simply use this one instead of modifying the other one?
I’m hoping to make peach pie using this pie crust. Do you know if I can make this pie ahead of time and freeze it? I want to just take it out of the freezer and bake it so that I can serve fresh baked pie at a later date.
Absolutely! This crust freezes really well, Karen.
Cool! Here’s just the answer I was looking for…Thank you 🙂
This looks awesome, I can’t wait until I try it this afternoon. Would you mind if I put a link to your recipe in my blog post about it? Thanks!
I wouldn’t mind at all, Misty! In fact, I would greatly appreciate it. Hope your pie turns out great. Keep me posted! 🙂
I really can’t wait to try this. While I am also watching my no nos from the blood type diet, which unfortunately coconut is on, I am going to go ahead and give this a shot. It really sounds delicious. I can probably use it as a cheesecake crust as well. Thanks for the recipe.
What would be a good, very healthy filling that you suggest? I’d love to try this ASAP, but wanted your suggestions!
Meat, or eggs, of course! I’ve used this pie dough to make meat pies, but it would be great for quiches as well! 🙂
What a great idea for a high-protein dish. Ironically, I plan to make a breakfast quiche for dinner tonight!
Awesome! Hope it turned out great! 😀
Hello, I was craving a tomato tart (I have tons of cherry toms harvested) and also wanted to bake my 102 year old Dad a pie and this fit the bill!
Making the crust was easy peasy – though I used Spectrum instead of lard as It’s all I had. It looked just like your pictures.
This is a baker that’s used to smooth, gluten-filled pie crusts (no longer) and I found the texture quite close to the old. Sure, it’s a little on the tough side to work with but the end result was wonderful.
Thanks for sharing a great recipe!
I take that as one major compliment, Syd. Thank you so much for taking the time to leave such great feedback. Hope your dad enjoyed the pie. (And WOW! 102 years old. That’s something!)
I have been researching lard vs. butter and I’m curious on how this would change the end result. Someone asked if they could use coconut oil, you said it works with other crusts, so it probably would work here. Someone else said they successfully made a crust with shortening. Obviously these alternatives work, but even with their success in a tasty, workable crust, I wonder if they are missing out on the supposedly true flakiness that lard supposedly gives?
What I have apparently learned is that lard gives the best flakiness, but butter would give better flavor. Do you generally find this to be true? If so, I’m torn between the two as I want both. I suppose I could use your recommended substitution of 1/2 cup ghee for lard, but how much of that great flakiness do you think I’d lose? I don’t know which way is best to get the ultimate true flaky texture, with a wonderfully buttery taste. What do you think?
I think you should try going half and half, Jeff, see what it says!
But keep in mind that gluten also plays a role in the overall flakiness of a pie crust. In eliminating all traces of it, you have to expect a crust that’s a tad less flaky, but a lot tastier. That’s a compromise I’m willing to make! (not that this crust isn’t plenty flaky, mind you!)
Can’t wait to hear how your experiment went. 🙂
I’m just wondering how many pies this recipe makes? I’m sorry because you must have said somewhere and I missed it. My eyes are very bad on the computer. It just seems like such a massive amount of flours… does it make only one pie?
Thank you!
It does mention in the recipe that this yields 4 pie crusts, Ruth. So depending on how many crusts you use for your pies (i.e. are they covered pies or crust on the bottom or top only), you could be making 2, 3 or 4 pies with this recipe.
Hope this helps!
Thank you!
Can this be made in a food processor instead of using your hands?
Honestly, I’ve never tried making dough in a food processor, Ani, so I really wouldn’t know. Best way to find out is to give it a try, I guess! 😉
I made this in a food processor and also used refrigerated, not frozen, lard. It turned out perfect!
YAY! Happy to hear, Mary. Thanks for taking the time to let me know! 🙂
how would this work for an apple pie that needs a longer baking time?
Bake it at a slightly lower temperature, Marci, like 375F…
I am allergic to almonds, would this recipe work with 100% coconut flour?
I’m afraid not, Norm… are you allergic to all nuts or is it just almonds? Maybe you could try raw hazelnut flour, or even cashew flour.
Due to an allergy I need to avoid all nuts. What else can I substitute for the almond flour?
Thank you
We tried the recipe tonight, and WOW! I made an apple pie, and it was ridiculously delicious! Definitely didn’t feel Paleo! I made a few changes in both the recipe and in the technique. I used 1 cup palm shortening (refrigerated), and 1 cup grass fed butter (refrigerated) just cup up into cubes. My mom is a vegetarian, and would NEVER eat this if I made it with lard! I used my food processor to make the dough, and I produced a very smooth, rollable, dough. I didn’t have the trouble that you did with it breaking apart. It was very easy to work with. The dough was easily transferred into my pie plate, and MAN this made a beautiful pie! Very very pleased with this recipe! Thank you so much! This recipe made enough dough for 4 sheets of pie dough! Enough for a top and bottom for 2 9″ pies!
Thank YOU so much for taking the time to leave this amazing feedback, Lindsay! So happy to hear that the pie dough was such a big success! I will definitely have to try adding ghee to my dough next time I make pie (which should be fairly soon). It just HAS to be soooo tasty! Thanks for the tip! 🙂
Lindsey, could you tell me what temp you baked your apple pie at? I’m attempting one myself using this crust and the recipe I have call for a temp of 325 degrees. Thanks so much for your comment! It was very helpful! 🙂
Also, Sonia, could I use Apple Cider vinegar in place of the white vinegar?
Thanks!
Of course you could, Amy! In fact, you really should…
Hi–I think in a comment above you mentioned that this dough freezes well–do/did you freeze it before or after baking, or would either work?
I will be getting home for Thanksgiving the night before and probably won’t have the time to make a pie from the beginning–but I was thinking I may be able to freeze the dough and bring it home with me, and then just fill and bake.
Either option would work great, Emily. You can freeze the dough then thaw and roll, or make the pie ahead of time, freeze it and then bake it, or even bake it and then freeze it…
Hi! I’ve never made pie crust that has vinegar in it before, can you taste it? I’m nervous about making a fruit pie with a vinegary crust! It looks wonderful though!
You can’t taste the vinegar at all, Danielle. Adding it only helps in making the crust flakier!
I wondered what role the vinegar played in the recipe. Thanks for mentioning that.
To be honest, it’s probably more superstition on my part than anything else. Vinegar is said to make pie dough more tender, lighter and flakier because it helps in preventing the formation of gluten. Since this pie dough doesn’t have any gluten to start with, it’s probably not necessary, but I’ve always used it in my “standard” pie dough with very good results, so I chose to use some in this dough as well. I suppose you could safely replace it with water.
Hi!
This recipe looks fantastic. I’m wondering if another starch could be substituted without changing the outcome? I have arrowroot on hand, but not tapioca starch.
Thanks!
Arrowroot will work just fine, Kellie!
Hey Sonia! I’m attempting your amazing-ness today ~~ This is our first Paleo Thanksgiving and I normally make about 10 pies for my family and friends, so I’m hoping the pie crust Gods of Thanksgiving grant me extra help today!!!! As always, thanks for the very informative and step by step directions/pictures…you’re so good to us!!!! I’ll post pics on Instagram & tag you…well that is, if things turn out well! No need to embarrass myself or you needlessly 😉 ~~Michelle
10 PIES!!!??! Oh my, you are one patient woman, Michelle! I love pie, but I hate making it… I could never make 10, I would just die. I hope things go well for you, I can’t wait to hear all about your experience. Oh, and thank you so much for your kind words, you totally rock! 🙂
You’re not kidding- this stuff is a frigg’in nightmare! I cursed the entire time I was preparing it. And, I haven’t even gotten to the roll-it-out portion of the process. 🙁 I sure hope the taste is worth all of this aggravation.
Oh my… and I thought it was a nightmare only from the point where I actually started rolling it, and I’ve always found any and all pie dough to be a nightmare to work with anyway. Hope things got better for you, eventually!
This was fabulous! Great taste and texture even though I rolled it out too thin. Wonderful for my turkey pot pie that I’ve been missing! Thank you for giving that back to me! Only change I made was using a food processor to make the dough due to laziness lol. Happy holidays!
HA! I might very well take the lazy route too next time I get to whip up a batch! Glad you liked the crust, Brandy! 🙂
Do you think this will turn out if I use egg substitute? My husband is allergic to eggs. I have been successful in using egg substitute in other baking recipes but not pie crust. Still trying to perfect a pie crust. UGH
Thanks
Honestly, Joan, I have absolutely no idea. I never tried to pull that one off… especially not with gluten free pie crust! Not sure I would dare try it!
Thank you! The pie crust was PERFECT! The whole family loved it (and no one eats paleo except for me). I used a mix of half butter, half leaf lard. And, I made sure the bowls, as well as the grater were in the freezer for a long time before I started working. Your instructions were very clear, and the photos helped a lot. I am so happy to be able to make a pie that is delicious, with ingredients that fit my lifestyle as well as my family’s taste buds!
Thank you so much for taking the time to leave such amazing feedback, Alison. I greatly appreciate that. Super happy to hear that the crust was to your liking, too! 🙂
Hey Sonia any suggestions for a paleo version of crumb topping vs a full crust on top of pie?
I’ve not yet come up with a crumble recipe per se, Ann, but I think the mixture that I used to make my paleo date squares could be a very good place to start. I’d perhaps tweak it a little bit to make it more “crumbly”, i.e. use chopped almonds as opposed to sliced, and maybe add a handful of chopped pecans in the mix, too…
I figure half the recipe, or even one third would be plenty to cover a pie.p
Do you measure 2 c. lard, freeze, then grate. Or freeze lard and grate into 2 c. measure?
Measure, freeze then grate, Eleanor.
Hi Sonia, thanks for the recipe. You say that this makes four pie crusts. What size pans would that be, please?
I use a standard 9″ pie dish, Barry.
Have you tried it in a food processor with ghee yet? I know that other people have tried butter with great success. I was wondering about frozen ghee with it.
I’ve tried it with half ghee, half lard in a food processor and it worked beautifully, April.
Thank you for this recipe. The pics are so helpful. I have done your recipe 3 times now, but I did not use lard. I used butter and crisco mix, which worked well. I used coconut oil the first time and it was too difficult to keep together. I love having being able to make it the day before and and roll it out at my convenience. I have done blueberry straight and mixed with strawberries where I cooked the insides first in a saucepan with arrowroot and flax seeds to thicken, adding brown sugar and cinnamon. I also did apple without cooking first and found the fruit really does need to be cooked first to get soft, since the crust only cooks for 20 minutes. My husband who is not gluten intolerant loves this crust!
Very happy to hear, Kassie! Thanks a bunch for taking the time to leave this awesome feedback, too. I sincerely appreciate that! 🙂
Hey, I don’t see any pics of how the crust looks after it’s been baked! I might give this a try with a blueberry pie.
You are so right, Paula; I should add a link to that in the post! You can see the finished, cooked product here and here.
What about using palm shortening with grass fed butter instead of lard- any ideas if that works? I don’t have time to make lard right now and wouldn’t dare use the one at our store….
WOW WOW! This is an awesome recipe! It came out great! I have finally found a crust comparable or better than traditional with wheat flour. I used 1/2 organic palm shortening since that’s what I had and half grass fed butter. Freezing both and shaving into small pieces worked perfectly in my Cuisinart. It came together in a ball; I chilled and rolled it out without any problem. Have to watch the temp and baking times- it is a little prone to burn I think. I made a peach custard pie like the one in Joy of Cooking- adjusting the modifying the flour in the custard with gluten free and mostly grain free mix by Bob’s red mill. Used coconut sugar instead of white – and it’s a winner!! Thanks so much for your efforts to come up with a great recipe that WORKS!!!
Wow. Thank YOU so very much for your awesome feedback, Brett. Your words are like pure music to my ear. Honestly. I am so super happy to hear that you are loving this pie crust recipe that much!
Testimonials such as yours are what make all that time spent coming up with new recipes worth the while. You are a true gem! 🙂
Hi,
How do you measure the lard to freeze it? Does it scoop out of the jars easily once it cools?
Thanks
What do you mean, Heather? When at room temperature, lard has a consistency that’s very similar to that of butter; it’s somewhat soft and spreadable, so you can easily measure it with a measuring cup.
I made this crust last night to use for your pecan pie recipe. THANK YOU, it’s so amazing!!!!!!! I tried THREE different Paleo/primal crusts for Thanksgiving pies, from my favorite Paleo bloggers, and none of them came close to your recipe. I processed mine in the food processor with ease. I found I needed to use more dough than indicated in your recipe, and also found that pressing the dough into the pie pan was easiest. I couldn’t be happier with the end result. After baking, it was golden, held up and nice and flaky. My SAD dad said to mention that it was “Damn good,” and that’s saying A LOT. This is the ONLY pie crust I will EVER use from here on out! Thank you, thank you thank you!!!
WOW! Thank YOU so much for taking the time to leave such amazing feedback, Amy. I greatly, sincerely appreciate that. And what kind words you spoke, really. I’m all flushed and flattered. 🙂
You and your dad are total gems!
Oh my…this crust is magical. It’s flakey, crispy, delicious. I absolutely love this recipe, plus the instructions are very easy to follow. I made it with butter instead of lard and used it for galette des rois – it came out just like the real pie crust. Mindblowing. Thank you so much for this recipe, you’re a genius.
Awesome!!! So happy to hear that this crust worked out that great for you, Maria. Thanks a bunch for taking the time to let me know, as well as for your super kind words. You’re a real gem! 🙂
Loved following your pie crust recipe. yes, it was a B…. but easier because I embraced the chaos.
Wow, look at that beauty! I say you totally nailed it! Can I hire you to make mine? I don’t think I’ve quite learned to embrace the chaos yet… 😉
Hi, is here a rather low carb alternative I could use instead if fttapioca starch? I have flax meal and psyllium husk and oddly enough linden flour, or just more almond flour/coconut flour or even would pistachio meal work? Also I really can’t use lard as it is so high in fat so could I use all low fat butter or extra virgin oil or something reasonably low fat instead?
Thank you very much, Anni.
Hi Sonia,
I made this pie crust this weekend for an apple pie. I made half the recipe and used ¾ c palm shortening (room temperature) and ¼ c clarified butter (from the fridge). I found to the dough to be fairly easy to work with. I wasn’t sure how long to bake the pie, so I went with my original recipe. I baked it at 425 for 20 minutes, then lowered the temp to 375, covered with foil and baked for another 20 minutes. It was way too long because the crust turned out very dry. I’m wondering if I should prebake the apples at 425 for 20 minutes then assemble the pie and bake at 400 for 20 minutes. Do you think this would work?
Absolutely! Or you could sauté your apples in a skillet to soften them up before adding them to the crust…
Is the calorie count correct….wow! I would really have to think twice if it is true 1,749
The calorie count is for the entire crust, Jackie. You’d only be eating about 1/10 to 1/8 of that in a slice of pie.
Have you ever made hand pies with this crust recipe?
I haven’t, Diana, but I really can’t see why it wouldn’t work…
I love the combination of flours! I’ve been trying to look for a flour blend that uses a good amount of coconut flour as well as almond and I’m wondering, do you think this ratio of flours would work in other recipes? For instance, do you think combining 2 cups almond flour, 2 cups coconut flour, and 1 cup tapioca and using it in a chocolate chip cookie recipe would work? I know it seems a little far out, but this is the best combination of flours I’ve seen yet.
Not sure, Willow… I think that the amount of coconut flour would be a little high for cookies or cakes. I’d probably go with something more like 2 to 3 cups almond flour to 1 cup tapioca and 1/2 cup coconut flour.
Thanks for posting this! I made this over the weekend (for your amazing pecan pie recipe!). I didn’t have any tapioca starch, but I used tapioca flour after googling and finding out that they’re pretty darn similar. I probably should have halved the recipe, as I have a lot of leftover dough. Do you know how long the uncooked dough keeps in the fridge/freezer?
You should be able to freeze it for up to a few months, Tori. Just make sure that you wrap it really really well, so air doesn’t get to it. Kept in the fridge, I would say no longer than 5 days.
Just was wondering should I pre bake at all for mini quiches? Or, just bake as suggested with egg mix. Thank you.
I wouldn’t pre-bake… I only ever pre-bake if the pie filling will not be going in the oven.
Thank you
I commented on this crust under the pecan pie recipe, but it’s so good that I need to leave a comment here as well. I only had ghee, so that’s what I used, and it was great! I also forgot to let it rest after refrigerating for 30 minutes. Maybe it was beginners luck (or maybe from all the ghee), but I didn’t have any issues of cracking or breaking. This will be my go-to crust recipe from now on. Thanks so much!!
YAY! Happy to hear you had such a positive experience with the pie crust, and thanks a bunch for taking the time to share it with us! You rock!!!
For this recipe, did you mesure the lard before or after grating it?
You need to measure first, then freeze then grate. 🙂
Hello, canm i know please why did you add vinger ? And any replacement for coconut flour ? Thanks