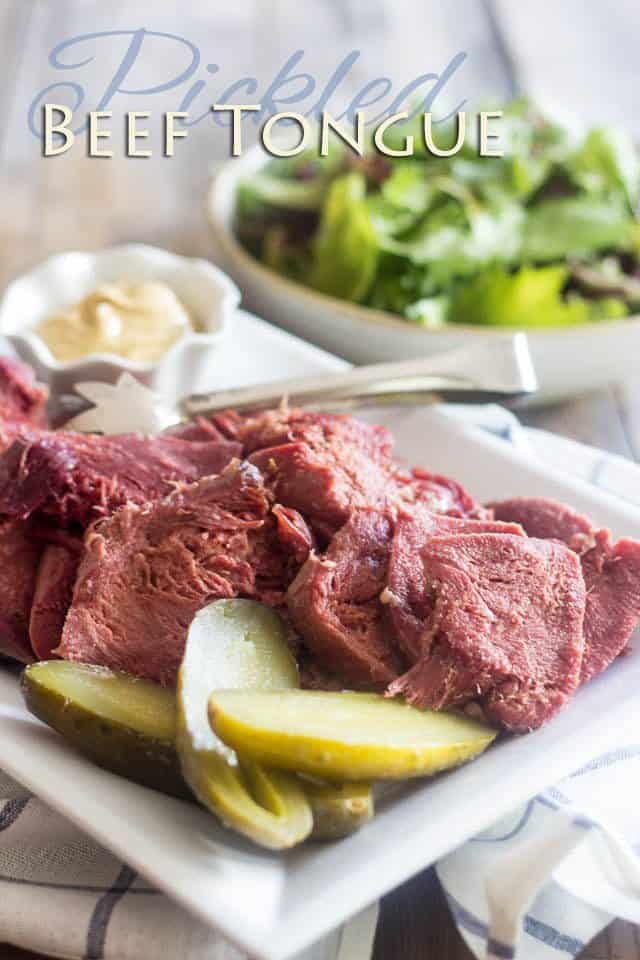
Pickled Beef Tongue
Wait, wait!!! Where are you all going?
I know, I know… today’s subject might not be on top of everyone’s list of favorites, but I think you should at least give it a chance… if only a tiny little one.
Like I said earlier, I’ve been working real hard at incorporating more offal and organ meats into my diet lately. To have fully adopted liver and integrated it as part of my regular feedings is one thing, but I felt it was time for me to graduate to the even less popular cuts, like head and heart and kidneys and… tongue. I have them in the freezer after all, so I might as well use them, right?
Plus, I so strongly believe in the nose-to-tail philosophy: if an animal gave its life in order to feed me, I feel the least I could do is honor it and do my darn best to consume as much from it as I possibly can. I just need to make this happen. After successfully dealing with my pork head a couple of weeks ago, I figured tongue shouldn’t be so bad.
But you see the thing is, my whole life I watched my dad delight in marinated pork tongue and I never could get used to the idea that he was actually eating the tongue of an animal. No matter how many times he told me that it tasted fantastic and that I should really try it, I just never could bring myself to actually bring a single piece to my lips. It just totally grossed me out.
Who knew that I would someday end up making my very own Pickled Beef Tongue… except I haven’t put mine in vinegar after it was done cooking. HA! If my dad were still with us, I think he’d be very proud of me!
And you know what? My dad was right. This stuff IS fantastic. In fact, it tastes pretty much like a cross between smoked ham and corned beef. Makes sense, I guess, since they all have very similar curing and cooking processes: cure the meat for a couple of weeks and then braise it slowly for a fairly long time over very low heat.
Honestly, once you get past the aversion for the fact that it’s an actual tongue you’re dealing with, the whole experience just gets that much easier.
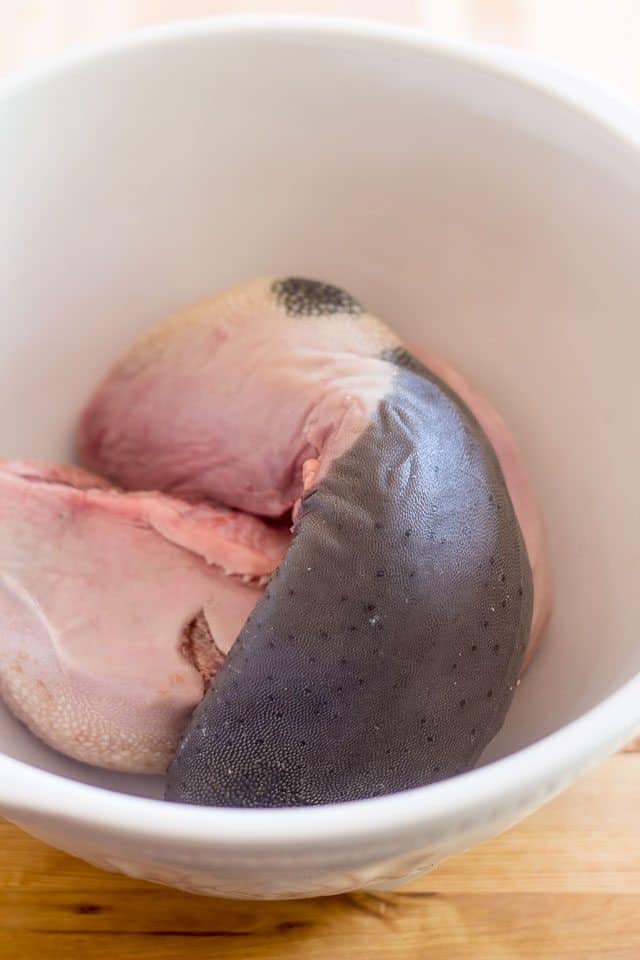
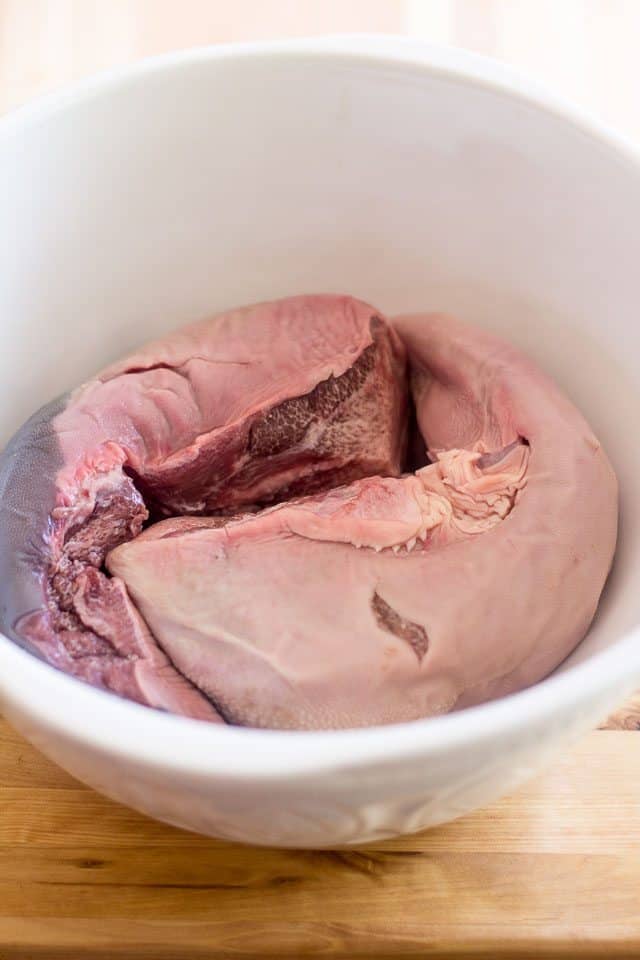
When I took the pieces of meat out of their plastic bags, I made it a business to really examine them. They are quite fascinating, you know. You can really see all of the taste buds and their texture is just the coolest. Really, there’s nothing gross about them at all!
I just love how one of them is almost completely black while the other one is entirely pink.
Don’t you think there’s something simply beautiful about them?
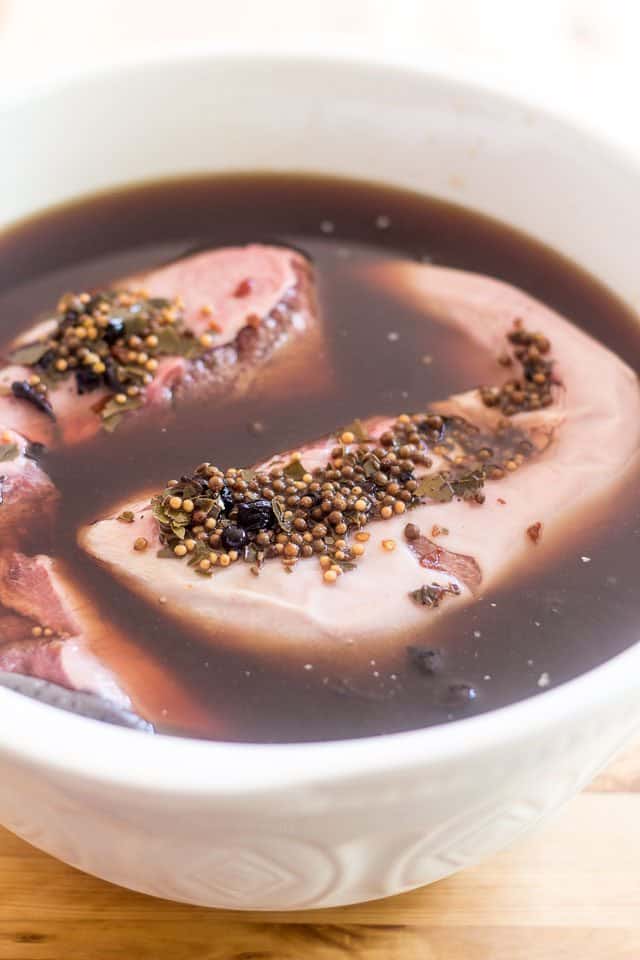
At this point, you don’t even need to handle the tongues at all. You only want to rinse them real good and place them in a non-reactive bowl that’s large enough to contain them and about 8 cups of brine.
Now this brine, you’re gonna have to make from scratch, but it really is stupid easy, don’t worry. As easy as bringing water to a boil!
You’ll want to add water, a few spices, pickling salt and curing salt to a large stockpot and bring it to the boil.
Again, I chose to add pink curing salt (not to be confused with pink Himalayan salt) to my brine, which is basically a mixture of about 94% salt and 6% sodium nitrite. This curing salt really helps in preserving the meat and preventing spoilage by inhibiting the growth of fungus or bacteria. Also, it ensures that the cured meat will keep its beautiful pink color. Without it, the meat would likely turn an unappetizing shade of grey. The amount used is so minimal that I personally don’t have a problem with it, but if you firmly oppose adding it to your meat, you could experiment with celery juice powder instead (not to be confused with celery salt) which pretty much plays the same role.
Stir your brine until the salt is completely dissolved, then kill the heat and let it come down to room temperature. If time permits, place it in the fridge and let it cool overnight. Or, if you’re in a pinch and wish to speed up the process, you could also add only half of the water to the stockpot and put the other half in the freezer, then add the cold water to the brine once it has boiled and the salt has completely dissolved.
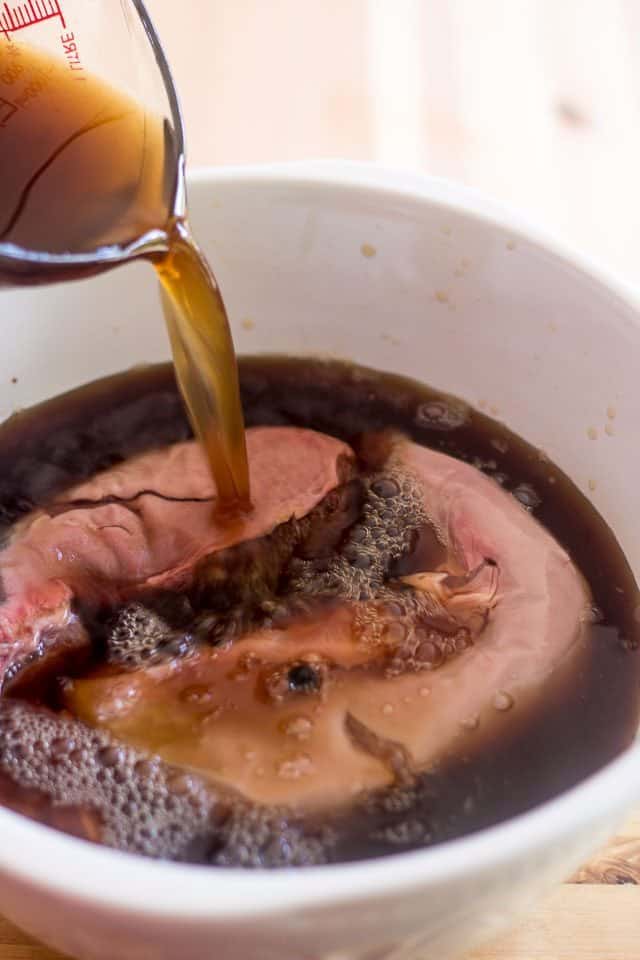
After your brine has cooled down completely, pour it right over your beef tongues until they are completely covered.
Now you need to make sure that your meat is completely submerged and that it will remain submerged for the entire duration of the curing process. If it seems to want to float to the top, weigh it down with a plate or any other similar clean and non-reactive object that will fit snugly inside your container.
Place your meat in the fridge and leave it to cure for 12 to 14 days. Check daily to make sure that your meat is still submerged.
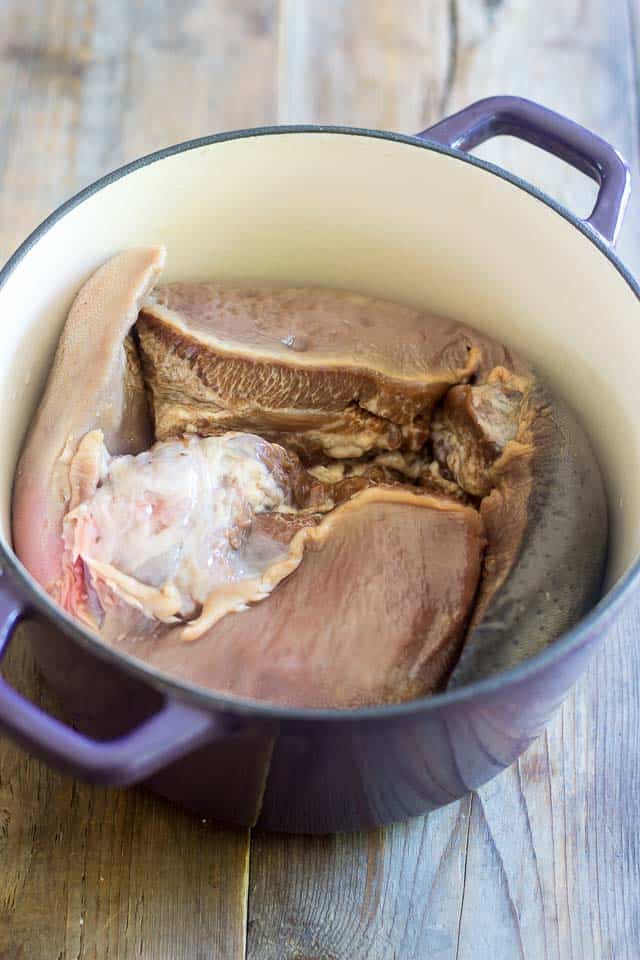
After the meat is done curing, rinse it under cold running water and place it in a Dutch oven; discard the brine, it’s done its job!
Add onions, garlic, celery and carrots to your Dutch oven and cover with cold water.
No need to get fancy-schmancy with the vegetables here. You can even leave the peel on: it’ll only give more flavor to the cooking liquid!
Cover your beef tongue and place it in a 250F oven for about 6 hours or until the meat is super tender and sort of pulls apart when you tug at it with a fork.
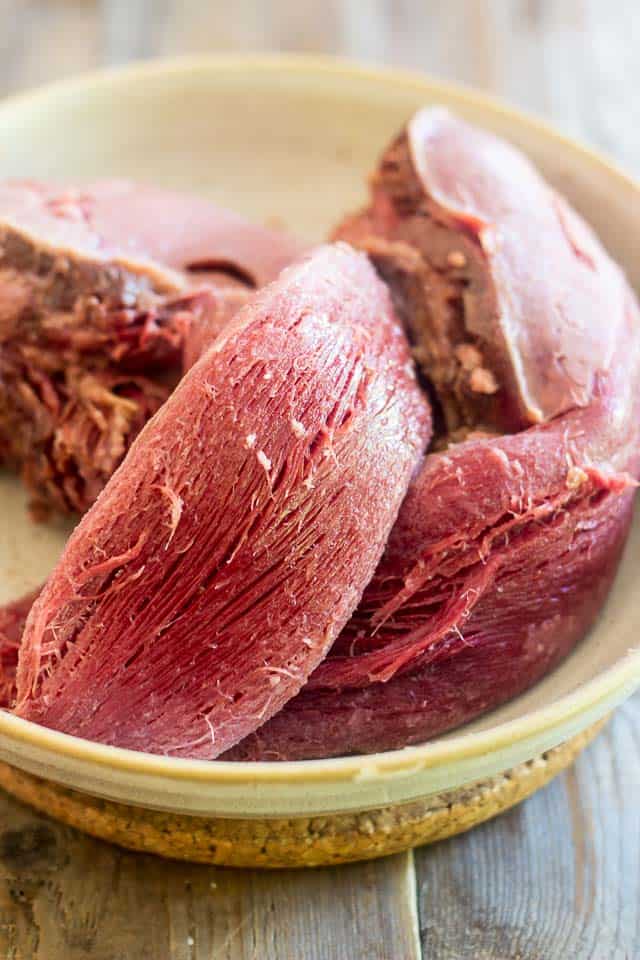
Now comes the part when you do need to handle the tongues, but so very little. Tongue has a very thick skin that covers it and must be removed. It does, however, come off extremely easily.
Simply let your meat cool for about 10-15 minutes until you can safely handle it with your bare hands, and then peel the skin off. If your meat is cooked all the way, the skin should come right off. If it offers resistance, put it back in the oven and give it a bit more cooking time.
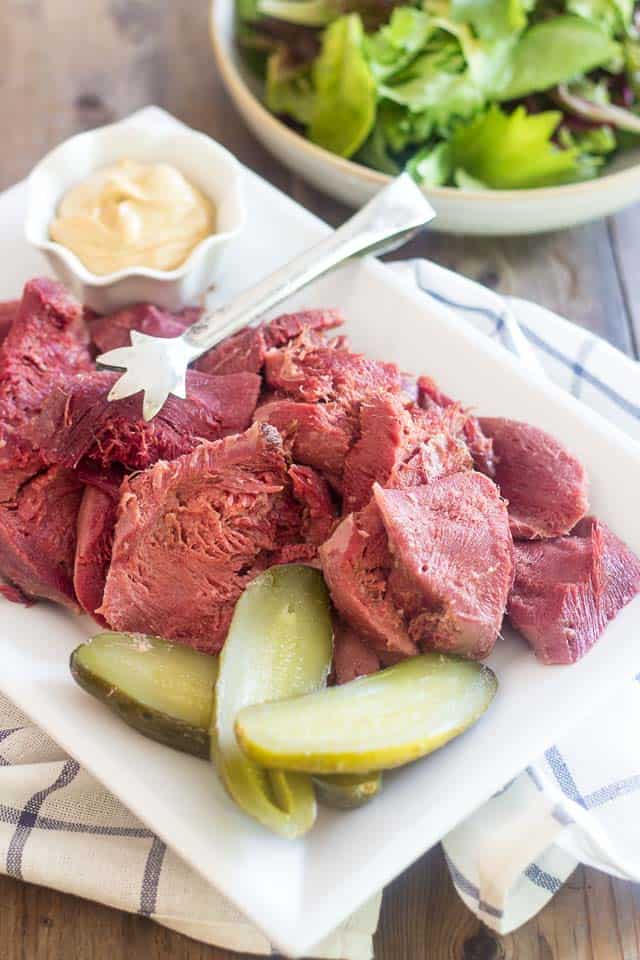
As you can see, tongue meat is kind of stringy, but in a good kind of way. It has a bit of a gelatinous texture, especially when it’s still warm, but it’s not unpleasant in the least: In fact, it really is melt-in-your-mouth tender and soooo flavorful, much like a good old picnic ham that would’ve been left to simmer in a tasty stock for an entire afternoon .
Hmmm, hmmm good. Comfort food at its best!
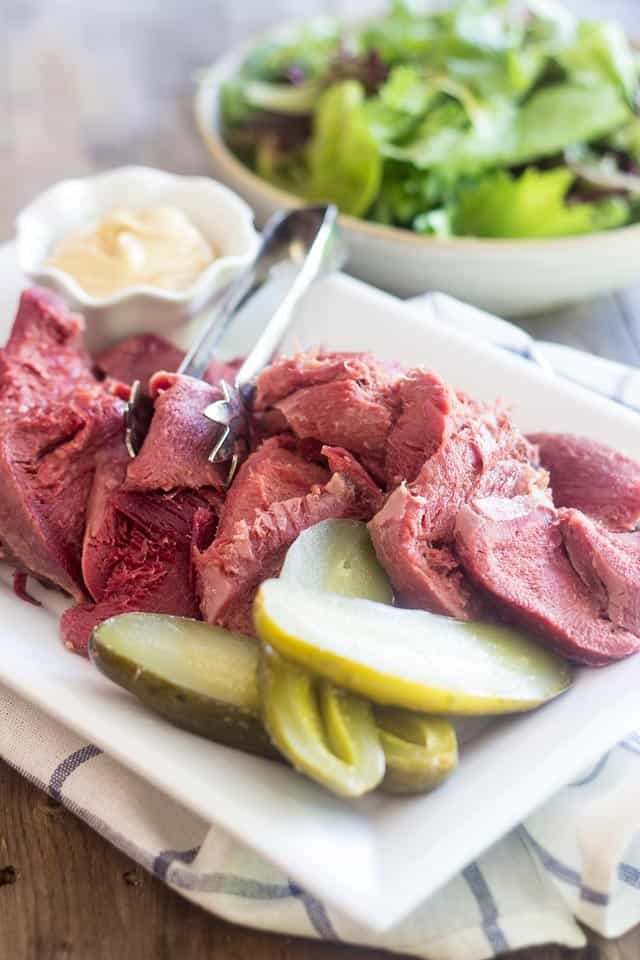
Once your tongue has cooled enough and been completely rid of its skin, transfer it to a cutting board, slice it across the grain and serve with a generous helping of good quality Dijon mustard and a few spears of fermented pickles.
For the record, know that beef tongue is also delicious served cold and makes excellent sandwiches…
But if you really can’t get over the fact that this is tongue meat and think there’s no way you’ll ever be able to bring it to your lips, or convince your friends or family members to give it a try, I’ve got just the thing for ya: a casserole so creamy, so cheezy and so tasty that no one will ever question the chunks of meat that’s in it. For sure, you’ll have ’em all fooled into thinking that it’s ham. Even your own brain will totally buy it…
Sounds interesting? Keep an eye out for my next post!
Pickled Beef Tongue
Ingredients
TO CURE THE MEAT
- 2 x 750g, 1½lb beef tongues
- 8 cups water
- 2/3 cup pickling salt
- 1/2 cup coconut sugar
- 2 tablespoons pink curing salt, prague powder #1
- 1 tablespoon pickling spice
- 10-12 juniper berries
- 1/2 whole cinnamon stick
- 1/2 whole nutmeg
- 4-5 whole cloves
- 1 whole star anise
TO COOK THE MEAT
- 1 small onion, quartered
- 2-3 cloves garlic, smashed
- 1 celery rib, cut in half
- 1 large carrot, cut into large chunks
- Enough water to cover the meat
Instructions
CURING THE MEAT
- Add all the ingredients, except for the tongue, to a large stockpot and bring to the boil. Stir until the salt is completely dissolved, then kill the heat and let the brine come down to room temperature. If at all possible, place it in the fridge and let it cool overnight. To speed up the process, you could also add only half of the water to the stockpot and put the other half in the freezer, then add the cold water to the brine once it has boiled and the salt has completely dissolved.
- Once the brine has cooled down, place your tongue into a non-reactive container and pour the brine right over it until it’s completely covered. Now you need to make sure that your meat is completely submerged and that it will remain submerged for the entire duration of the curing process. If it wants to float to the top, weigh it down with a plate or any other similar clean and non-reactive object that fits snugly inside your container.
- Place your meat in the fridge and leave it to cure for 12 to 14 days. Check daily to make sure that your meat is still submerged.
BRAISING AND SERVING THE MEAT
- After the meat is done curing, rinse it under cold running water and place it in a Dutch oven; add onions, garlic, celery and carrots and cover with cold water. Discard brine.
- Cover your beef tongue place it in a 250F oven for about 6 hours or until the meat is super tender and pulls apart when you tug at it with a fork.
- Remove the cooked meat from the oven and let it rest for about 10-15 minutes and then peel the skin off. If your meat is cooked all the way, the skin should come right off. If it offers resistance, put it back in the oven and give it a bit more time in there.
- Once the tongue has been completely peeled, transfer it to a cutting board, slice it across the grain and serve.
- Beef tongue is also delicious served cold.
If you’ve tried this recipe, please take a minute to rate the recipe and let me know how things went for you in the comments below. It’s always such a pleasure to hear from you!
You can also FOLLOW ME on PINTEREST, FACEBOOK, INSTAGRAM and TWITTER for more delicious, healthy recipes!






84 Comments on “Pickled Beef Tongue”
Pretty gross before it is cooked but you are so right, delicious after it is cooked. My mom made this regularly in the pressure cooker. She made my dad peel it though. We didn’t think anything of it as it was a pretty regular event. We had liver too!
The flavor is pretty mild and the texture, well I love it. I will be trying this when I buy my first partial grass fed cow.
You think they’re gross, really? I found them to be quite fascinating. The taste buds are almost a work of art. Seriously, I thought I would be way grossed out and that they would be slimy as hell and all, but not at all. Making beef tongue has actually been a great experience for me. Now I need to try the pressure cooker technique. Do I need to add anything, like celery and carrots and spices?
Oh they are fascinating to be sure and you are right about the taste buds being like a work of art. I just think the cut end is, well, not!
Add everything you would add to any pot. It is a cooking method, just approach it the same way you would any other cooking method.
Definitely ketchup or bbq sauce needed. On my to try list.
Do you put ketchup or BBQ sauce on your corned beef (brisket) on St Patrick’s day?
Boil it with an onion for about 6 hours and it will be firm and not stringy
Can you advise how long in the pressure cooker and at what heat and the number of whistles. Thanks
I grew up with beef tongue, but never thought to pickle it. This is on my ‘to try’ list. Thanks!
I bet you’ll love it, Chris. Make sure you let me know how it turned out if you ever give this a go! 🙂
I’ve actually had cow tongue! Wanna guess where?? Okay Ill tell you… KINDERGARTEN. That’s right my class had a visitor who brought cow tongue. Kids will eat worms, why not tongues?
OH. And they served it with… ketchup!
Of course, ketchup! To mask the taste, I guess. My mom used to serve us liver with tons of ketchup. I don’t know which I hated most, the ketchup or the liver! 😉
And worms, seriously? No way… not even as a kid. That’s a line I will NEVER cross. Worms disgust me to no end, you have no idea! 😉
It is always interesting to see how other people eat different foods. As a vegan there is always some food I wont eat, but none the less it is interesting to see what others eat
I never really thought of trying cows tongue before, it seems very interesting however, I wonder where I could get some
Anywhere you can buy well-raised meat, Earl. Just ask for it, they’ll be able to hook you up with some.
well, I had four tongues and I need to can them cause the freezer is full so I cooked them then found your recipe. sooooo
I’m going to make the pickling brine and can them in it. Hoping it works. LOL sure wished I’d looked first.
Not sure I would can them in this brine, Kitty. It might be a tad salty. Plus, I’m no expert but I think you need some kind of vinegar to can beef or pork tongue. At any rate, if you do decide to try it, please let me know how it turns out!
This looks great. I have always LOVED tongue, but haven’t had it corned since my mother used to make it when we were kids. I’m going to give this a try, but there’s something missing from what my mother used to do: pressing. When brinning th emat, she used to press it down with a clean brick she kept for this purpose (and for making head-cheese and pates). I seem to remember she did that after the brining or maybe as a second step in the process of brining. I’m not sure…. It gave the meat a fuller/thicker/richer texture.
Interesting… I never heard of pressing the meat. Are you sure she didn’t use the brick just to make sure the meat stayed submerged?
Thanks for posting the brining process! It worked perfectly. But, this is really a “Corned Tongue” recipe. It’s exactly as I remember having in Jewish Delis as a kid. I grew up eating “Pickled” tongue in Pennsylvania which has another step to take. After you have cooked your tongues, dice them and put them in a large jar with white vinegar, crushed red pepper, pickling spice, and a little brown sugar. Put the jar in the refrigerator and let it get happy for about a week, and you’ll have a delicious PA Dutch snack that has sadly gone by the wayside. But thanks again for trying to get people to try something that may be a bit different. Whether Pickled or Corned, tongue is really a delicious food that people need to try!
If you have a heart or two, brine (corn) them in the same way, cook the same way. When cool, slice with a meat slicer and use for sandwiches. Yum yum yum!!!!
Sounds YUM indeed, Eric! I need to get me a couple of hearts! 🙂
I have used this method to corn tongue before a good twist is to lightly smoke the thinly sliced leftovers have also rolled peeled tongue in salt pepper mix and smoked call it tonguestrami
Tonguestrami! Love it! Definitely something I’ll have to try. Thanks for the inspiration!
Wow that tongue looks quite interesting and tasty
Is the amount`of prague powder #1 a printing error. I have been led to believe that the ratio is 1 tsp. Per 5# of meat.
I believe that would be the ratio for dry curing, Terry. Brining is a completely different thing…
Here’s a very interesting and detailed article on the subject, if you’re interested in reading a little more about brining/curing meat: http://www.pelletsmoking.com/searching-cure-26/ham-brining-101-bacon-6993/#post72952
Sonia,
I was thinking brining and curing were the same. I now`have to add more cure #1 to my brine.
Thanks for the prompt reply. You have saved my beef tongue.
That was the problem with my slimy ham. Not enough cure.
Oh well, brine and learn.
Haha! Glad I could save the tongue! But I thought you said you’d followed my recipe exactly for the ham. Had you modified the quantity of curing salt?
Apparently, I did, thinking that the one tsp/5#was enough. Rereading the initial post, I apologize for saying I followed the recipe as stated. Thank you for the web site info and clarifying the difference between curing and brining.
Well, I guess that explains it, then! Could you please clarify that in the other comment thread, if only for the benefit of future readers, so they know what went wrong with the ham and don’t get discouraged from trying the recipe?
Thanks a bunch, and hope the tongue turns out better! 🙂
Sonia,
I stored my brining beef tongues in the garage to cure. The temperature has been Ontario balmy. Wednesday night, the temperature plunged to about -20*C ( -4*F ). Yesterday morning I brought the tongue in and the brine was frozen. Not solid but slushy. Have I lost this batch or will it be OK when thawed.
Terry
I really don’t think that it’ll be a problem, Terry. The tongue should be ok when thawed. You will however need to place it somewhere where it can indeed thaw and continue brining. In the future, though, I recommend that you keep your meat in a refrigerator, or other place, where conditions are steady.
I couldn’t agree more. My fridge was full so I thought I would take advantage of the natural refrigeration. Mother Nature decided to have some fun with me.
Thanks for the prompt reply.
Terry
Sonia,
I have just finished peeling, trimming and testing the tongue. Absolutely delicious. It looks exactly like your pictures and tastes exactly like corned beef but with a little less texture. I will definitely be doing this again.
Thanks for holding my hand through this with all your advice.
Terry
*HIGH FIVE* That is so cool, Terry! So glad to hear that operation pickled tongue was a complete success! Helping you through the process has been a real pleasure! 🙂
We had this Often when I was growing up! Ours was a bit of the reverse though. My Dad would cook the tongue First, until it was tender, in a simmering pot with some spices. Then peel it, cube it and put it in the pickling jar, in the fridge…. try for a couple of weeks… rarely made it all the way, but, was DELICIOUS!!
Hahaha! Well, at least by pickling it first, one’s not tempted to eat it before it’s ready! But I might have to give the reverse technique a try, someday. Sounds interesting!
I fix it like Lita-coults dad, my family expects it every Christmas for sure. I’m trying to find out just how long I can keep sliced pickled tongue in the refrigerator safely?
Hi
I bought beef tongue that is already pickled please tell me how to cook it?
If it’s already pickled, then you don’t need to cook it!
Hi Sonia! Judging by the name I am assuming Mpho is from South Africa. Here you can buy tongue which is pickled but not cooked. The tongue is sold in vacuum sealed bags with a few peppercorns and bay leaves. This product still needs to be cooked. First rinse it and then place tongue in a pot and cover with cold water. Add salt, bit of sugar, cracked black pepper,clove or two peeled garlic and maybe some chopped chili and bring to the boil. Simmer for an hour or two, depending on size. Once the tongue is soft, dunk in ice cold water and you’ll find the skin pulls off quite easily.
Where can you purchase tongues ? I am not a big meat eater so is there a special place one needs to go to in order to get tongues like this ?
Ask any butcher James. If they don’t have it, they’ll get it for you.
Other than cow is there other animals that one may get a tongue from? Like sheep or deer?
Absolutely, Henry!
I agree if an animal dies for me to eat it don’t waste any. I have been eating smoked beef tongue since a child. I used to buy it at the grocery store but have started buying tongue from a local butcher, more humanely raised, and making my own brine, experimenting with different recipes, trying yours tommorrow, gonna smoke 1/2 afterward and try some without smoking.
I like the idea of smoking it! Let me know how it turns out, Dottie! 🙂
I really want to try this recipe! …But I live in a tiny studio apartment with a tiny kitchenette and limited storage space, so no Dutch oven… Could I cook this in a crock pot on low for the same amount of time? (Please say yes, please say yes, please say yes…)
Hhahaha, you’re too funny Erica. Although I haven’t actually tried it, I am absolutely convinced that it would work perfectly well. I would do 6 to 8 hours on low…
Please report as to how it turned out if you end up making it! 🙂
My stepfather is from Mexico, and on the Texas/Mexico boarder they make Bar-ba-coa (this means Barbecue) of the entire cow head, skinned and the nose cut out, but use the rest including the tongue originally it was wrapped in some leaf and buried in a fire pit, but that was already changed by the time I started eating it in the ’70’s. It was then wrapped in foil with salt and put in the oven over night. By morning the meat falls off the bone. Eat with corn tortillas salt and jalapeno peppers. The problem is I can’t find the heads any more.
Go to a Mexican market.
Once you get past the idea of tongue, you can move on to haggis. We visited Scotland and tried the haggis on a dare to each other. It turned out that haggis is similar to the best meatloaf you’ve ever had, albeit loose. Lacking eggs, haggis is loose. But I highly recommend trying haggis with nips-n-tatties (mashed turnips and potatoes). After trying haggis one time both my wife and I ordered haggis with nips-and-tatties twice again the next week.
I would eat the haggis (I have eaten an Americanized version) the problem is that apparently the Big Brothers at the FDA have made many of the ingredients illegal to sell.
I grew up on pressure-cooked ox tongue and introduced it into our regular meal repertoire when I married years ago. My husband was initially quite grossed out by the idea of it, but he fell in love with the taste and texture the first time I cooked it for him.
I must say I have never pickled a tongue before cooking it. Why would you need to do that?
What I do is soak it for a few hours just in water. Then I rinse the tongue and put in enough fresh water to cover it. I then add several cloves, cardamon pods, a cinnamon stick, 2-3 bay leaves, salt and pepper. Finally, I pressure cook the whole mix for about 45 minutes for (1.5lb meat) and it has always come out perfectly: soft, juicy and pink.
Sonia, I’d be interested to know if your or anyone else has cooked the tongue as it comes from the butchers, and what they think of it.
Sounds exactly how my mom made it. I know she didn’t have a weekly process prior to throwing it into pressure cooker. Thought she bought it already pickled so thanks for solving that mystery. Yes I will follow your recipe. 🤗
If I parboil and then peel, before the rest of the process, would that cook the meat too much, or improve the uptake of seasonings?
That wouldn’t work, Wendy; the tongue needs to be completely cooked in order to peel easily. Besides, I can’t think of any reason why you’d want to do that? Did you have a specific purpose in mind for wanting to do that?
To improve seasoning uptake, I slice through the outer tongue skin in several places……..greatly improved the flavor
Do you cook the tongue some other way in order to be able to slice it Thin like deli meat?
I’d simply chill the meat before slicing it…
Can I use the cooking liquid from the tongue to make soup stock?
Probably, or at least part of it. Pea soup comes to mind! With chunks of tongue in it… YUM!
I’m making tongue (been brining for 15 days) and beef stew with the cooking liquids, I intentionally cook the tongue in a large pot so I end up with lots of stock to make beef stew, no need to do much of anything to the liquid. This batch is with beef shanks. I’ve used chuck, London broil, stew meat, whatever is the cheapest cut………can’t wait for the tongue………..stew tomorrow, in the 20’s here in the NorthEast.
I am about to embark on this recipe. Could one replace that six-hour braise time with an hour in an Instant Pot?
I’m sorry Howard I have no experience whatsoever with instant pots, so I wouldn’t be able to tell…
Fantastic recipe! After a bit of googling, I found that 30 minutes in an Instant Pot = four hours in a slow cooker. I gave my tongue an hour and it came out tender and delicious. Thanks for the inspiration and guidance.
Awesome!!!! And thanks a bunch for taking the time to let me know. 🙂
Why coconut sugar in the brine? Could I use brown sugar or honey?
Brown sugar would work fine.
No no no my mother bought the tongue from the butcher and it was already pickled or corn or whatever but you could not eat it that way you had to put it in a pot and she must’ve boiled it for hours and that was it it was delicious and when she brought it home it was a big huge gigantic uncut Cow tonque also I grew up eating hot tongue sandwiches at the Jewish deli But if it was pickled or corn and I don’t remember but I know she stuck it in a pot and boil it for hours,, your recipe sounds like a lot of work and time serve with rye bread nustard pickle …Better yet buy a pound of the Jewish deli or a sandwich
Raised in NY and a grandson of Eastern Europeans, beef tongue was nothing unusual. Most NY deli’s offered it as well. Tongue on rye with mustard and coleslaw with a nice sour pickle, OMG! Anyway I never made it myself until recently when I found your recipe. It came out just amazing. I’ve made it several times. Thanks for a great simple recipe.
Awesome! Real happy to hear, Byron. Not to hard to make yourself, is it? And so much better, too! 🙂
I have used this recipe a couple of times, and now during the quarentine I plan to do it again. Like other commenters I took another step and rubbed the cooked tongue with pastrami spices, let it dry in the fridge overnight, then slow smoked it for several hours. Oh my goodness. The only problem is my SO simply won’t touch it no matter what, so I would be eating the whole tongue myself.
Just the best feed ever especially when you add beef cheeks as well
Hi Evening, I’m planning on making this tongue, but I dont have 12 day for it to brine, only will have 7 before it will be cooked, do you think 7 days will be enough or should I find a faster type of brine, please help
7 days should be plenty long to get you very decent results… I would definitely go for it!
Hi dear! I would not have occurred in a thousand years that the stiff of tongue is practically the same Pastrami recipe, but logically the meet is not cook. I will do it soon. Thank you for teaching. Take care. Kisses
Q. D. I translated by traducer + same correction of mine 😉😉.Is it right?
I remember my mom’s tongue tasting like corned beef and firm. Thanks for the recipe!
Very very good. After cooking I peeled the tongue and squeezed it into a suitable meat press. Into the fridge overnight and remove from press and use as cold meat.
I love pickled ox tongue,I cooked one last night on my wood stove,I get them very cheap from local butcher ($4.50)each,they don’t last long in my fridge for
Hi! I used two tablespoons of wishful season pin curing salt and my brine is VERY PINK. Is it safe?
So tender and delicious. The best part of the cow. I love it pickled in brine.
My mom bought it already pickled way back in the day NYC. I do remember vividly she cooked it in pressure cooker. Any thoughts on that?
Awful Offal::
Greetings from Montreal. English Canadians tend to shy away from organ foods recipes whereas French Canadians (such as myself) enjoy tongue, sweetbreads, brain, kidneys, etc. Whenever I crave tongue, your recipe is my Go-To recipe but I drop the cinnamon because I do not like this taste with tongue and substitute maple syrup for the coconut sugar. Also, on this occasion, I am going to inject the tongue with some of the brine and see what that does so stay tuned.
I have also looked at your head cheese (Tête de fromage) recipe which is very similar to an old family recipe. Without going into detail, I would mix a lot more of the fat into the meat. Upper half of pork hocks is great substitute for the head. My mother always mixed in the brain and quite a bit of the cooking liquid. This generally makes a large amount so the trick is to freeze portions in small containers and when needed, take out a container, place in saucepan and warm to liquid or mushy consistency, adjust seasonings and return to fridge to gel up overnight. Great on toast or as a canapé, In Québec, head cheese is a traditional Christmas recipe. Sugar pie also but it is year round.
Marc B.