
How to render your own Lard
If someone had told me a few months ago that I would soon be dedicating an entire blog post to the art of rendering your own lard, I would’ve called them crazy.
Yet, here I am today, dedicating an entire post to the art of rendering your own lard.
Oh, I’m not saying that I am an expert in the matter, far from there.
But ever since I got to read Beyond Bacon (which I highly recommend, by the way), I’ve been dreaming of having access to good quality lard so that I could cook and bake with it.
So I went on a quest to find me some good pork fat (because I hadn’t read the book prior to ordering my side of pork, so I didn’t ask for the fat) and proceeded to render me some lard. And I figured since I would be using it a lot in my recipes, I might as well share the experience with you so that you too, can stock up on this great, versatile and healthy fat.
Yes, I’m already in love and don’t know how I have been without it for so long.
And I haven’t even started baking with it yet!
Now it is imperative, when selecting your pork fat, that you purchase the highest quality that you can get your hands on, since that is precisely where all the nasties wind up being stored.
That means if you buy fat from a pig that has been fed all sorts of nasties, you will be getting a concentration of those nasties in the fat that you will be rendering.
And you don’t want that in your body now, do you? You want pure, beautiful fat from a healthy and well cared for animal.
100% pastured would be best if you can find it, but if you can’t get your hands on it, make sure you at least get organic, hormone and antibiotics free.
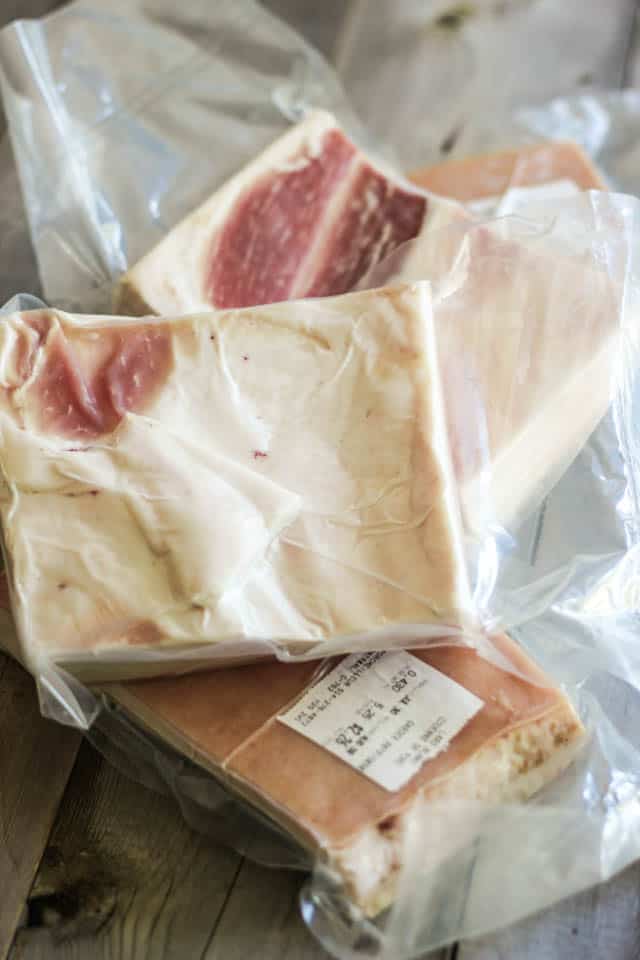
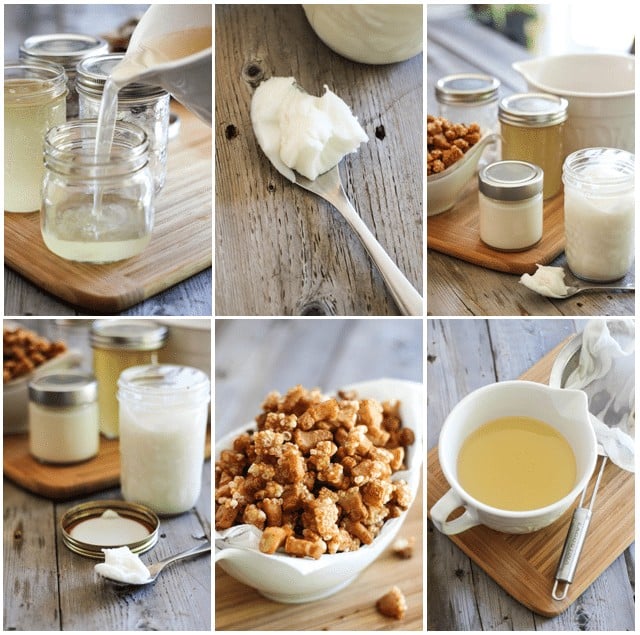
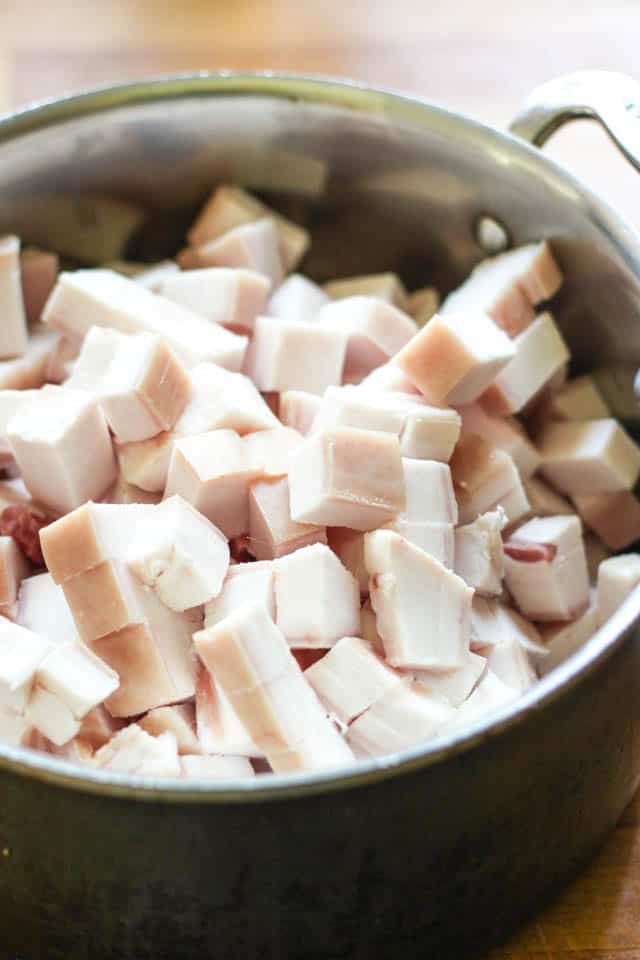
This batch here I made with back fat, but you can also use leaf fat if you wanted to. The process is pretty much the same, although I found leaf fat to melt a little bit faster. Also, the lard from leaf fat is somewhat finer, a tad lighter in color and has less of a pork or meaty flavor to it, which makes it ideal for baking.
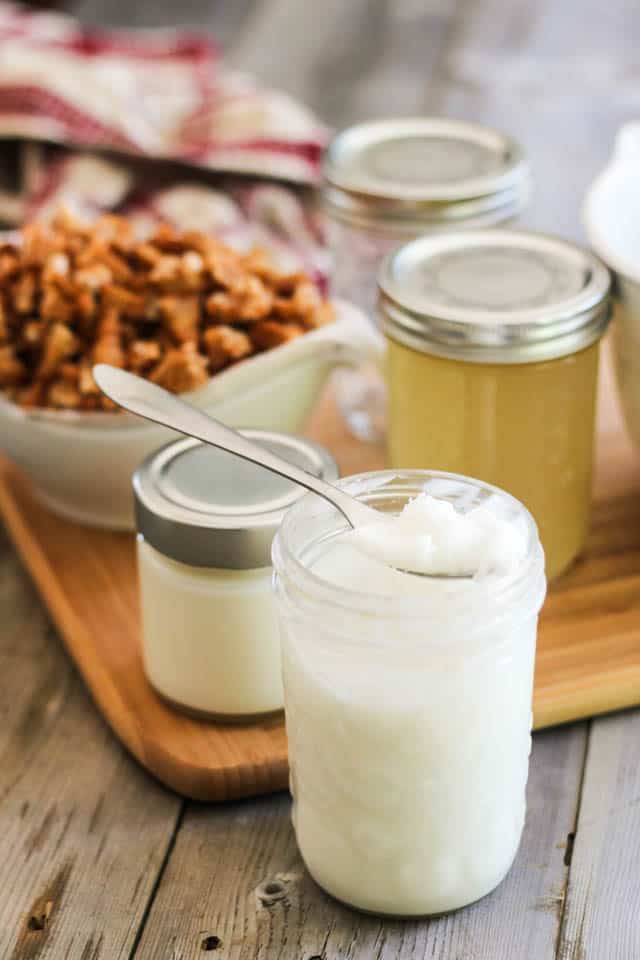
But both types are extremely suitable for cooking, though, as they can withstand pretty intense heat! Lard would be the perfect fat for deep frying, especially since it’s really not that expensive. If you look closely on the label above, you will see that $2.26 got me close to a pound of fat.
All in all, I spent $14.40 for 4 packages of back fat and 3 packages of leaf fat, which yielded a total of 13 cups of pure, top quality lard.
Oh, and I got Crispy Lardons as an added bonus, but we’ll get back to this later.
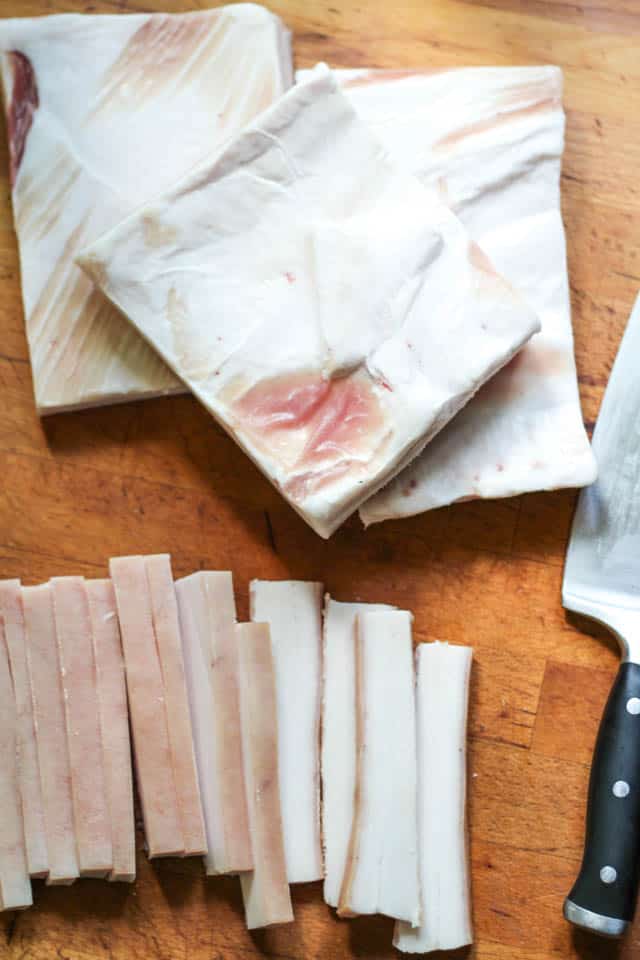
Now, I chose to take the basic route to get the job done and used a simple knife to cut my fat. You’ll notice that the back fat that I got still has the skin attached and that is a little bit on the tough side, so I suggest using a very sharp knife and getting a very good grip on it. This will require quite a bit of pressure and you don’t want to end up hurting yourself.
I personally haven’t been able to find any, but I know for a fact that this also comes in sheets with the skin removed, which would no doubt make it so much easier to chop.
But the thing is, you see, that skin becomes so puffy and crispy after spending a great deal of time frying in its own fat, it’s insanely delicious.
But we’ll get back to this later!
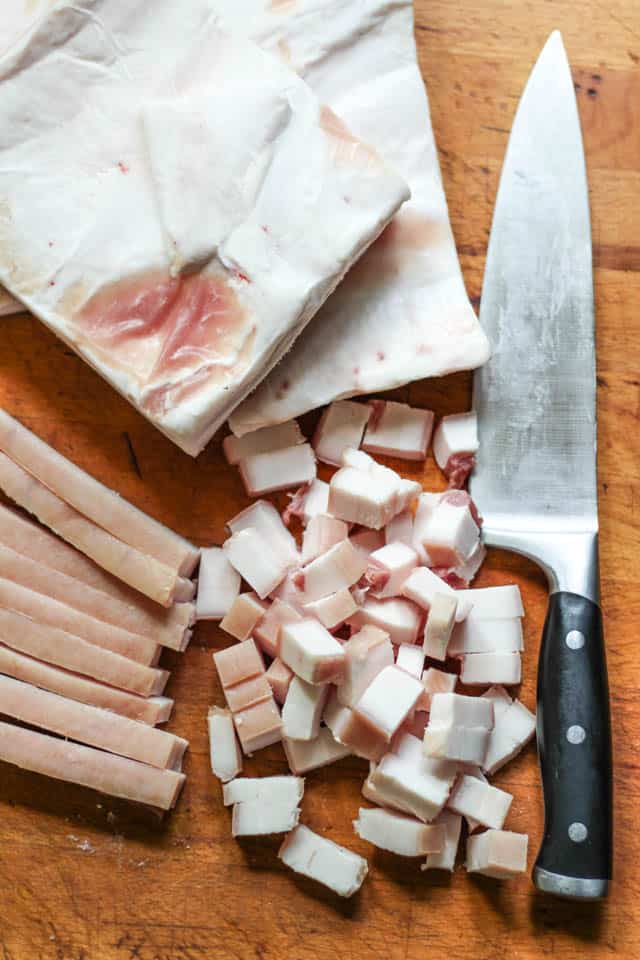
After you’re done cutting the strips, you want to cut them again into tiny little dice.
Make sure you keep your pieces as tiny as possible,too for the smaller they are, the more fat you will render.
You could even pass them through a meat grinder if you have one, or throw them in the food processor and give them a couple of spins on pulse.
Make sure you work in small batches, though, for this stuff is really stiff and you wouldn’t want to end up burning the motor!
And don’t go too small either, ‘cuz then the lardons might not be quite so yummy!
But we’ll get back to this later…
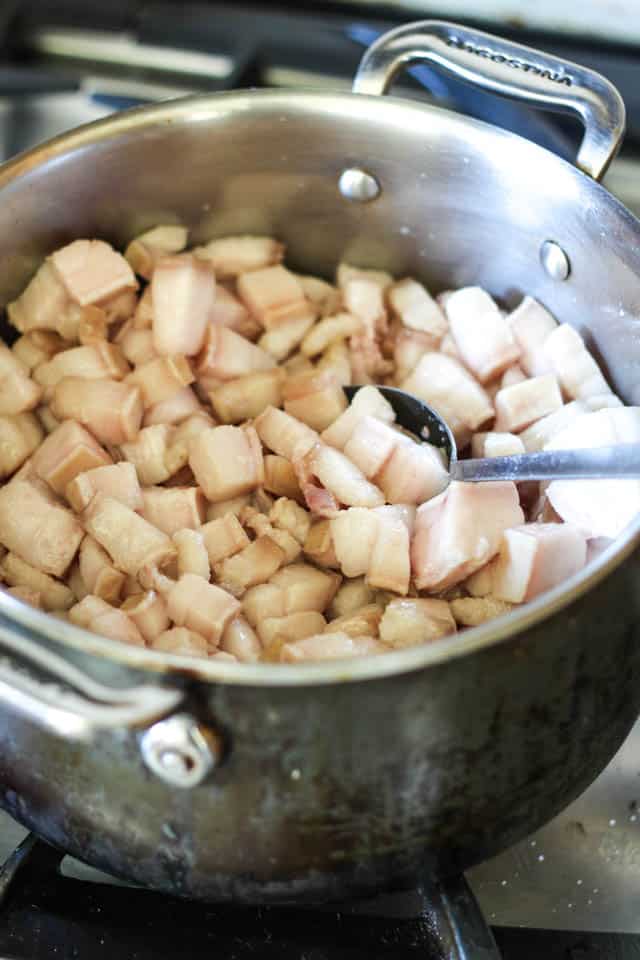
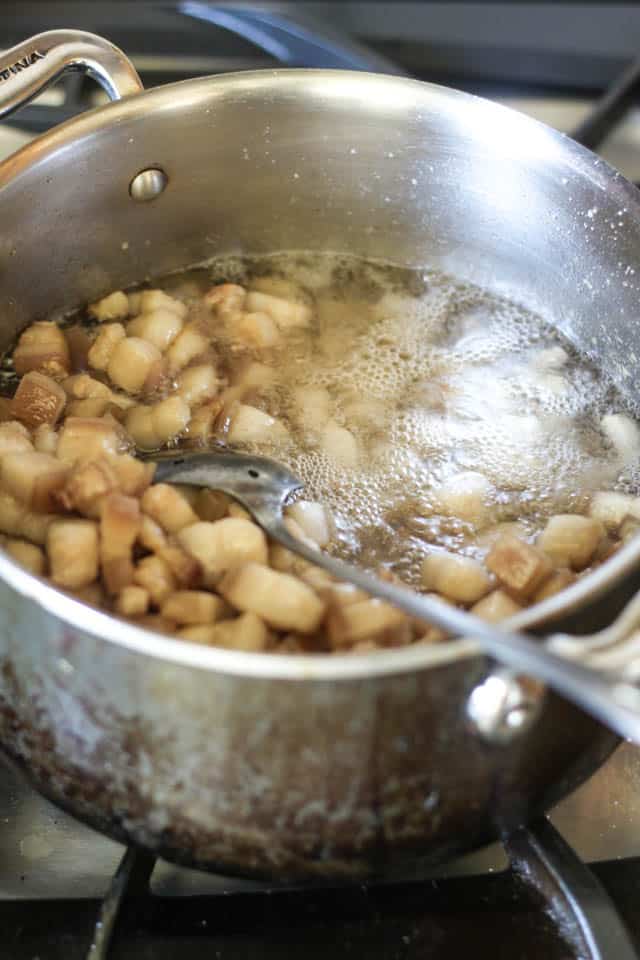
Throw all your fat in a large stockpot and put it to heat slowly, delicately, over medium heat.
Lard will burn fairly easily and you do NOT want your precious fat to burn, so don’t go set the temperature too high in the hopes of getting the job done quickly…
That’s NOT the way it goes… This is a food of love, guys.
Slow and low, that is the tempo!
At first, you’re going to feel like this is going nowhere. The fat will only very slightly melt and become a tad more translucent. It will remain like this for a little while too, say 5 to 10 minutes.
Just stir the fat at regular intervals and keep a very close eye on it.
Do not despair, this WILL happen eventually. I guarantee it.
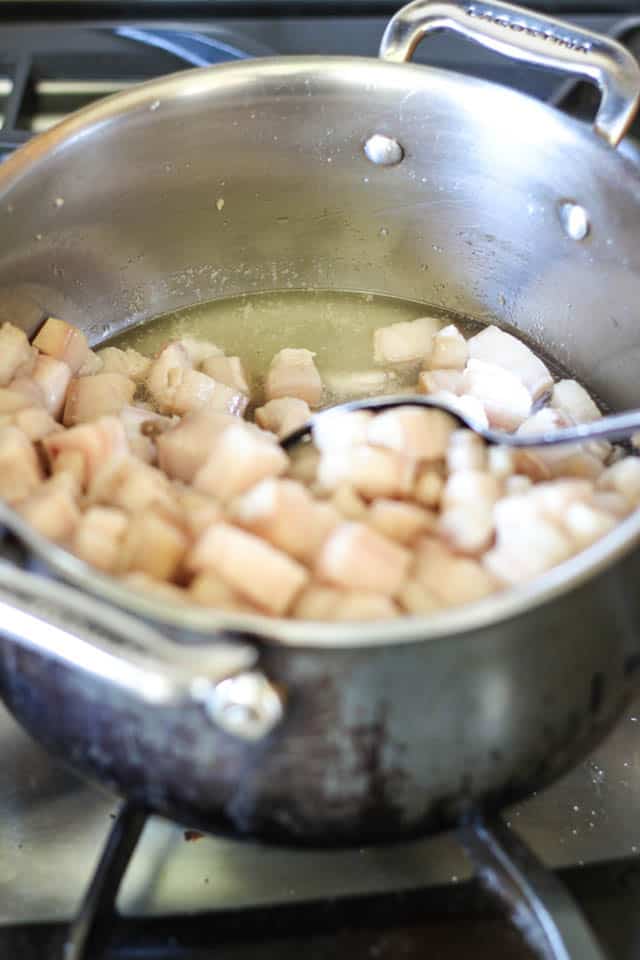
Then, slowly but surely, you’ll see a small amount of liquid fat starting to appear at the bottom of the stockpot.
Some of the beautiful fat is finally being rendered!
Keep stirring and after a few more minutes, you will see the level of liquid fat slowly start to raise.
It would be a good idea to strain that rendered fat regularly, just in case you would inadvertently burn it somewhere down the road.
This would at least insure that you don’t end up burning the entire batch.
This is the point at which I decided it was time to strain some of that fat. I was probably about 30 minutes in the process.
You might feel more comfortable starting to strain sooner, or you might feel confident letting it go a little bit further.
But remember: the more often you strain, the less you run the risk of ruining your batch of precious lard.
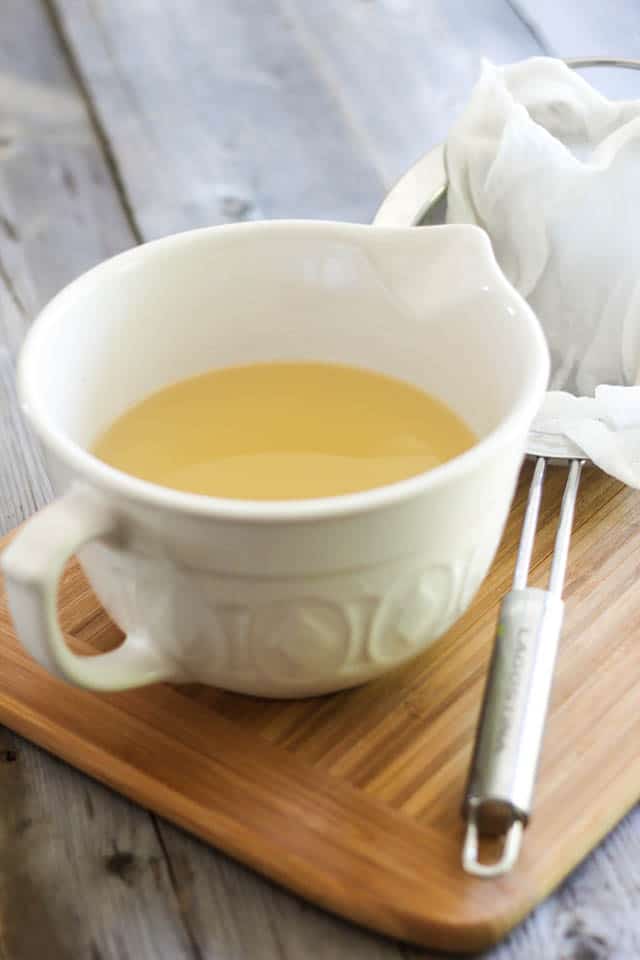
Strain the liquid fat through a fine meshed sieve. I opted to line mine with a piece of cheesecloth to make sure I got all of the tiny little brown bits out, even the minuscule ones, but this is entirely optional.
A fine mesh sieve alone will suffice, if you don’t have the cheesecloth.
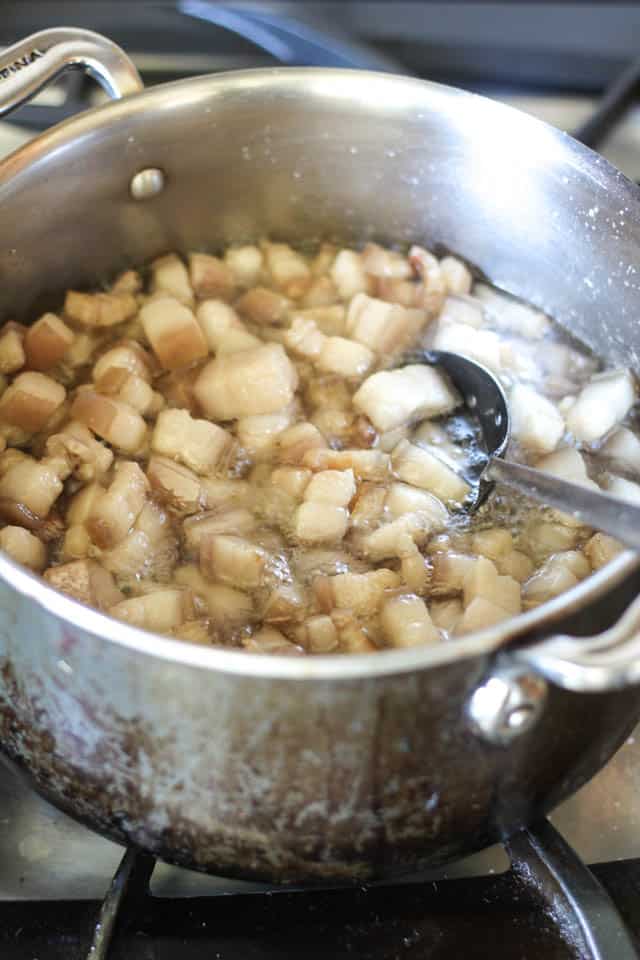
Put the fat back over the heat source and continue cooking over medium heat.
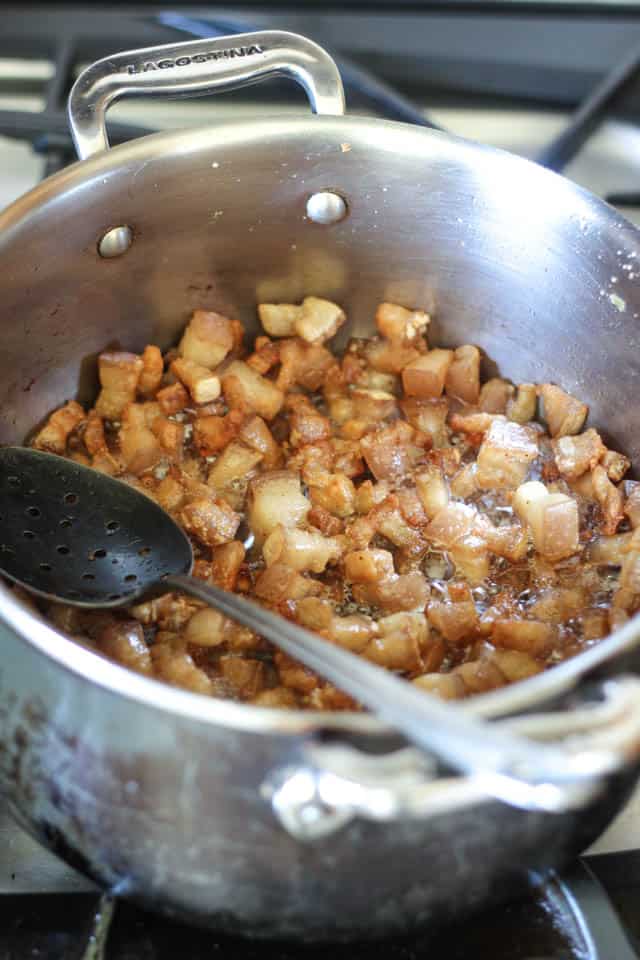
The lardons will start getting smaller and turn golden brown as the fat is becoming less abundant.
They are literally starting to fry in their own fat.
That is not a bad thing, but when that starts to happen, you might also want to start straining more often…
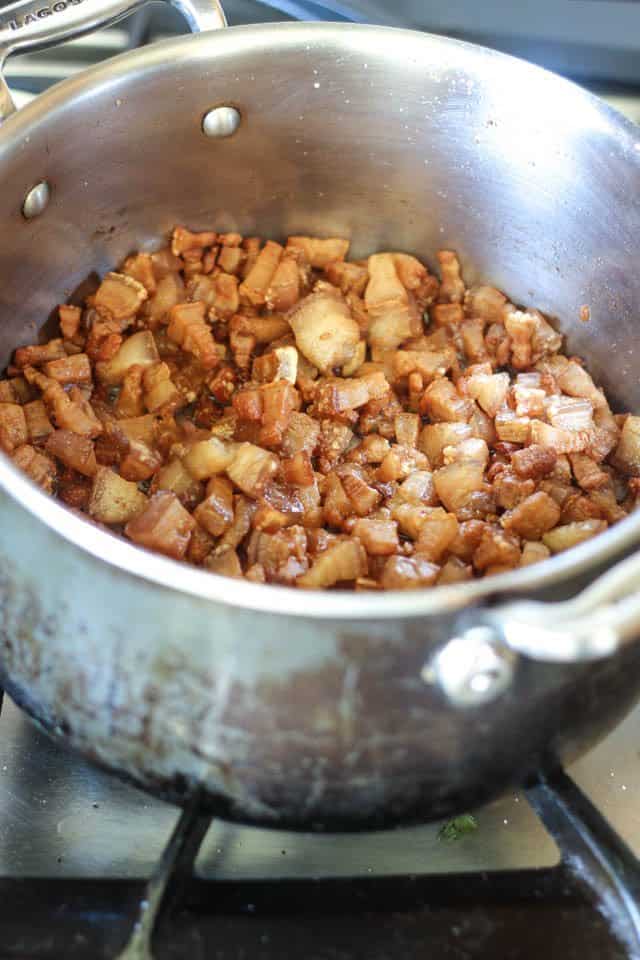
Eventually, the lardons will become somewhat dry and will stop rendering fat. They will only get darker, and will start to smell real good.
Make sure you don’t let them burn!
‘Cuz these things are GOOD! Whatever you do, do not let them go to waste.
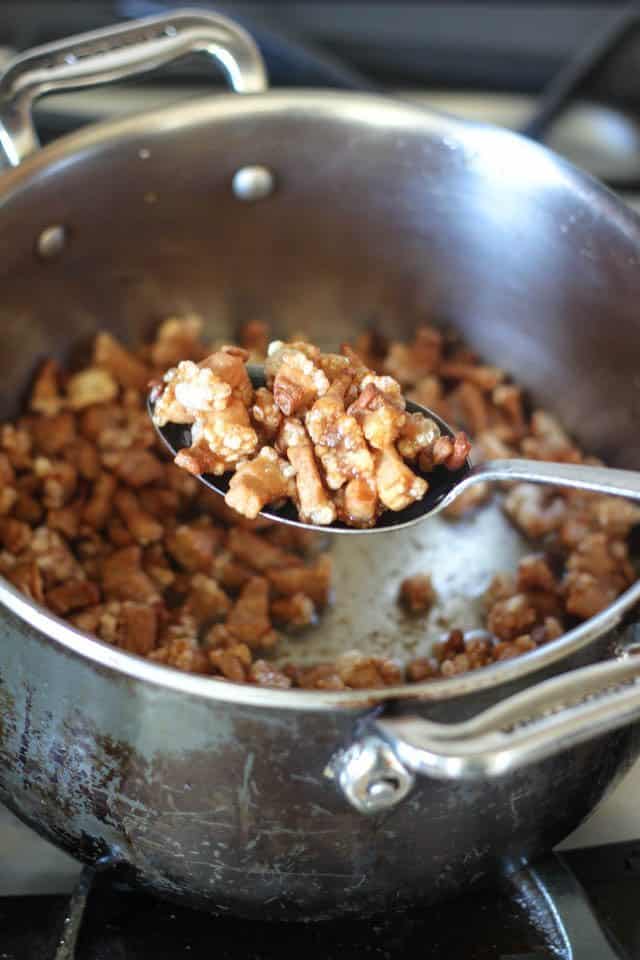
Eventually, they will just completely stop to render fat at all.
At that point, the skin will start to puff up, almost as if it were popcorn.
And THAT’s when we get to the Crispy Lardons!
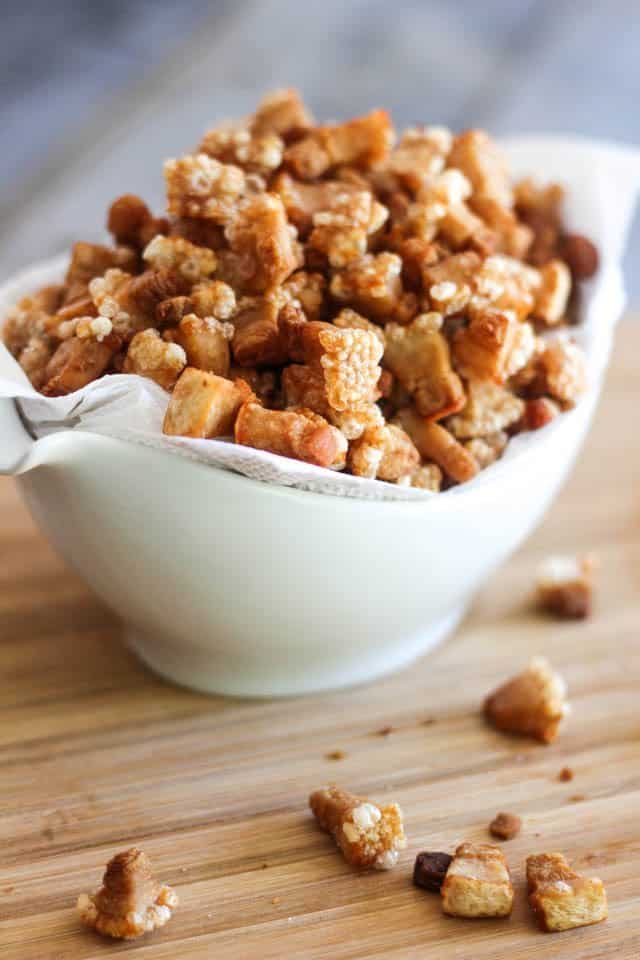
This, my friends, is just crazy delicious. It’s like Pork Fat Popcorn.
Just sprinkle a little bit of sea salt on these puppies and get ready to have your mind blown.
Of course, though, you’re not going to want to eat all of these in one sitting…
Apparently, they will keep in the fridge for quite a few weeks, so you can save them and enjoy a few pieces here and there with your meals. They reheat very well in a pan and go very well alongside your morning eggs!
Also, I like to throw mine in the food processor and turn then into the tastiest, crispiest fat I’ve ever eaten, which I then add to meatballs and beef patties. They add so much flavor, it’s not even funny.
I’m sure I’ll find a million use for them and will run out of those WAY before I run out of lard…
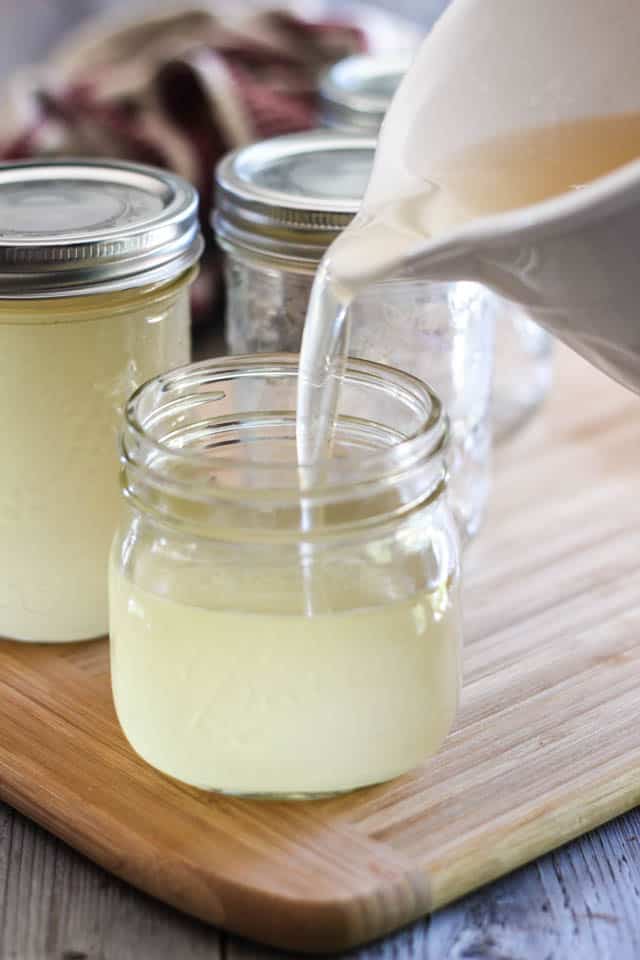
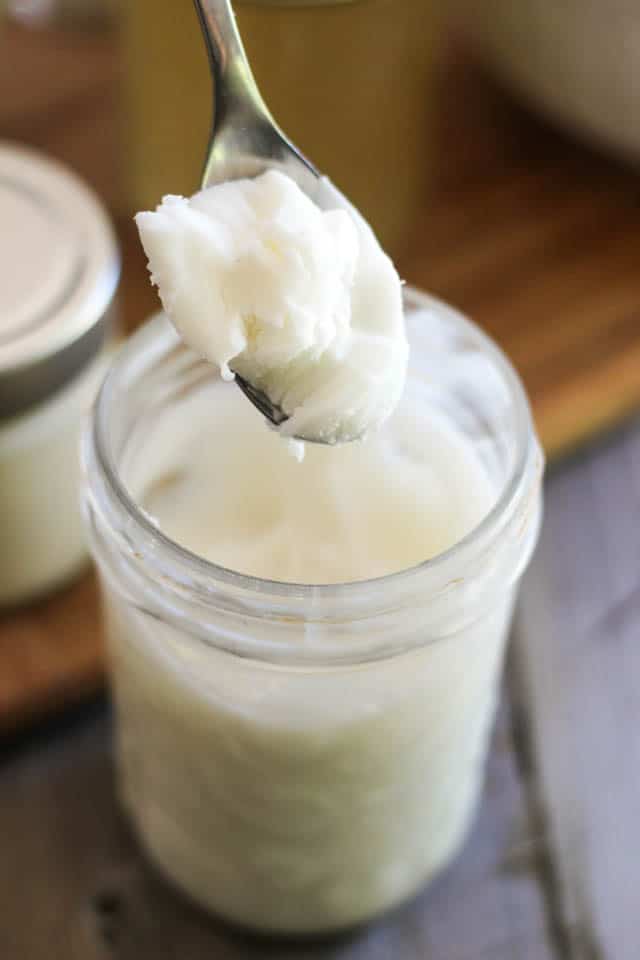
Once you’re done snacking on the crispy lardons, it’s time to transfer your strained fat to clean glass jars.
Look at how pure, how beautiful!
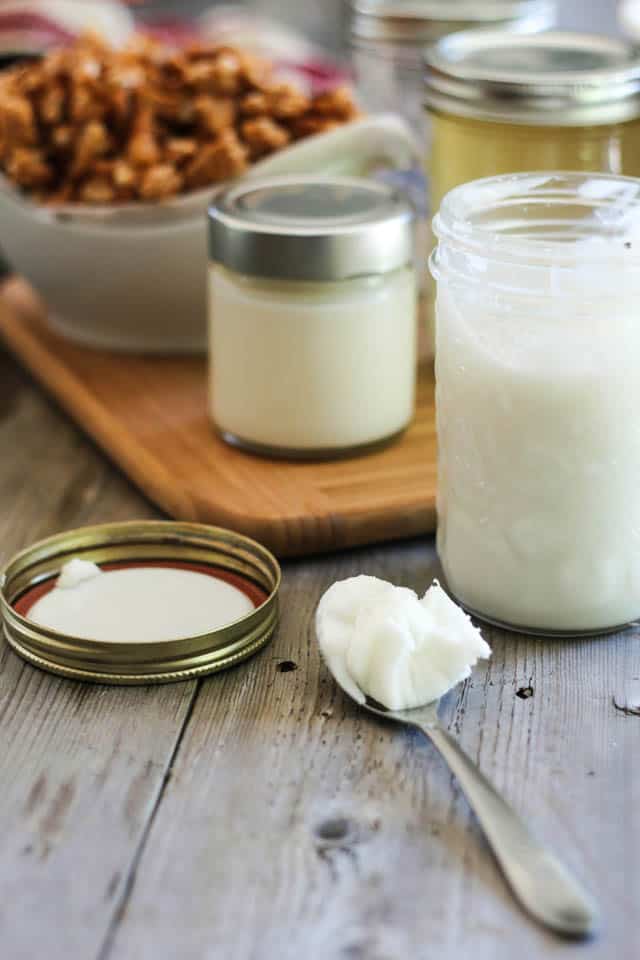
After a few hours, your lard will set and turn beautifully opaque.
Honestly, I never thought I’d ever think of lard as being “pretty”, but looking at this, I have to admit that it sure can be a lovely thing to look at!
Can you imagine yourself cooking with this?
It immediately became my favorite cooking fat.
Can you blame me?
Oh, I so can’t wait to start baking with this.
I get the feeling that my Christmas menu will be particularly copious this year… thanks to a freezer full of pork and cupboards full of lard!
So be on the lookout for tons of glorious, delicious and most of all, nutritious Holiday recipes!


100 Comments on “How to render your own Lard”
I render my lard in the oven at a low temperature… works really well if you are only doing small batches.
I have even used the skin/fat that came on the ham I got last time I ordered half a pastured pig. That made the most delicious fat – something between lard and bacon drippings.
Sounds like a great idea! I might give it a try if I ever make a small batch. And your rendered fat sounds heavenly. I can’t wait to try my hand at making my own bacon and ham… I need to eat more pork so that I can order a new one! 😉
What temp for the oven is “low” temp?
The Healthy Foodie rendering lard. Hmmmm… I guessing you’ve done some research on the healthiness of it, and I would be interested in knowing what you found out. After all, lard is traditional in tortillas, which I make frequently. Thank you for posting such a detailed tutorial on the rendering process. I’m certain that your end result would be much better for us than the commercial stuff, which I won’t buy. 🙂
How do you make your tortillas with lard?
You would just use lard in place of shortening for whatever tortilla recipe you choose. This is for flour tortillas. The recipe I use is Mexican Whole Wheat Flour Tortillas on Allrecipes.com (http://allrecipes.com/Recipe/Mexican-Whole-Wheat-Flour-Tortillas/Detail.aspx?event8=1&prop24=SR_Thumb&e11=whole%20wheat%20tortillas&e8=Quick%20Search&event10=1&e7=%2fmy%2frecipebox%2fdefault.aspx&soid=sr_results_p1i1)
I personally use Smart Balance when I make them, but it takes less regular fat to make them. Fat is what keeps them flexible. Hope this helps.
Well health wise animal fat is WAY better for us than vegetable oils, with the exemption of extra virgin olive oil or coconut oil. Smart balance would be high on my list of what NOT to eat. Butter not margarine. All these years with the FDA telling us that fat makes you fat and causes heart attacks was just a scam. Sugar makes you fat, (any carbs) and it also is what causes heart attacks. Plus your body can not even absorb vitamins and mineral without good healthy fat. All the vegetable oils they sell, like canola oil, are all rancid from the light, temps, and processing they do to them. SO not only are they not good for you, they are actually ruined when you buy them and make you sick. Thats why there is a huge amount of people living very healthy on ketone diets, or what was in the 1970’s called Atkins, but the real Atkins not the junk they sell in grocery stores that is nothing but process garbage. That the real Dr. Atkins would roll over in his grave to see his name on. Try “The mood cure” by Julia Ross, “The Art and Science of Low Carbohydrate Living” Jell S. Volek, PhD, RD & Stephen D Phinny, PhD, MD, or just read the real Dr Atkins book he wrote in the 70’s. The worst part is doctors were prescribing a low carb diet to people since before the 1800’s. Grains wheat, rye, corn thats what cows eat, they have 3 three stomachs, we only have one! Plus the wheat in the United States is genetically altered to have twice as much gluten as the rest of the worlds. Thats why you can not go to Europe and make super fluffy pasties like we have, the flour is not altered like it is here. I’ve been reading everything I can get my hands on about it since December and when you find out our own government basically used us for the last 50+ years as a health experiment then they complain, because everyone has type 2 diabetes what did they expect?
Another GREAT book that squashes conventional nutritional wisdom is Eat the Yolks by Liz Wolfe. If anyone has interest in learning more about eating real food, breaking through conventional diet dogma, and learning the truth about food, this book is a MUST read! Diane Sanfilippo’s Practical Paleo is also excellent.
I was always under the impression that lard was bad for you, so I Googled it and found this article http://www.thestar.com/life/health_wellness/nutrition/2013/05/14/why_lards_healthier_than_you_think.html
It’s a Canadian newspaper but is a good article that explains that lard is not as bad as we all think, although if you read through it, some of it is not as good. Just thought I’d share this info with you.
Very interesting article, Monique. Thanks for sharing!
https://chriskresser.com/the-diet-heart-myth-cholesterol-and-saturated-fat-are-not-the-enemy/
Sorry cholesterol is not bad for you! Your brain actually needs it to function, also it does not raise your blood cholesterol! Sorry thats lies from 50+ years ago they are still pushing.
This looks so good. I’m going to try this next week. Thanks!
Interesting… How would you suggest storing it? Cupboard or fridge? And how long would it last?
Thanks 🙂
Just keep it in the cupboard, Sheona. And it keeps for a very long time. Not sure it even goes bad, ever…
I put my rendered lard, while still hot into silicone bake wear that I got from the thrift store and when it gets solid, I cut it into soap sized bars, put parchment in between and freeze it. It will go rancid if not kept stored properly.
That’s a brilliant idea, Nanette! I’ll be sure to keep it in mind.
Your knife us awesome !!
Where did u buy it?
Best Wishes from Mexico =)
My husband went boar hunting this past weekend and came home with the meat AND the fat…I’ve never been so excited about fat! He has boar hunted for years but we only educated ourselves on REAL FOOD in the past couple years so this is the first year he remembered to keep the fat! And his dad gave us the fat from his pig too, I think we will end up with about a gallon total.
Really looking forward to these crispy lardons, especially to add to meatballs/patties etc. Have you found any other uses yet?
Oh, lucky! What I wouldn’t give for a hubby who brings home wild game! Boar has to be incredibly tasty. I can already imagine all the delicious Christmas recipes I would come up with if I had all that meat and fat on my hands.
As for the crispy lardons, apart from munching on them from time to time, I must say that I haven’t yet found any other uses for them. But they DO add a great deal of flavor and moisture to patties and meatballs. I figure they must be totally glorious in a meat pie! I think I’ll save a bunch and give that a try myself… 🙂
They are terrific sprinkled on fried eggs, scrambled eggs, casseroles (instead of breadcrumbs), and salads (instead of croutons).
I use them as croutons.
uses for lardons corn bread bisquits and gravy turkey dressing
You can also buzz them up with egg and grated parm to make a gluten free pizza crust. Highly recommended…
http://www.food.com/recipe/low-carb-pork-rind-pizza-crust-282073
How long will the lard keep in storage?
Practically indefinitely, David. Years, for sure.
Sorry for posting to an old thread, but I just found it, so someone else is likely to, and I couldn’t skip putting in something I’ve learned the hard way:
If you live in a warmer climate, it may go rancid over a single summer.
I don’t have air conditioning, and it gets over 100F here sometimes, and over 90F in the house. I’ve had both store-bought and home-rendered lard go very rancid over a single summer. I used to live in the mountains and had never had a problem, but things are different here!
So, be advised, if your house gets hot, it’s a real good idea to slap your beloved lard in the ‘fridge or freezer during those hot months!!
Thanks so much for your beautiful article and pictures, Sonia! I was so upset over my lard having gone rancid a few hot summers ago, I hadn’t rendered any since, but finally decided to do it again later this Autumn. Your article provided a very good and much needed refresher for me!
Great tutorial! We rendered lard last night, and mine didn’t all come pure white and they are not all odorless. Is it possible to re-render this? I am afraid we may have burned it? We found mixed instructions and we not sure how long to let it boil, and at what temp, etc. It seems so easy, we were over-thinking it! Now I wonder if this lard we have is able to be boiled again, or if I should start over with a new batch?
What’s the color like, Crystal? I’m thinking you might have burned it too, and if that is the case, unfortunately, there isn’t anything you can do to unburn it. You’ll have to start fresh with a new batch of fat.
Thanks! They are all shades of white, but nothing is snow white. One or two is even beige-ish. Bummer. I will try again soon. Can it be made into soap? (If someone doesn’t mind bacon flavor?)
Very good question! I’ve never made soap in my life… perhaps something I should be looking into! 🙂 Now you just got me very curious. Off to do some research!
I make soap with my lard as well as bake with it. The trick to not burning the lard is to put some water in with the fat when beginning the rendering process and to cook on low (minimum) for several hours, stirring often. I don’t start skimming until about 6 hours has gone by. You will notice the fat gets clearer after that time. I strain mine twice. Each colander has a layer of cheesecloth and they are stacked on top of each other. I render about 10 lbs at a time though.
I could be wrong, but it sounds like you rendered fat from bacon. If the bacon was smoked, flavored, or preserved in someway, you are not going to get the white lard. It should still be ok to use, will taste like bacon where white lard doesnt taste that strongly.
Cubans love chicharrones! Chicharrones are what you call “lardons,” but I have always known them as “chicharrones.” They are so, so delicious!
I know this is old, but here the lardons ae called pork skins. And I to have made soap from the lard, makes a great soap with lots of bubbles.
Hi! I was wondering if you can make lard from any type of fat, or if it only works with pork? Thanks in advance for any answers!
Lard specifically refers to pig fat, Deborah. You can render the fat of other animals, that’s for sure, only it wouldn’t be called lard. In most other instances, i.e. beef, lamb or horse, the fat is referred to as tallow.
What a delightful experience rendering lard using your method! So happy that I have a pig farmer who gets me excellent fresh pork right here in vegetarian country!
Thanks for the detailed instructions and pictures- great help and the lard is beautifully clear.
Thank you so much for taking the time to leave that great feedback, Cecy. I really appreciate that. Glad the instructions did the trick for you and that you now have beautiful healthy and heat resistant fat to cook with. 🙂
This past weekend we butchered hogs with my husband’s family. I saved the fat back from our pig and some from several others (almost 15 POUNDS TOTAL!!). So this morning I followed your directions for rendering lard, and just want to say thank you! It turned out perfect! Although I may have gone a little lower and slower than I needed to, it took over an hour for the first batch. Needless to say when the zombie apocalypse comes, I’ll be ready. LOL!! 😛
That’s just great, Sarah! Seriously, you won’t have to worry about a potential shortage of healthy cooking fat happening in your household anytime soon… but hey, lard doesn’t go bad, and it’s the best fat for deep frying, too! So now you’ve got your freezer full of pork meat and your cupboards full of lard. Lucky you! 🙂
Looking forward to trying this with your directions. The last time I made this I canned the lard and didn’t like the result so I’m excited to try this way. I’ve read that one thing that will spoil grease is water. Just wanted to add that for anyone storing the lard.
Really? I didn’t know that! Thanks for sharing, I’ll definitely have to read more about this!
Forgive me if this is a silly question, but when you put the lard in jars are they supposed to be sterile and then processed in a water bath? I’m not sure if I should “can” this or if it can just be put in a clean, but not boiled and sterilized jar.
Thanks, I have about 10 lbs of lard to render. I’m excited for baking goodies with it!
There is no such thing as a silly question, Erin! The jars need not be sterile, but really squeaky clean. I like to put mine in the dishwasher before I use them for projects such as these. No need for boiling, canning or sterilization. Just good cleanliness.
And 10 pounds of lard?!?! *swoon* This foodie is quite jealous! 😉
I use my biggest crockpot. Works great.
You can also “can” the lard.
Put directly into clean jars which have been rinsed with boiling water.
Heat the lids and apply when jars are filled. As the lard cools, the jars with seal.
Keeps nicely without getting rancid.
Great tips! Thanks for that, Betty! 🙂
Hi Sonia,
Thanks so much for the response. Rendering the lard was easy and a total success, thanks to your detailed instructions 🙂
I made a Mulberry pie and used a lard pie crust. It was an amazing, flaky crust full of flavor! I can’t wait to bake more, thanks again!
*HIGH FIVE* (and Mulberry Pie? This foodie is even more jealous…) 😉
How do you store your crispy lardons? Also, an you freeze the crispy lardons to keep them longer? Do they thaw well?
I’ve never tried freezing them, Elizabeth, but seeing as how they are pure fat, they do keep for a fairly long time (i.e. months) in the refrigerator, so I don’t really see a need for freezing. I just keep mine in an airtight plastic container way in the back of the fridge and they’ve been doing fine!
meant to say can not an you freeze**
Hello! I was wondering, what happens to the fat if you burn it a little (i.e., it’s a pale brown color instead of clear in the pan)? Is it just the flavor that is changed, or is its usability/shelf life disturbed? I have some bacon fat I just cooked off, and wondered if I can still use it. I assume I would just be dealing with bacon-flavored fat instead of a less flavored fat. (Mmm, bacon!)
Bacon fat is not the same as lard, JR. It is not pale in color like lard and is entirely normal for it to have a little bit of a beige/brown shade to it. And yes, I agree: it does have a mucho yummo flavor! 🙂
Awesome, thanks!
What does it taste like? Does it taste like anything?
Doesn’t have much of a taste, really… It is very subtle and can be used in pretty much anything!
My husband had high cholesterol BUT at the same time we began a paleo diet (gaps) for my son.
After a year of eating butter/pork fat my anxious husband went to get his cholesterol tested:
His cholesterol had LOWERED!!!
The food pyramid is a lie folks.
Enjoy yr organic pork fat! We just fry it up and pour through a small sieve sitting on the jar lip.
That’s just awesome, Tigga. Thank you so much for taking the time to share this! More proof that pork fat is indeed not to be feared, so long as it’s well sourced! 🙂
Anyone know if
Rendering lard in a slow cooker would be good and it would burn less easily?
It takes a long time but i have done it. If i add water it is fine. Without water it al ways burns for me.
How long before the yellow liquid turns white (lard)
Couple of hours… it just needs to chill!
Thank You very much for your reply .Your complete article on rendering lard was so informative , especially the pictures.
Thanks Derrick! That’s very kind of you to say! 🙂
My mother and I were just talking about how my nan used to render her own lard. I’m so excited to try this.
Where do you get the pork back fat? I have been looking for years but cannot find a decent thick pork back fat here in Sacramento. Any ideas what stores carry it?
I get mine directly from the farmer where I get my meat, or at a local farmer’s market. Unfortunately, I wouldn’t have any idea as to where you would be able to find it locally… Maybe try this site?
After you get the liquid fat, do you keep it hot and put in hot jars like canning? I’d love to do this. Please let me know. Thanks.
You just pour it into clean jars and keep it at room temperature. No need to sterilize and go through the canning process.
I remember in the fall of the year the family would butcher out in the barn yard. I have the big iron kettle they would build a fire under and my mother and grandmother would render lard. I have the lard press too. They stored the lard in a 5 gallon bucket. Lard makes the best fried chicken every.
Oh, I bet! I wish I had enough lard so I could fry me some chicken… 🙂
When i render lard without water it always turns dark. I do this same process but i add water to help keep the lard from burning. I dont know why it works but it does. The water cooks out. You know it is gone when there is no more steam coming off the pot. Then you end up with perfect white lard after straining.
the lady my wife works for gave her about 20 lbs of hog today gone to render it can wait food tastes better cooked with hog lard I believe the reason the say its bad for you is that they can regulate it thanks for the good article
20 pounds??? OMG! I am soooooo envious! Have fun rendering it! 🙂
well I rendered the hog fat today it took me all day but got it done got about 2 gallon of lard cant wait to start using it fatting out some hogs now to butcher in march
2 gallons of lard? WOW! Now I’ve got big time lard envy… 🙂
We just butchered a very large hog. I am in the process of rendering the fat – I anticipate about 18 quarts of lard when it’s all done.
I use a couple of crock pots to do it. I cut up the fat, and put it in the pots along with a very small amount of water (1/2 cup or so) and put the lid on, and set it on low overnight. In the morning, when I’m going to be around so I can watch it, I prop the lid so the steam can escape. If it’s not cooking fast enough, I turn the pot to high to finish it off. It takes much longer to make lard this way, but you don’t have to watch it and I’ve never had it burn.
After it’s done, I strain it into wide mouth Mason jars and pop the lids on. Most of them seal just from the heat of the lard, but I’ve never worried about it if they don’t.
This is the most lard I’ve ever made at one time. This pig was fed a very large amount of excess Jersey milk from our cow and we can sure tell it.
I also render fat from steers (tallow — I use some for french fries, just like McDonald’s did for a long time) when we butcher one and ditto chickens (rendered chicken fat is called “schmaltz” and is delicious).
This was excellent…Thank you! Just processed my first home grown pig. its taken all weekend but today was the day to deal with the “Bits”. I used the flare-fat from the belly to render down and it came out perfect. All the other fat offcuts have been rendered as well in a seperate batch and they were just as good. Only back fat i have saved is for the sausages and salamie!!
i just rendered my first ever lard, from our Farm raised (pasture and forest) Guinea Hogs. Half of my lard is beautiful, and the other half looks nice, but isn’t setting at room temp. It’s staying kind of messy, like pudding, or thick applesauce. Should I be concerned? I read somewhere that pasture raised pork would have a different fat content and may have to be kept refrigerated. Do you know about this? Thanks. I found your post quite helpful.
Really? That’s strange. I’ve never heard about this, but I will definitely have to do some research… I’ll let you know if I find anything!
Hogs make fat that varies with what they eat. The more monounsaturated and polyunsaturated fats they eat, the less solid the lard. Hogs raised on a lot of peanuts, for example, can have a very soft / semi-liquid in hot temperatures, lard.
Don’t worry. Just put it in the fridge and it will harden.
Really? I had no idea… That’s fascinating! Thanks for sharing the info! 🙂
Question: we’ve rendered lard in a crock pot using the dry method {no water added} and it’s the same golden color seen here. It turns white in the jars as it cools but it never sets up hard so that it’s spoonable like Crisco. What are we doing wrong? Has a good flavor, but it stays soft and more on the liquid side.
Sounds like your refrigerator is not cold enough.
You are not doing anything wrong. Some pig fat is just softer than others. Commercial lard is hydrogenated (an evil process…) to prevent it from being too soft / liquid at room temperature.
Just put it in the fridge to harden to make pastry, or use it as is for frying.
I purchased a 4 1/2 Pork Butt from a local butcher that carries local pasture raised pork. I was dismayed when I opened the package to cook it for dinner tonight that at least 1/4 of it was a solid layer of fat – until I found your website. Now I have my pork cooking in the slow cooker and about 2 cups of lovely lard. Thankfully, I spooned some of it out 1/2 way through so it is very light in color, The remainder is more of a golden color but still tastes good. I can’t wait to use it for all my high heat cooking (cracklin’ chicken, anyone?).
*HIGH FIVE* 😀
Thank you so much for this awesome tutorial! Headed out now to get me some fat! I bake all the time and cant wait to see the difference it makes!
Just wanted to say thank you. Beautifully explained and presented. 🙂
Thank YOU Karen! That’s really nice of you to say! 🙂
Can I ask a question?
I have made lard twice now (tried three times) . The first time I just cut the fat into chunks, added some water and cooked it down. The resulting hot oil was clear but a little amber coloured…although when it cooled the lard was white. That said, it smelled and tasted a little “porky.”
In a second, unsuccessful attempt recently, I did everything the same but between one breath and the next, it got too hot and scorched terribly.
Undaunted, I tried again and mindful of the scorched fat and the lingering smell, I did several things different. First, I put the fat through a sausage grinder and second I kept the heat pretty low until the water had boiled off and the hot fat appeared crystal clear.
I strained it through a cheesecloth and poured it into pint canning jars. It was clear in the pan but as the liquid was being poured into the jar it looked cloudy, right from the get-go…somewhat like yours in the above photos. It was not amber at all (it was my intent that it not be amber) and when it cooled it cooled white with only a very faint porky aroma.
However, where it splashed up on the glass it seems a little “curdled”…I think this was what made the liquid cloudy.
Has my lard been successfully rendered? Or need I re-heat it to try to get rid of the cloudiness?
thank you for your time…
I don’t know, really… without seeing it, it’s hard to say. Melted lard isn’t absolutely crystal clear, it’s always a tad cloudy and as it starts to set, it becomes more and more opaque. What I’m thinking is perhaps the melted lard that splashed up on the glass started to set because of the coldness of the glass and it was such a tiny amount, so that’s why certain parts were more opaque than other. At least, that’s what I think. But like I said, it’s hard to say without having actually seen it.
My husband came home with a whole pig and so I did make some lard and it turned out beautiful and the cracklings were gone in no time. Yum! HOWEVER, yesterday I made a second batch. Did it exactly the same but it seems to have separated. It looks like an oil on the top. Any ideas what happened or if it is usable?
I wouldn’t worry about it, Ruth. It’s probably just not cold enough in your house for it to have completely congealed. Also too, the fat of pastured raised animals has a different fatty acid profile and tends to remain softer than that of conventionally raised animals. If it smells right and looks right, them you should be just just fine. Perhaps you should keep it in the fridge, just to be on the safe side!
I did have it in different ways and always comes very well and much better than any I previously bought in the store. That this provision is also great, tested and I can recommend it. From myself I will give even such ideas http://www.open-youweb.com/jak-zrobic-domowy-smalec/ They may also be useful for seasoning. And can someone answer me how long it can be stored in the refrigerator?
When my mom made lard, she would store it in jars with lids at room temperature. It would keep for about a year or so in the basement. After that, it would begin smelling strong and somewhat rancid. She would then use it to help light the fire in the coal furnace.
is lard healthy.durable? please explain
thanks for the lard lesson…nice beastie boys reference.
Wow you caught that? Nice! Thanks! 🙂
i started rendering my own leaf lard 2 years ago. its so much better then anything you buy in the store. and its realey so much better for you then the junk oil store bought.